A Beginner’s Guide to Installing MySQL for Learning and Practice
To learn SQL, the best way is to practice different sets of commands and get hands on experience. If you have learned the SQL basics, then it is time for practice and reinforce your learning.
This is a simple beginner’s guide to help you install MySQL for learning and practice SQL commands. If you are not familiar with the SQL commands.
Visit our comprehensive guide on sql – SQL Basics Explained: Command, Queries, and Examples.
What is MySQL ?
MySQL is an open-source Relational Database Management System (RDBMS). It has all the features of a relational database model. The data is stored in database tables and it support SQL.
From a student’s perspective, you can download it free of cost and start practicing SQL immediately. However, you need:
- sufficient amount of disk space on your PC.
- memory
- network
- install necessary software dependencies for a successful installation.
This guide is strictly for Windows PC running Windows 7 or higher. For installation guides for Mac, Linux and other operating systems, visit MySQL installation guide.
Prerequisites to Install MySQL
There are many types of MySQL installer such as Enterprise Server, Standard Edition, and more. However, for learning purposes, we are going to install the MySQL 8.0.44 Community Edition under GPL License, which means it is open-source free software.
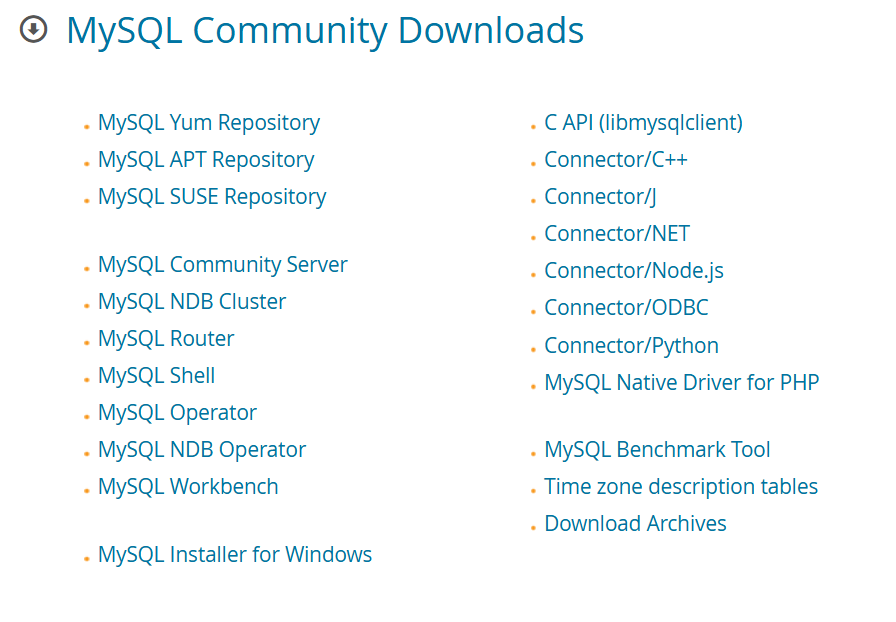
To download MySQL visit: MySQL Community Edition Download.

You must download the larger file and install on your Windows PC.
Before installation, make sure you meet the minimum requirements for installing MySQL server. Here is a list of prerequisites.
Hardware Requirements
There are three hardware requirements.
- CPU – A single core processor is enough for testing or practice, however, 2- 4 core processor is recommended for medium load.
- Memory – Minimum 2 GB RAM is required.
- Disk Space – Minimum 800 MB to 1 GB disk space is required.
- Networking – The SQL ports must be open inbound and outbound , if you are using Windows Firewall. Most of the time it is not a problem.
Software Requirements
On Windows, you need latest Visual C++ redistributable is present. The Microsoft Visual C++ redistribution package depends on the version of MySQL you are installing. The new version of MySQL 8.0 requires VC++ 2019 and above. The older version need VC++ 2015-2019.
Installing MySQL Community Server on Windows PC
The MySQL Community Version 8.0.44 and above, installation is divided into two parts:
- MySQL 8.0.44 Community Server Installation
- MySQL 8.0 Community Workbench
After installation, you need to connect your MySQL Workbench to the server in order to create databases and run SQL queries or commands.
MySQL 8.0.44 Community Server Installation
At the time of writing this post, MySQL 8.0.44 is the available version, and the installation for future version may not be different. In case, you are installing a higher version of MySQL, refer to the online documentation.
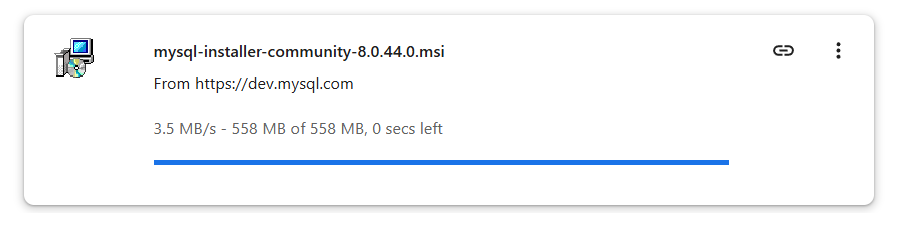
Step 1: Run the mysql-installer
After you have finished the download for MySQL Community Edition , run the MSI file. This will open the MySQL Installer window.
Step 2: Choose the setup type
The installer will give you options to install different types of setup. Since, we only want a simple server to create database and tables, choose “Server only“.
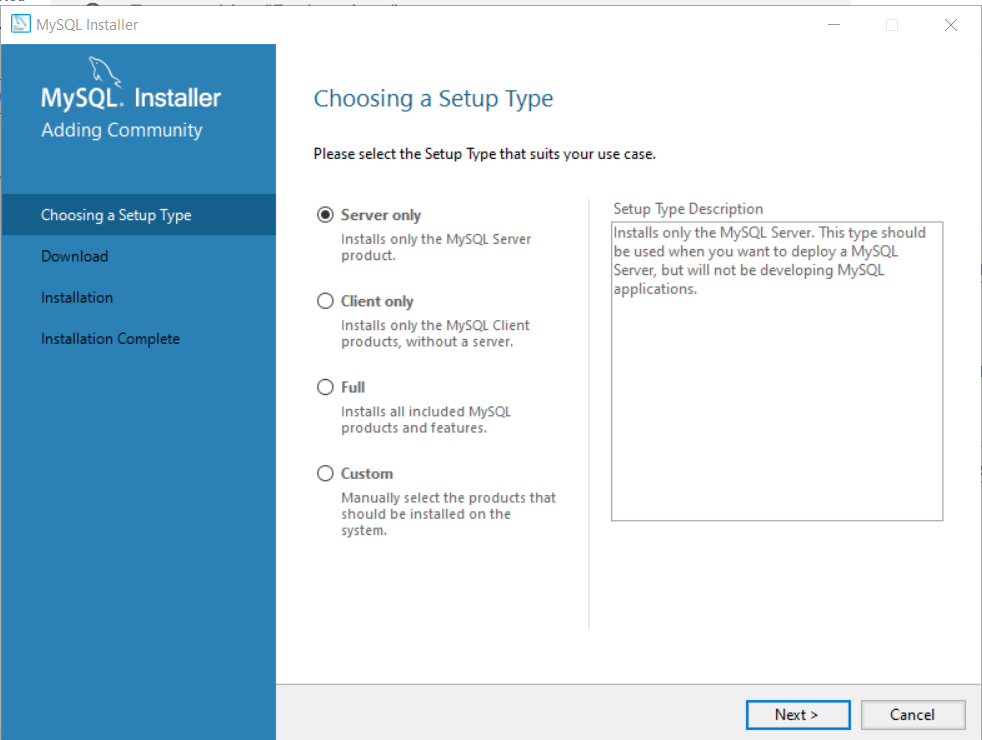
Click “Next” to continue installation.
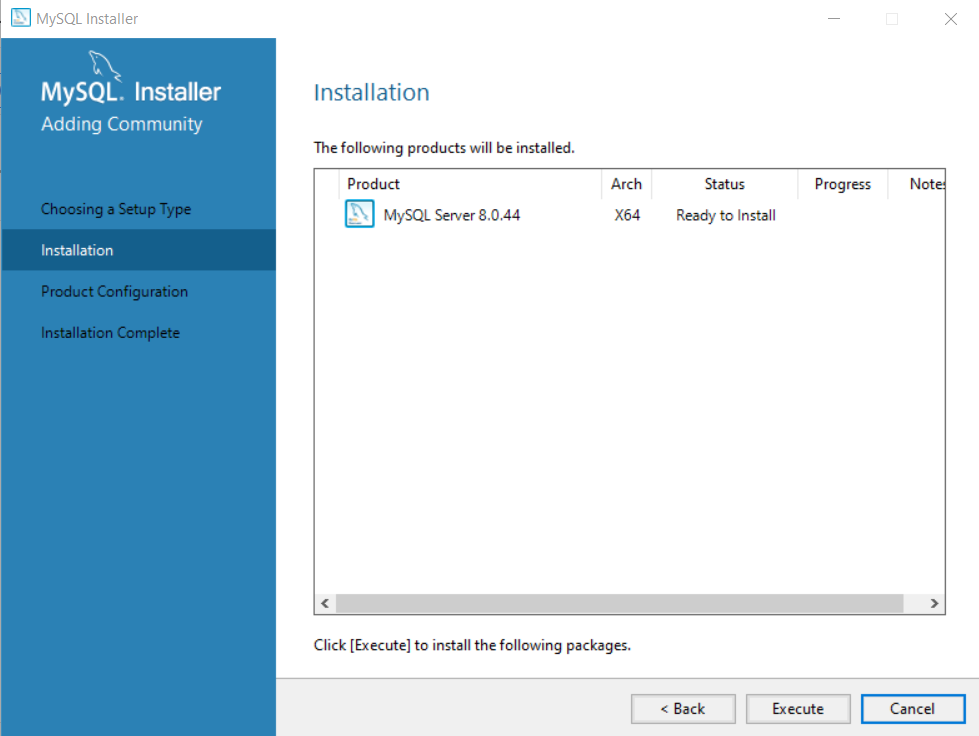
Step 3: Continue installation
In the next windows, there is nothing to do. The setup is only confirming the products you are going to install. We are only installing the server.
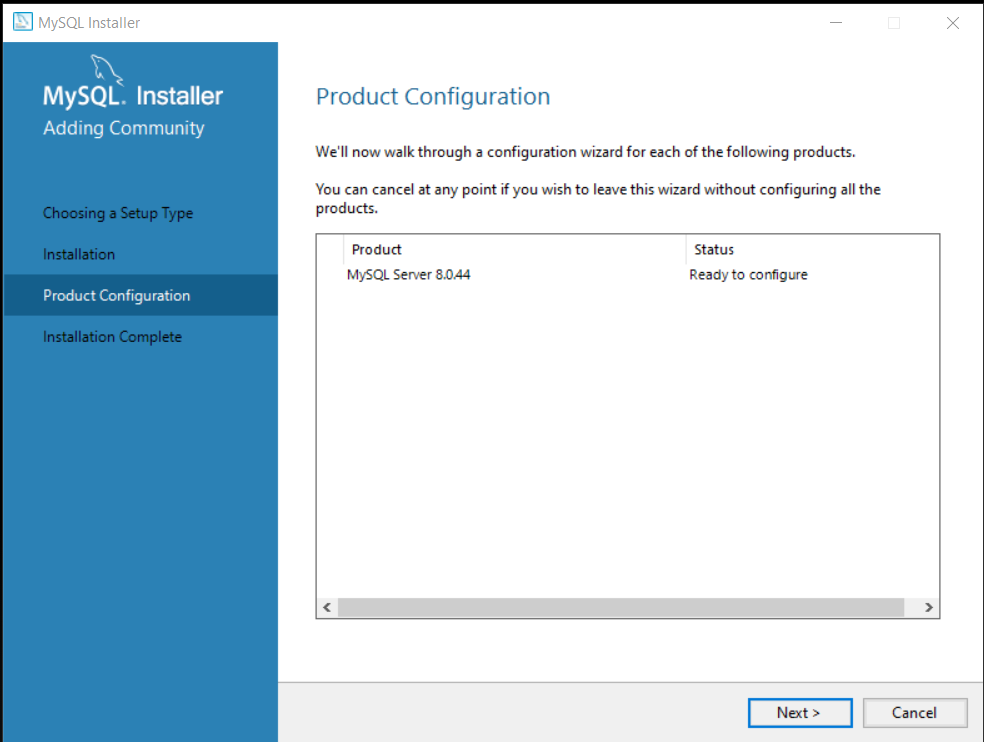
Step 4: Product Configuration Wizard
After installation is complete. You will see a ‘product configuration‘ window. The product configuration will show screens based on number of products, you have chosen to install.
In our case, we have only installed ‘MySQL server‘.
Step 5: Choose the Authentication Method.
In the Authentication Method, leave the default recommended setting, which is “Use Strong Password Encryption for Authentication”.
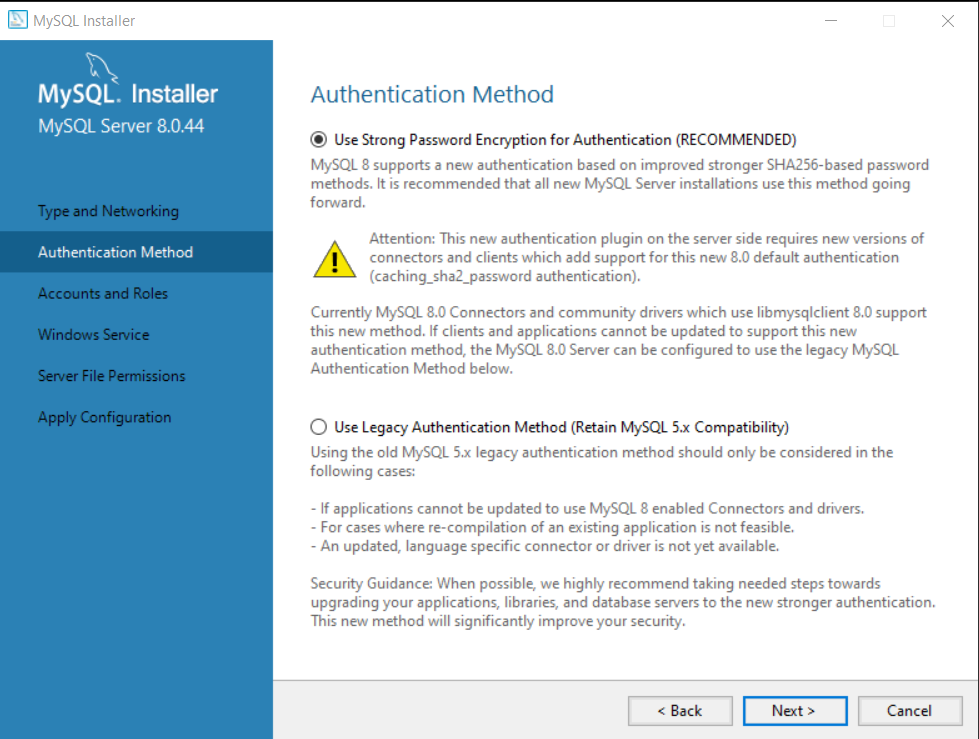
Click “Next” to continue.
Step 6: Set password under Accounts and Roles.
The default administrator user for MySQL is “root“. Set a strong password for this user in Accounts and Roles window. You can add more users in MySQL User Account section. You can also assign privileges to these new users based on their role.
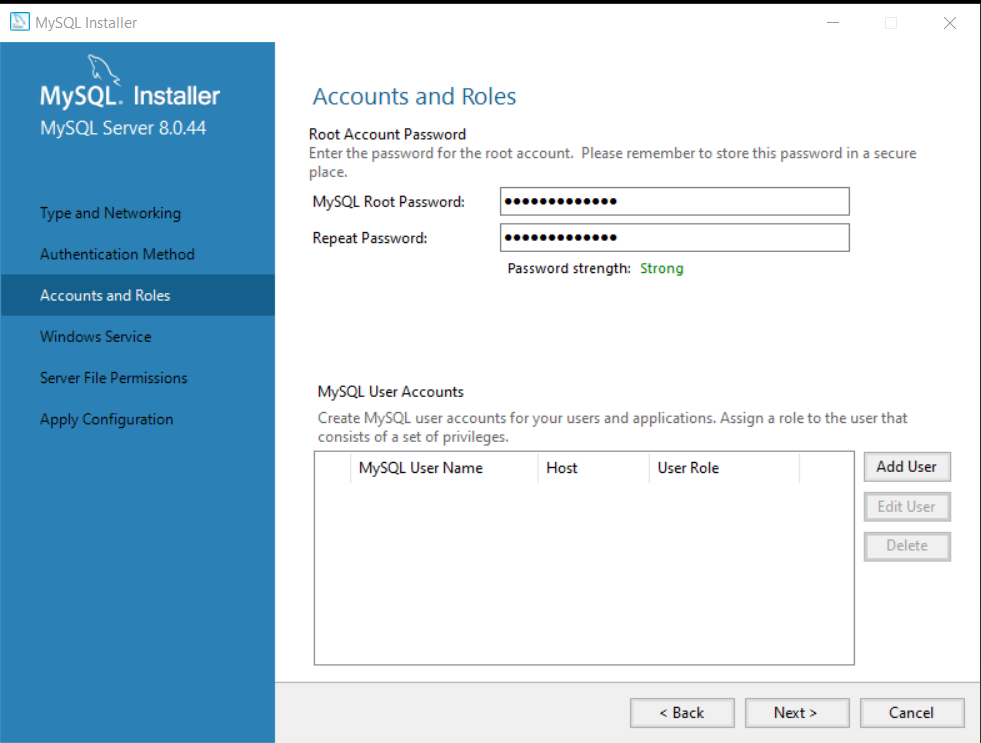
Important ! Note down the password because we will need it again, When we connect Workbench to the MySQL server.
Click on “Next” to continue configuration.
Step 7: Run MySQL Server as a Service.
In the next window, you don’t need to change anything. Make sure that the following options are selected:
- Configure MySQL Server as a Windows Service.
- Standard System Account
Leave the service name as it is. This will list MySQL Server as a a Windows service. You can confirm this after completing the installation.
Go to Start > Search > Run > type Services.msc and click Ok. The Services windows will pop up and SQL services are listed here.
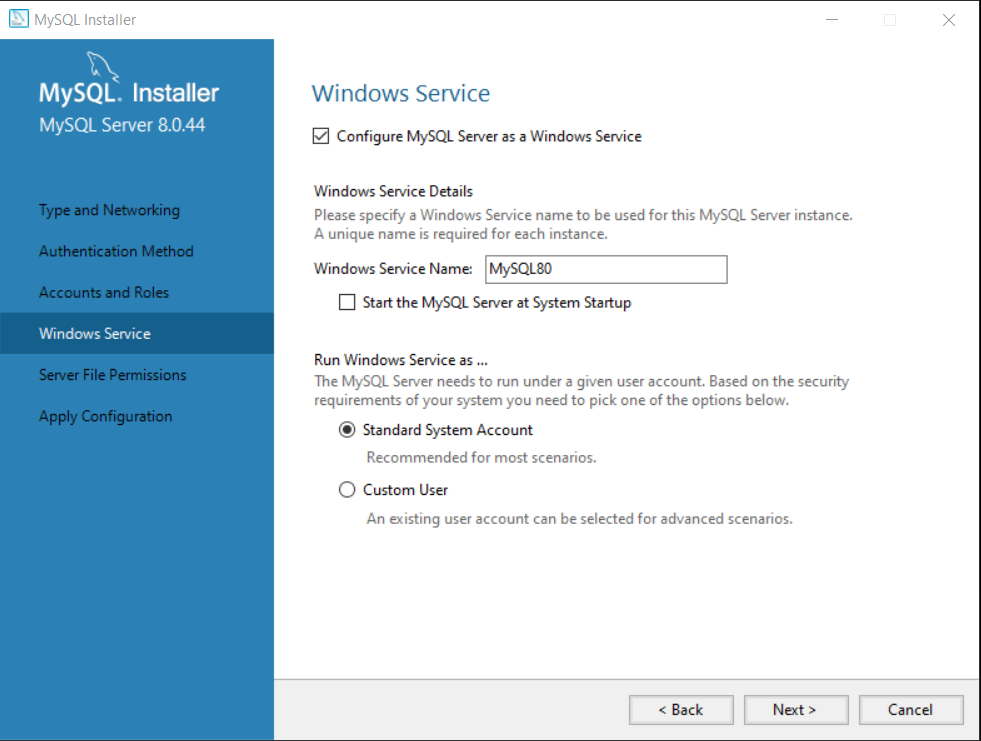
Click “Next” to continue.
Step 8: Set Server File Permissions
The MySQL service needs appropriate file permissions. To set the file permissions , make sure “Yes, grant full access to the user running Windows Service and the administrators group only” is selected.
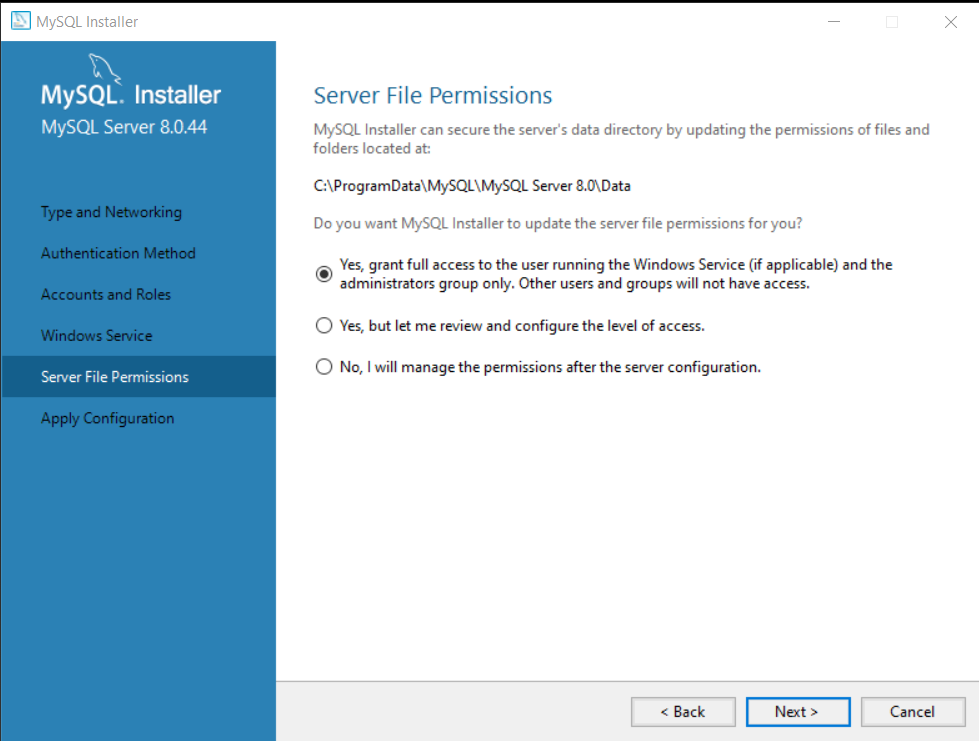
Click “Next” to continue.
Step 9: Apply Configuration
A page with list of configuration steps will show up. At this step, you only need to review the settings, if you are unsatisfied with any of these settings, click “Back” and adjust the settings.
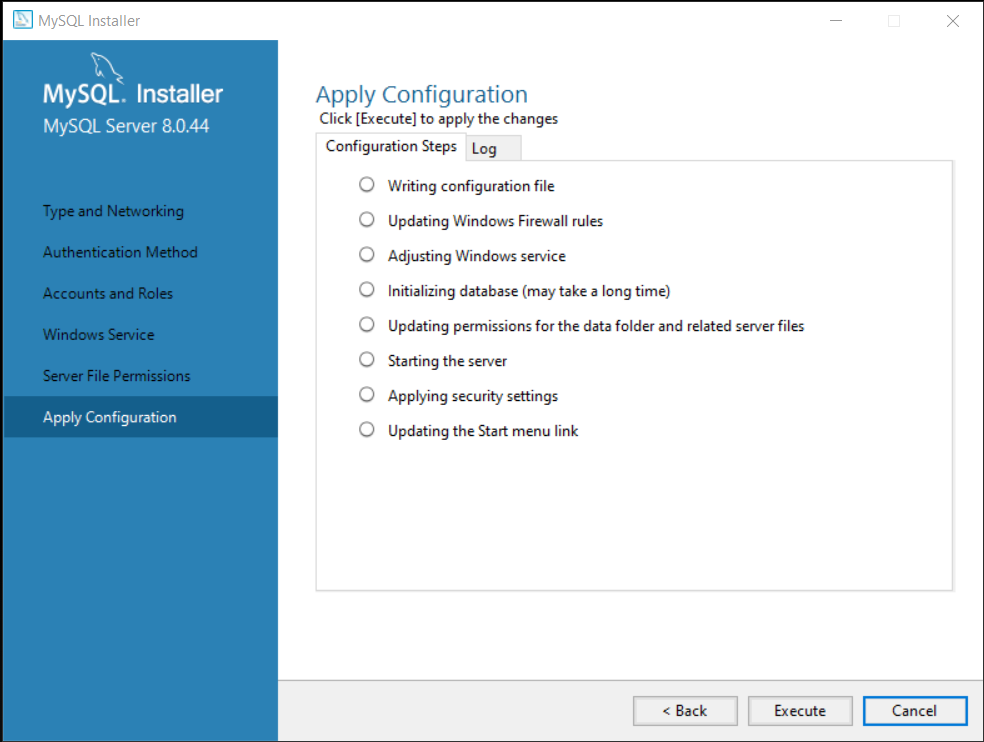
Click on “Execute” to continue.
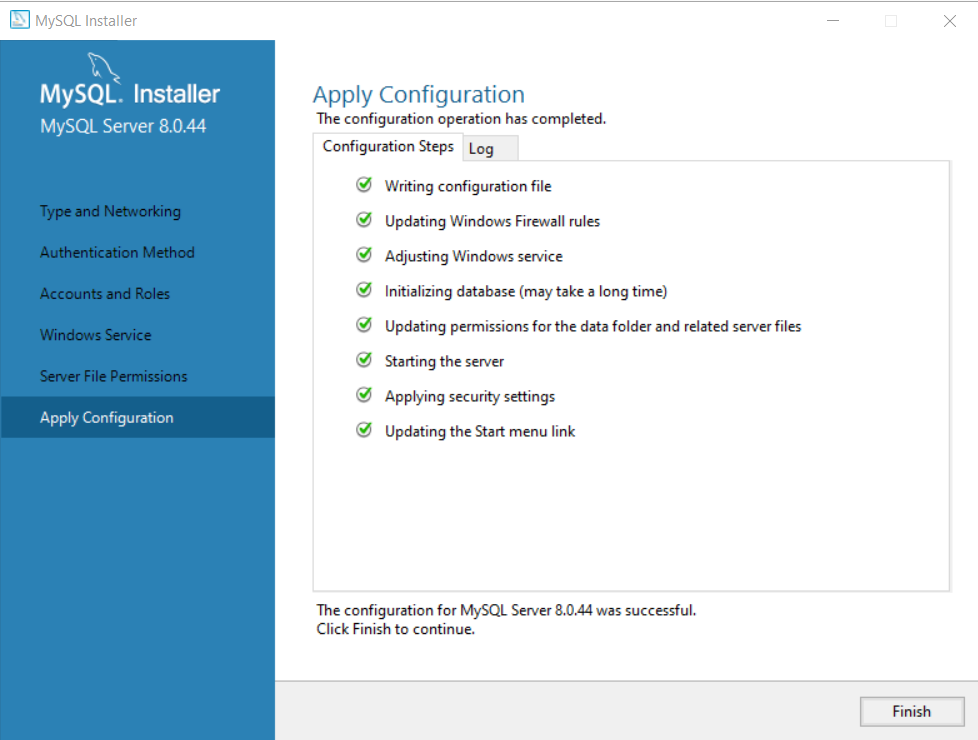
Step 10: Finish the Configuration.
After applying the configuration, click “Finish” to complete the installation.
Step 11: Complete the installation of MySQL Server.
We completed the configuration steps, and now you are back the installation Wizard. The Installation Wizard wants you to complete the installation. Click “Next” to complete the installation.
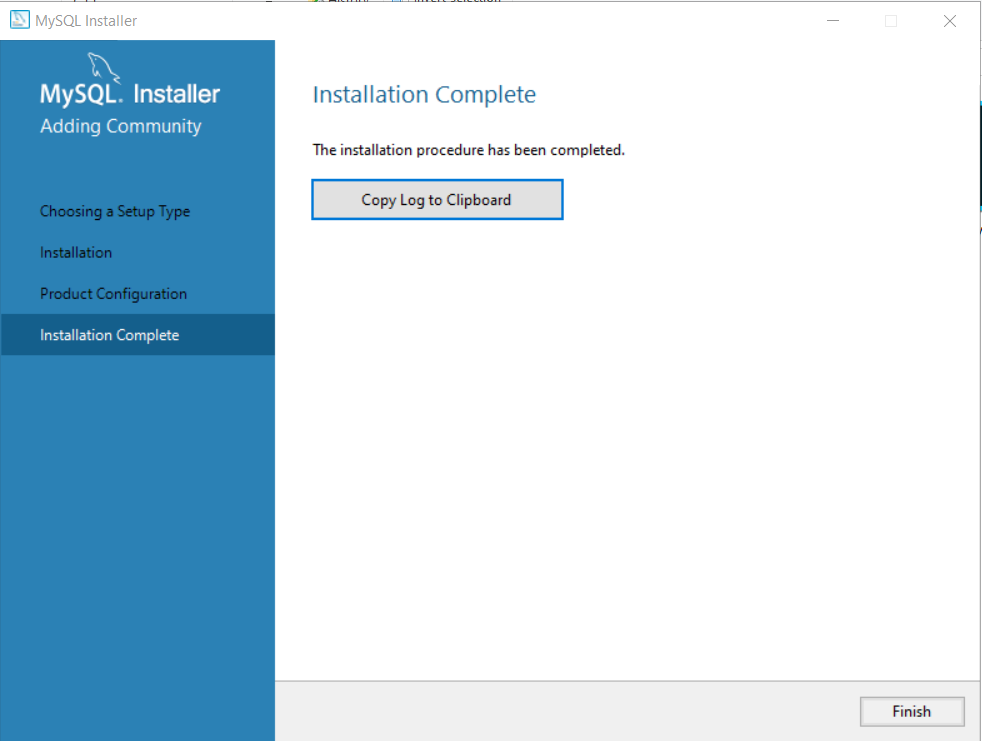
Click “Finish” to complete the installation.
The first part of MySQL Server installation is complete. In the second part, we will install the MySQL Workbench Community Version and connect it to the server.
MySQL Workbench Setup
In this section, we will complete the second part of our MySQL setup by installing MySQL Workbench. It is a software that allows you to connect to SQL server and manage databases.
The software and hardware requirement is similar to MySQL server and since, we are only installing for practice. You don’t need anything extra.
Step 1: Download the latest MySQL Community Workbench and run the setup.
Visit the following : MySQL Community Workbench.
Select the Workbench from available downloads.
Once downloaded, run setup for Workbench.
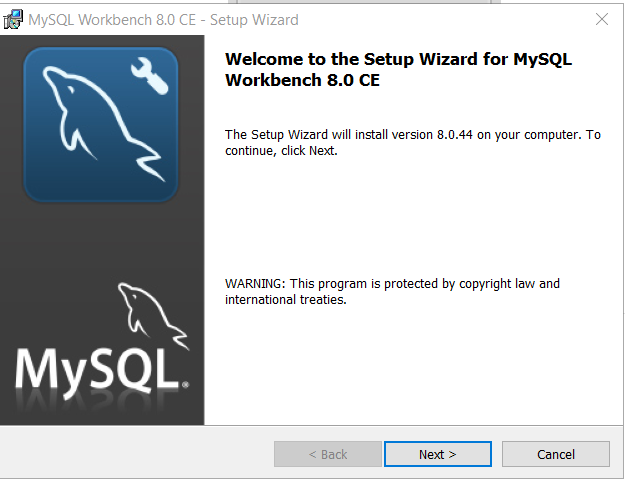
Click “Next” to continue.
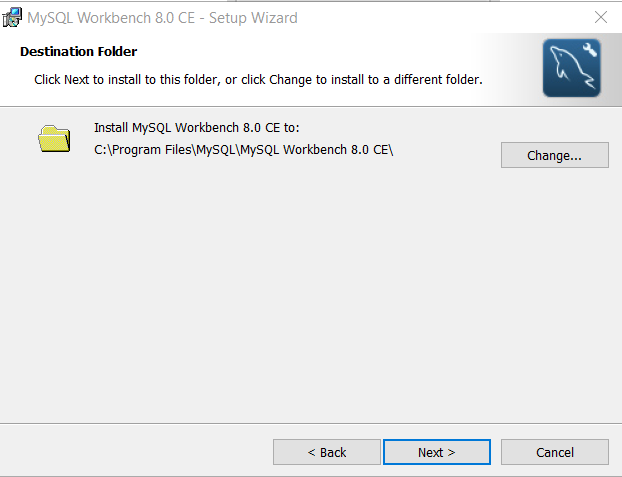
Step 2: Select the destination folder for Installation
The setup now ask you to select the destination folder for installation files. There is no need to change the location unless you are running out of disk space. In that case, you may want to install the Workbench on a different disk.
Click “Change” if you want to change the location.
Step 3: Select the features to Install.
The setup wizard want you to specify how you want the installation. You can go for a “Complete” setup, if disk space is not an issue.
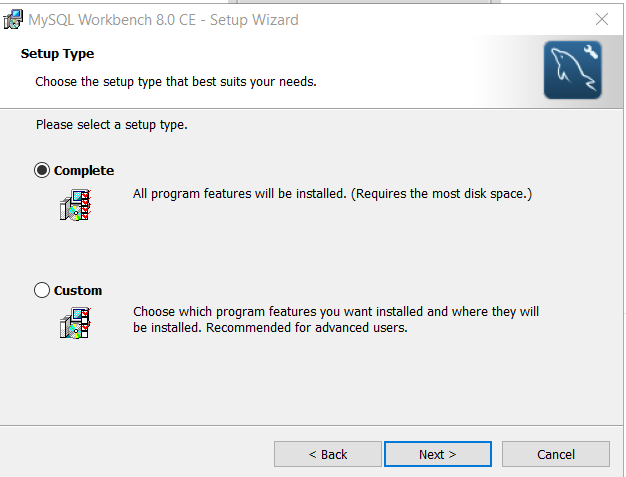
Click “Next” to continue installation.
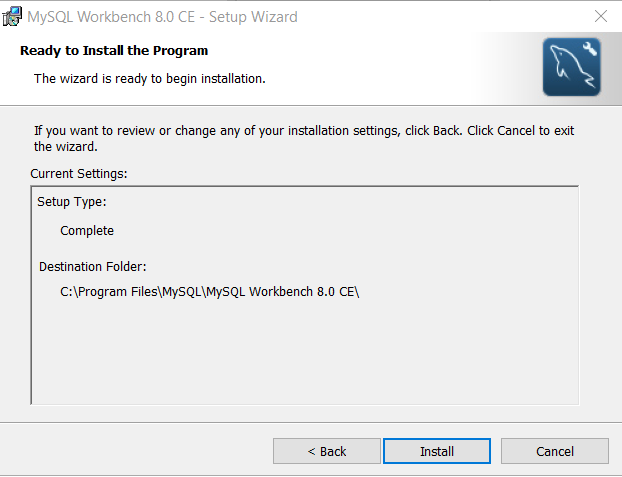
Step 4: Review Installation Setup and Install.
At this stage, you must review setup type and destination folder. If you are satisfied, click “Install“.
Step 5: Complete the setup
Once the setup is complete, click “Finish“.
If you keep “Launch MySQL Workbench now” selected. The Workbench will open automatically when you click “Finish“.
Configuring MySQL Workbench for Practice
When you open Workbench, you get the following screen.

Currently, there is one Local Interface connection. You need to make a connection for yourself. That connection is used to create databases and run SQL queries.
To connect to a database, select Database > Connect to Database. You will get a dialog box for connection.
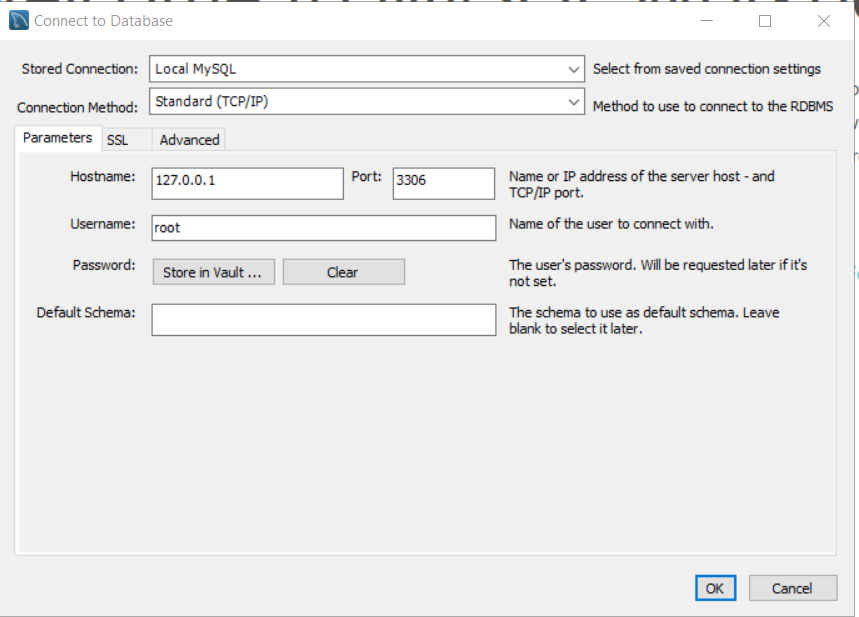
Stored Connection: Local MySQL
Connection Method: Standard TCP/IP
Hostname : 127.0.0.1 (The ipaddress of localhost)
Port: 3306 (Standard port for SQL)
Username: root
You need to provide password for root user. It is the same password that you entered during MySQL Server configuration.
Enter the password and click ok to connect. Once you are connected, write queries. It will work.
Summary
MySQL is open source software to manage relational databases (RDBMS). On Windows, you need 2-4 core processor, 2 GB RAM, and VC++ redistributable package.
You need to install two part software for MySQL on windows.
- Install MySQL Server
- Install MySQL Workbench
Lastly, you must make a connection from Workbench to SQL Server to run commands and queries.
SQL Basics Explained: Commands, Queries, and Examples
SQL (Structured Query Language) is the standard query language for databases. It is not just for querying data, but a complete language used to control, manage, and maintain a relational database system.
Why only RDBMS (Relational Database Management Systems)?
Because NoSQL systems such as MongoDB, CouchDB, and others use different storage structures like JSON, BSON, or document-like formats. They do not follow the relational model, so SQL is not used in the same way.
This post will explain basic SQL commands and queries with examples. It will help you get started with your SQL journey.
Types of SQL Commands
The different types of SQL commands are categorized based on their functions within the database system. These commands can define database structures such as tables and indexes, insert or update data, delete values from tables, retrieve information through queries, control user access, and manage transactions.
A list of SQL command categories is given below:
- Data Definition Language (DDL)
- Data Manipulation Language (DML)
- Data Query Language (DQL)
- Data Control Language (DCL)
- Transaction Control Language (TCL)
Let’s discuss each of them in detail.
Data Definition Language (DDL commands)
Data Definition Language (DDL) consists of SQL commands used to create, modify, and delete database structures such as databases, tables, views, and indexes. All DDL commands are auto-committed, meaning the changes take effect immediately and permanently, and cannot be rolled back.
Common DDL commands are listed below.
- CREATE
- ALTER
- DROP
- TRUNCATE
- RENAME
CREATE Command
The CREATE command is used to create database objects like databases, tables, indexes, and views.
Examples of CREATE
1. To create a database.
CREATE DATABASE library;2. Command to create a table.
CREATE TABLE books (
    book_id INT AUTO_INCREMENT PRIMARY KEY,
    title VARCHAR(200) NOT NULL,
    author VARCHAR(150),
    publisher VARCHAR(150),
    published_year INT,
    price DECIMAL(10,2)
);
Note: If you are running SQL commands on MySQL , then make sure run to USE <database name>;
before any SQL command. Otherwise , it won’t work.
3. Command to create views.
A view is a virtual table based on SELECT query.
CREATE VIEW cheap_books AS
SELECT title, author, price
FROM books
WHERE price < 300;
4. Command to create a unique index.
A database index helps in faster searches.
CREATE UNIQUE INDEX idx_isbn
ON books(isbn);
ALTER Command
The ALTER command can modify the structure of an existing database object. It allows you to change, add and delete columns, constraints, and any other properties without deleting the table or its data.
The ALTER command is mostly used for:
- Add a new column
- Modify the data type of an existing column
- Rename a column
- Drop (remove) a column
- Add or remove constraints
- Rename the table
Examples of ALTER Commands
1. Add a New Column to Existing Table.
If you are using My SQL, make sure to run USE <database name>; before any other SQL commands, otherwise, it won’t work.
ALTER TABLE books
ADD isbn VARCHAR(30);
2. Modify the data type of an existing column
ALTER TABLE books
MODIFY price DECIMAL(12,2);
The initial data type of the price attribute was DECIMAL (10, 2);. The new data type is DECIMAL(12, 2);.
3. Rename a Column
ALTER TABLE books RENAME COLUMN title TO book_title;The RENAME takes two parameters:
- Old column name
- New column name
4. Drop a Column
ALTER TABLE books
DROP COLUMN published_year;
This will remove the column published_year from the table. Any data for the column is permanently deleted, including constraints, indexes, etc.
How to know if the column is deleted ? Use DESCRIBE books; or SHOW COLUMNS FROM books;
You should see all columns except published_year.
5. Add or Remove a Constraint
ALTER TABLE books
ADD CONSTRAINT unique_title_author UNIQUE (title, author);
The command above will add a UNIQUE constraint on the title and author columns. All combination of title and author are unique.
How do we know if the constraint was added?
The command SHOW INDEX FROM book; will return non_unique = 0 which means that all entries are unique.
6. Rename the table
ALTER TABLE books RENAME TO library_books;DROP Command
The DROP command helps to delete database objects. You can delete databases itself using the DROP command. This command is auto-committed meaning the action cannot be undone, and deletion is permanent.
You can delete following using this command.
- Database
- Table
- Views
- Index
- Columns via ALTER TABLE command
- Constraints via ALTER TABLE command.
Examples of DROP Command
We can see example of first 4 objects from the above list. For examples of drop column and constraints, refer to the ALTER command examples.
Before running any command in My SQL , run following command, USE <database name>;.
1. Remove a Database
DROP DATABASE members;2. Remove a Table
DROP DATABASE memberships;3. Remove Views
DROP VIEW cs_books;4. Remove index
DROP INDEX idx_isbn ON Library;TRUNCATE Command
This command deletes all the rows from a table but keep the schema and structure of intact. It is more efficient than DROP command which delete the entire object.
The TRUNCATE command cannot be used for deleting specific roles.
Example of TRUNCATE command
If the books table is empty, insert the following records, otherwise, skip this step.
INSERT INTO books (book_id, title, author, price) VALUES (12, 'Ashtavakra Geeta', 'Ashtavakra', 120.43);
INSERT INTO books (book_id, title, author, price) VALUES (13, 'Sri Ramayanam', 'Maharshi Valmiki', 550.50);
INSERT INTO books (book_id, title, author, price) VALUES (14, 'Sri Mahabharatam', 'Maharshi Vedvyas', 1000.35);
Now run the truncate command.
TRUNCATE books;To know the effect of TRUNCATE command, run the following SQL command. This command will try to retrieve all the records from book table.
SELECT * FROM books;If you only see a structure of table in the results, but no records. The TRUNCATE has been successful. The TRUNCATE command will remove all records.
RENAME Command
The RENAME command will help us rename the TABLE. There are two ways to achieve this goal.
- Rename the Table directly.
- Use the ALTER TtBLE command.
Examples of RENAME Command
1. Direct renaming.
RENAME TABLE books TO library_books;2. Using ALTER TABLE Command.
ALTER TABLE books RENAME TO library_books;DML Commands
Data Manipulation Language (DML) commands are those commands that work with actual data records stored inside database tables. They are used to insert, modify, retrieve and delete the records.
Why are DML commands used:
- Add a new record
- Modify an existing record.
- Retrieve and display existing records.
- Delete records from one or more tables.
List of DML commands
There are many DML commands, the most common ones are listed below.
- INSERT
- UPDATE
- SELECT
- DELETE
Let’s discuss each of them briefly.
SQL questions in university exams are usually application-based. Regular practice of basic queries (SELECT, WHERE, JOIN) helps in answering 2–5 mark SQL questions accurately.
INSERT Command
This command simply inserts a new record into the table with the values you provide. The table name and the data values must be correct for insert to work.
Before you try this command in MySQL, do the following.
CREATE DATABASE university;
USE university;
To insert values into the University database, create a table for Students and insert values.
CREATE TABLE students (
    student_id INT PRIMARY KEY,
    first_name VARCHAR(50),
    last_name VARCHAR(50),
    age INT,
    email VARCHAR(100),
    course VARCHAR(100)
);
Now, insert values using the INSERT command.
INSERT INTO students (student_id, first_name,last_name, age, email, course)
VALUES (1, 'Rakesh', 'Kumar', 20, '[email protected]', 'Physics');

INSERT INTO students (student_id, first_name,last_name, age, email, course)
VALUES (2, 'Karuna', 'Nair', 20, '[email protected]', 'Mathematics');
UPDATE Command
This command will update records in a table.
We have entered the wrong age for student ‘Karuna’, which we now want to change.
UPDATE students
SET age = 25
WHERE student_id = 2;
SELECT Command
This command helps query the database, retrieve results and displaying them. You can query the database based on conditions.
For example, to view the updated information of student “Karuna”, run the following command.
SELECT * FROM students WHERE student_id = 2;The following command will retrieve records from entire table.
The asterisk (*) selects all columns from the table. The WHERE clause is used to filter rows based on conditions.
SELECT * FROM books;DELETE Command
This command helps delete the records from a table in a database.
DELETE FROM students
WHERE id = 1;
Data Query Language (DQL)
The Data Query Language (DQL) is used to retrieve data from the database based on specific conditions. It does not modify or change table values. — It only reads data.
SELECT is the only command to run query. But DQL can do lot of things such as:
- Retrieve data from one or more tables.
- Filter and extract data based on conditions.
- Sort data in ascending or descending order.
- Group data.
- Join multiple tables.
Examples of DQL Commands
Here are some examples of different tasks carried out using SELECT command.
1. Get all the records from a table.
SELECT * FROM students;2. Filter and get results based on conditions.
SELECT first_name, age FROM students;This time the query return only the first name and age column from the students table.
3. Sort the results.
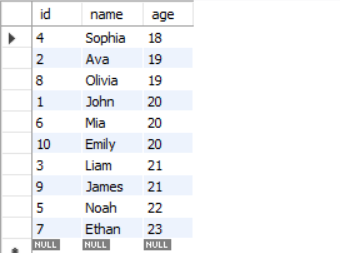
You can sort the query results by using ‘ORDER BY’ clause.
Ascending order
SELECT * FROM students
ORDER BY age ASC;Result:
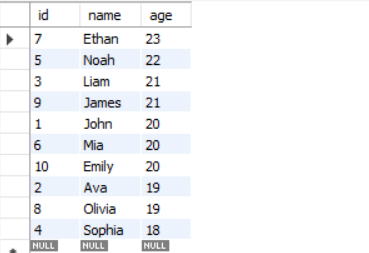
Descending order
SELECT * FROM students
ORDER BY age DESC;Result:
4. Group the results
GROUP BY is used to organize rows that share identical values in one or more columns. It is commonly used together with aggregate functions such as COUNT(), SUM(), or AVG() to summarize data.
Aggregate functions are take multiple of rows data and return a single summarized value. Use these functions to calculate total, averages, or maximum /minimum values.
- SUM()
- COUNT ()
- AVG()
- MAX()
- MIN()
Grouping students on age and counting students for each group
SELECT age, COUNT(*) AS total_students
FROM student
GROUP BY age;
The SQL command does two things.
- Group all students in groups where age is same.
- Count the total number of students for each group.
Result:

5. JOIN two or more tables
The JOIN command joins two or more tables based on one or more shared shared columns. All types of joins use a shared column except
- CROSS JOIN
- SELF JOIN
What are different types of JOINs?
Here is a list of common joins.
- INNER JOIN – When all records from both table are matching.
- LEFT JOIN – All records of left table and matching records from right table.
- RIGHT JOIN – All records of right table and matching records from left table.
- FULL JOIN – All records from both tables.
- CROSS JOIN – Return all combination of both tables ( A Cartesian Product).
- SELF JOIN – A Join on itself ( A reflexive relationship).
JOIN Command Examples
We shall see examples of JOIN now.
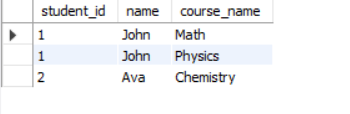
INNER JOIN
SELECT
    s.student_id,
    s.name,
    c.course_name
FROM students s
INNER JOIN courses c
ON s.student_id = c.student_id;Result:
Return records of all students who have joined a course.
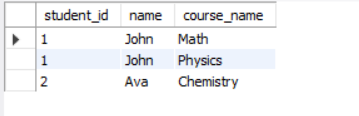
LEFT JOIN
SELECT
    s.student_id,
    s.name,
    c.course_name
FROM student s
LEFT JOIN course c
ON s.student_id = c.student_id;Result:
The LEFT JOIN returns all entries from left table (student) and those entries from course table where student.student_id matches course.student_id.
All non-matching entries will have a Null value.
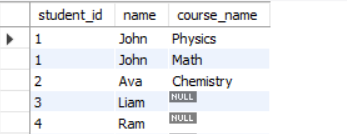
RIGHT JOIN
SELECT
    s.student_id,
    s.name,
    c.course_name
FROM student s
RIGHT JOIN course c
ON s.student_id = c.student_id;Result:
The RIGHT JOIN returns all entries from right-hand table(course) and matching records from student table. Non-matching entries will have a Null value.
Note that there is no Null in the output, because there are no mismatched records. Every course has a student.
FULL JOIN
SELECT
    s.student_id,
    s.name,
    c.course_name
FROM
    student AS s
LEFT JOIN
    course AS c
ON s.student_id = c.student_id

UNION

SELECT
    s.student_id,
    s.name,
    c.course_name
FROM
    student AS s
RIGHT JOIN
    course AS c
ON s.student_id = c.student_id;
MySQL do not support FULL JOIN, therefore, you can use UNION command to include results from LEFT JOIN and a RIGHT JOIN.
The FULL JOIN returns all rows from both tables – student and course. If records match, it shows the matching data, if not, the missing values are filled with Null.
Result:
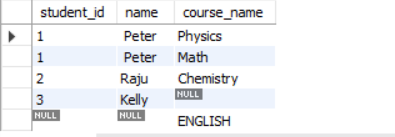
The result shows all matching records from student and course table. It also includes all records that do not match and fill the empty column with Null.
The student ‘Kelly’ did not join any course and the course ‘ENGLISH’ has no students.
CROSS JOIN (Cartesian Product)
SELECT
    student.student_name,
    course.course_name
FROM
    student
CROSS JOIN course;Result:
The CROSS JOIN produces a Cartesian product of two tables. Every row of first table is paired with every row of second table.

Data Control Language (DCL)
The Data Control Language (DCL) in SQL consists of commands that manage access control, permissions, and data security. It decides who can do what.
It has three main tasks:
- Grant permission to users.
- Revoke the permission given to users.
- Secure the data and make sure authorized access.
DCL Commands
There are only two commands. Different version of SQL uses slightly different syntex, but they mean the same thing.
- GRANT
- REVOKE
For example, MySQL doesn’t use DENY, but SQL Server does. MySQL uses REVOKE statements.
Examples of DCL Commands
Grant permission to SELECT, INSERT to the user ‘Kiran’ using GRANT command.
GRANT SELECT, INSERT ON students TO 'kiran'@'localhost';Revoke all permissions for user ‘Kiran’ using REVOKE command.
REVOKE ALL PRIVILEGES, GRANT OPTION FROM 'kiran'@'localhost';Transaction Control Language (TCL)
A transaction is a group of SQL commands executed as one unit of work. Either all of the operations succeed or fall fails.
Transaction Control Language (TCL) controls these operations which are nothing but several DML statements such as INSERT, UPDATE, and DELETE.
TCL Commands
The Main TCL Commands are:
- COMMIT
- ROLLBACK
- SAVEPOINT
- SET TRANSACTION
Examples of TCL Commands
COMMIT
When transaction is successful. The Commit command save the changes to the database permanently.
START TRANSACTION;

UPDATE accounts SET balance = balance - 500 WHERE id = 1;
UPDATE accounts SET balance = balance + 500 WHERE id = 2;

COMMIT;
In the example above, both succeed or both fails.
Learn more about Database Transaction States.
Want to get in-depth knowledge on Transaction Processing?
Visit Transaction Processing in DBMS: Concept, Properties and Examples.
ROLLBACK
When the transaction fails, database can become inconsistent and all changes are ROLLBACK to bring the database into a consistent state.
START TRANSACTION;
DELETE FROM student WHERE student_id = 4;
ROLLBACK;  -- Undo the delete
SAVEPOINT
The SAVEPOINT creates a checkpoint, so that we can partially rollback to it, if necessary.
START TRANSACTION;
UPDATE products SET price = price + 10;
SAVEPOINT p1;
UPDATE products SET price = price + 5;
ROLLBACK TO p1;   -- Undo only the second update
COMMIT;
You can understand the example, by knowing what each step does.
- Transaction starts.
- product price is set to price + 10;
- We created a SAVEPOINT, if anything goes wrong, go back to SAVEPOINT.
- The product price is incremented by 5. This is an unwanted activity.
- Rollback to the nearest correct price and state.
- Commit the changes if all operations are completed successfully.
SET TRANSACTION
The SET TRANSACTION define the properties of a transaction. A set transaction changes following properties:
- Isolation Level – Isolation is one of the ACID properties that controls how a transaction must behave during concurrent access. Therefore, isolation level decides how much the current transaction must “see” from other transactions, running simultaneously.
- Read/Write Mode – It defines whether transaction can (read and write) or (read only).
- Scope – This property decides whether settings are applied to Next transaction or Current Transaction only.
SET TRANSACTION READ ONLY;

START TRANSACTION;

SELECT * FROM products;  -- Allowed
UPDATE products SET price = 100;  -- Not allowed

COMMIT;
Summary of SQL Basic
| Category | Full Form | Purpose | Commands |
| DDL | Data Definition Language | Create or Modify database structures. | CREATE, ALTER, DROP, TRUNCATE, RENAME |
| DML | Data Manipulation Language | Manage data inside tables. | INSERT, UPDATE, DELETE |
| DQL | Data Query Language | Get data from Tables. | SELECT |
| DCL | Data Control Language | Control user access and permissions. | GRANT, REVOKE |
| TCL | Transaction Control Language | Manage transactions. | COMMIT, ROLLBACK, SAVEPOINT, SET TRANSACTION |
If you are starting with SQL and preparing for exams, structured practice is essential. The free SQL Starter Kit includes:
- SQL Basics Explained (PDF) – clear explanations with examples
- MySQL Installation Guide – step-by-step setup for practice
- SQL Practice Sheet – exam-relevant questions with queries