C++ Functions
The C++ functions are user-defined named block of code that performs a specific task. The function takes parameter or no parameters, it may return a value or not return anything. Every function has a type that indicates the return type of that function.
The main() is a function in C++ program and there could only be one main function. The default return type of main function is integer. A user-defined function can call other functions except main function.
How to use functions in C++ program?
There are three things to remember while using functions in C++ programs.
- Declare the function
- Define the function
- Call the function in your program.
Function Declaration
A function declaration is a way to declare return type, number and data type of parameters. There are two places you can declare your function. First, you can declare your function globally outside of main function. Second, you can declare the function inside of main function.
For example,
void addition( int a, int b);
int multiplication( int x, int y);
In the first example, the return type is void which means the function is not going to return any value. The function name is addition and it has two integer parameters.
The second example has a return type of int, the function name is multiplication and there are two integer parameters. The parameters are called formal parameters.
Function Definition
The function definition contains the actual code for the function. The function definition must match the function declaration, otherwise, it will result in compiler error.
For example,
void addition( int a, int b)
{
           //Variable declaration and initialization
            int total = 0;
          //Do addition of two numbers
            total = a + b;
         // Print the results
          cout << "Total =" << " " << total << endl;
 }
The function definition has code to perform the addition in the above program. It matches the function declaration we did previously. Note that the function does not return the value, but prints the output.
Calling Function
The function is used several times during the execution of a program. The main function or other user-defined function can call a specific function to perform a task.
For example,
void main()
{
  // Variable and function declaration
            int a, int b;
            void addition( int a, int b);
   // Calling a function
            addition( a, b);
}
The main function calls the function addition with two actual parameters. The actual parameters does not need type declaration, the variable name is sufficient. The function name does not need a return type because it is already declared at the beginning.
Actual Parameters vs. Formal Parameters
The formal parameter is used as a dummy parameter. Its purpose is to declare the type and number of parameter being used in the function.
The actual parameter is the variable value that get passed on to the function. The names used for actual parameter must match with variable names.
The formal parameter does not need variable names, even data type is enough to declare or define the function.
For example,
float square (float , float , double);The above code contains three parameters for the function. A variable name is not used for any parameters, but still it a valid declaration.
In the next lesson, we will learn about function types, and variable scopes.
C++ Breaking Control Statements
There are three ways to break a control statement – break, continue and goto statements. In this article, you will learn about these statements in detail.
A control statement executes all statements within its own block, but sometimes it wants to stop and exit the block. In these cases, we introduce a breaking statement.
Three keywords are used to do the task. You may use anyone of them depending on the task.
- break
- continue
- goto
break Statement
The break statement simply exit the block wherever placed. You can use break in switch-case, while loop or any suitable block of code.
For example,
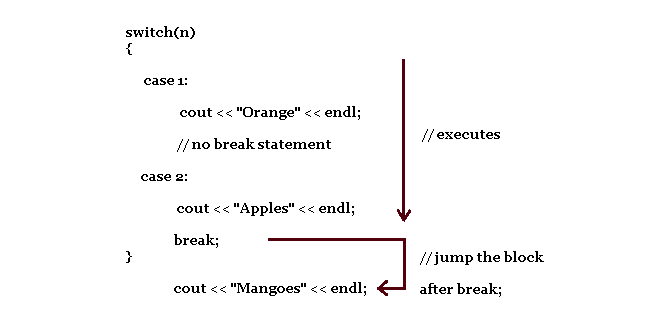
switch(n)
{
    case 1:
        cout << "Orange" << endl;
    case 2:
        cout << "Apples" << endl;
        break;
}
        cout << "Mangoes" << endl;
If the case is 1, then the output will be Orange, Apples because there is no break statement in case 1, it does not terminate the block and move to the case 2.
Graphical Representation
Breaking Out of while Loop
The break statement can exit a while loop similar to a switch-case. As soon as the necessary condition is met to break the loop, the break statement comes out of a while loop.
int number;
sum = 0;
int i = 0;
while(i < 20)
{
          cout << "Enter a number:";
          cin >> number;
         if( number < 0)
        {
             cout << "Negative number entered! try again !" << endl;
             break;
       }
        sum = sum + number;
}
cout << "Sum =" << " " << sum << endl;
If the number is less than 0, the break statement exit the while loop immediately.
continue Statement
The does exactly opposite of break statement, it continues the loop without breaking it. When an error condition is met the continue does not exit the loop, goes to top of the loop again.
For example, consider the previous program with continue.
// Continue with while loop
#include <cstdlib>
#include <iostream>
using namespace std;
int main()
{
    // Variable declaration

    int i,sum,number;

    //Initialization

    sum = 0;
    i = 0;

    //while loop begins

    while(i < 5)
    {
            cout << "Enter a Number:";
            cin >> number;

            //if condition for continue

            if(number < 0)
            {
                      cout << "Negative value! try again." << endl;
                      continue;
            }
            sum = sum + number;
            i++;
    }

    //Printing output

    cout << "Sum =" << " " << sum << endl;

    system("PAUSE");
    return EXIT_SUCCESS;
}
Output:
Enter a Number:10
Enter a Number:-9
Negative value! try again.
Enter a Number:10
Enter a Number:10
Enter a Number:10
Enter a Number:10
Sum = 50
The output shows that the continue does not exit the loop, but skip the current iteration. It is sometimes useful in some C++ programs.
goto Statements
The goto statement is different from break statement, or continue statement. It jump from one location to another within the C++ program.
The general syntax for goto statement is here.
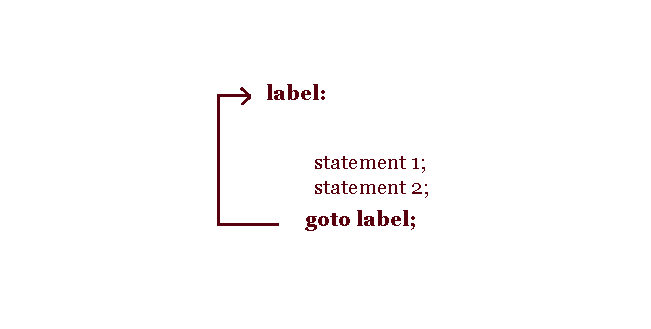
The type of goto statement shown above will create an infinite loop. That’s why goto is not popular method to break a loop.
Example Program:
begin:
while(x < 10)
{
      sum = sum + x;
      if(x == 0)
      {
          goto begin;
     }
}
In the above piece of code, the if condition will stop an infinite loop from happening. Hence, conditional statements can avoid such problems.
C++ Do-While Loop
The do-while is another type of loop supported by C++ language. In the case of while loop and for loop – three expressions are compulsory. This is also true for do-while, but in a different way.
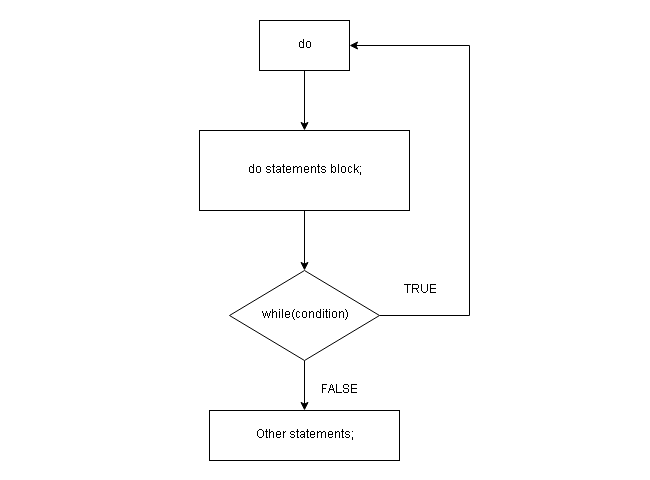
do-while Loop Structure
The do part allow the code block to execute first and then the while part perform a test for terminating the loop. The loop terminates when the test condition is false.
The general structure for do-while is given below.
expression1;
do
{
         do something;
         expression2:
}while(expression3);
Graphical Representation of do-while
The graphical representation of do-while is useful in making flowcharts for C++ programs.
Example Program: do-while
//do-while loop
#include <cstdlib>
#include <iostream>
using namespace std;
int main()
{
    //Variable decalaration

    int sum;
    int value;


    //Initialization

    sum = 0;
    value = 10;


    //Do-while to compute the results

    do
    {
               sum = sum + value;
               value--;

    }while(value >= 0);

    //printing outputs

    cout << "Sum = " << " " << sum << endl;

    system("PAUSE");
    return EXIT_SUCCESS;
}
Output:
Sum = 55C++ while Loop
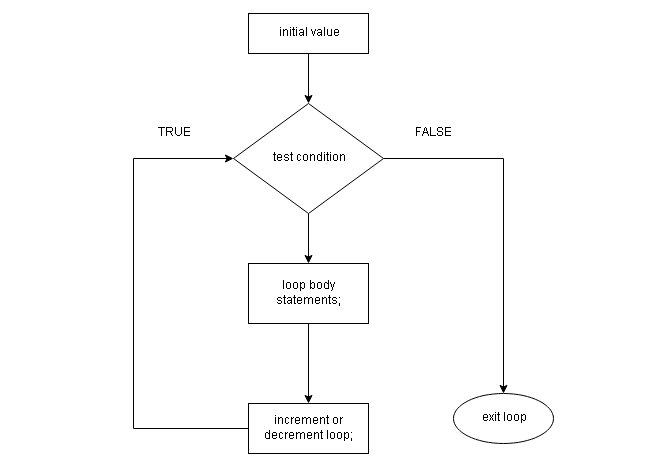
A while loop is another kind of loop control structure. The loop has initial condition and a test condition to pass before the actual loop body starts. The loop is incremented or decremented inside of the loop body.
The general structure of while loop is given below.
initial expression;
while( test condition)
{
     do something;
     increment or decrement loop;
}
The initial expression is a simple assignment where a loop starts with 0 or 1. The test condition can be an expression, return from a function, or a constant. The loop is incremented or decremented inside the body of the loop.
You can note the similarity between while loop and for loop, both contains 3 expressions. However, with while loop the initialization happens before the loop body starts.
Graphical Representation of while loop
A graphical representation is helpful when you create a flowchart of your C++ program. Here is the graphical representation of while loop.
Example Program:
//While loop
#include <cstdlib>
#include <iostream>
using namespace std;
int main()
{
    //variable declaration and initialization

    int number,i;
    int sum = 0;

    //read values and computing total

    for(i = 0;i<5; i++)
    {
          cout << "Enter Number:";
          cin >> number;

          sum = sum + number;
    }

    //printing output

    cout << "Sum = " << " " << sum << endl;

    system("PAUSE");
    return EXIT_SUCCESS;
}
Output:
Enter Number:23
Enter Number:55
Enter Number:66
Enter Number:67
Enter Number:76
Sum = 287C++ switch-case Statements
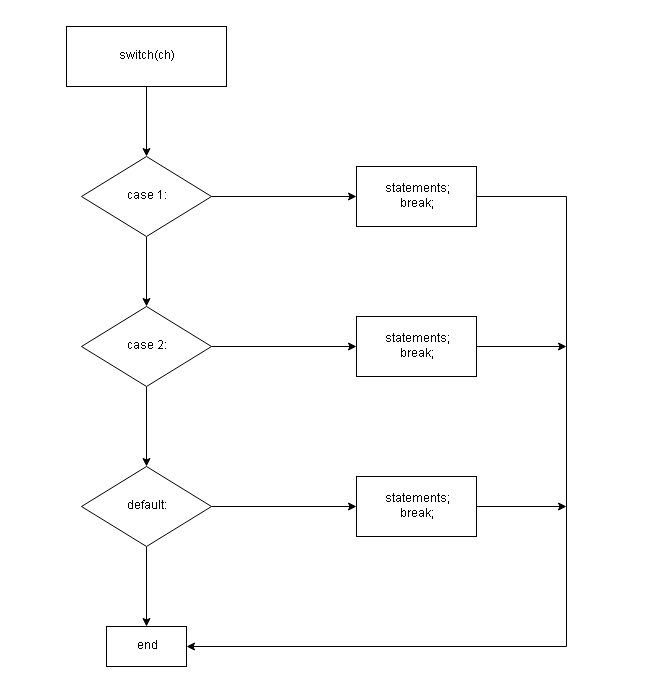
The switch-case statements are similar to if-else-if construct – a multiple decision maker. It allows you to choose a constant (a switch) that matches with a case (constant) and executes all statements that follow the matched case.
The main difference between if-else-if construct and switch-case is that the if-else-if uses multiple conditions at each level. The switch-case on the other hand, use only constants to choose a case and execute statements. The general format for switch-case is given below.
switch(ch)
{
    case 1:
        statement1;
        statement2;
        break;
    case 2:
        statement3;
        statement4;
        break;
    default:
        statement5;
        break;
}
Points to Remember
- The switch can only take integer constants, or character constants. Do not use float, expression or strings.
- Value that follow case must be integer constant or character constant, must not be float, expression or strings.
- Each case is terminated using break statement.
When to use if-else-if and switch-case?
It is very hard to tell when to use switch-case or if-else-if constructs, but when you have many expressions to test at different level then if-else-if is suitable.
The switch-case is like choosing from a menu, you make a choice with a single character and if a case matches it executes the statements under that case. If no case matches then the default case executes its statements.
For example,
if (num > 100)
{
    do something;
}
else if(num == 100)
{
    do something;
}
else
{
    do something;
}
The above if-else-if code can be implemented using switch-case, but without conditions and only with a constant value.
switch(ch)
{
    case 1:  // num > 100
        do something;
    break;
    case 2: // num == 100
        do something;
    break;
    default: //  num < 100
        do something;
    break;
}
Both are similar, but, for the switch-case we need to write conditions for each case. Hence, if-else-if is more clear and better choice.
Graphical Representation of switch-case
The graphic representation of a program is necessary to understand the algorithm of a C++ program. You can use this diagram to represent a switch-case statement in the program.
Example Program:
// Program to display weekday using switch-case
#include <cstdlib>
#include <iostream>
using namespace std;
int main()
{
    //Variable declaration

    int ch;

    //Read input value

    cout << "Enter a Number between 1 to 7 to Display Weekday:";
    cin >> ch;

    //using switch-case to display weekday

    switch(ch)
    {
              case 1:
                   cout << "It is Monday" << endl;
                   break;
              case 2:
                   cout << "It is Tuesday" << endl;
                   break;
              case 3:
                   cout << "It is Wednesday"<< endl;
                   break;
              case 4:
                   cout << "It is Thrusday" << endl;
                   break;
              case 5:
                   cout << "It is Friday" << endl;
                   break;
              case 6:
                   cout << "It is Saturday" << endl;
                   break;
              case 7:
                   cout <<"It is Sunday" << endl;
                   break;
              default:
                      cout << "Wrong Input ! Enter number between 1-7" << endl;
                      break;
    }

    system("PAUSE");
    return EXIT_SUCCESS;
}
Output:
Enter a Number between 1 to 7 to Display Weekday:5
It is FridayC++ if-else Statements
The if-else statement is a conditional statement with an optional else. The if statement executes a block of statements is the condition is true, but does not do anything when condition is false. The if-else block contains code for both true and false conditions.
Each of the block in if-else construct will be enclosed using braces( { } ). The general form of if-else is given below.
if(expression)
{
    statement1;
    statement2;
}
else
{
    statement3;
    statement4;
}
Clearly, the a program executes if block when expression = true and executes else block when expression = false.
Example Program: if-else
// example program to demostrate if-else
#include <cstdlib>
#include <iostream>
using namespace std;
int main()
{
    //Variable Declaration

    int x,y,total;

    //Variable Initialization

    x = 100;
    y = 200;
    total = 0;

    //the if-else block

    if(x < 100)
    {
         total = x + y;
    }
    else
    {
         total = y - x;
    }

    //Printing the output

    cout << "Total =" << total << endl;

    system("PAUSE");
    return EXIT_SUCCESS;
}Output:
Total =100In the above example, the condition x < 100 is false. As a result, the else block is executed giving an output 100.
Types of if-else Constructs
There are several ways to construct if-else structure. Here is a list of possible constructs.
#1
if(expression)
{
    statement1;
    statement2;
}
else
{
    statement3;
}
#2
if(expression)
{
   if(expression)
   {
      statement1;
      statement2;
   }   else   {
      statement3;
   }
}
else
{
    statement4;
}
#3
if(expression)
{
           if(expression)
          {
              statement1;
          }
           else
         {
             statement2;
         }
}
else
{
           if(expression)
          {
                statement3;
          }
           else
         {
               statement4;
         }
}
#4
if(expression)
{
}
else if(expression)
{
}
else if(expression)
{
}
else if(expression)
{
}
You can create different kinds of if-else constructs which one of the above construct as building blocks.
C++ If Statements
The C++ If statement is a conditional statement. The program executes a block of code only if condition is satisfied or true. This changes the flow of C++ program. The program executes only required blocks and ignore others.
There are two ways to write an if statement.
- With curly braces
- Write without curly braces( { } ).
If statement with curly braces
The if statement with curly braces are the default way of writing the if block.
if(expression)
{
    statement 1;
    statement 2;
    statement n;
}
The above block has if statement with an expression. When the expression evaluates to true, the block of statements is executed. This form of if statement is suitable when the program needs to execute more than one statement.
The expression is a logical expression that always result in a Boolean result – true or false.
If statement without a curly brace
Sometimes, you can write if statement without curly braces when only one statement follows the if condition.
if(expression)
  statement1;
There is no other statements to execute except statement1.
Nesting If statements
Nesting if statement means that an if statement contains another if statement within the block. The inner if block is executed first.
Consider the following example,
if (expression)
{
       // there are statements and another if block
    statement1;
     // nested if block
    if(expression)
    {
             statement2;
            statement3;
   }
}
Example Program: if ststatement
// Example program If statements
#include <cstdlib>
#include <iostream>
using namespace std;
int main()
{
    //variable declaration

    int top;

    //variable initialization

    top = 100;

    //if block without braces

    if(top == 100)
        cout << "Top is equal to 100:" << endl;

    //if block with braces

    cout << endl;

    if(top == 100)
    {
           top = top + 100;
           cout << "Now Top is" << " " << top << endl;
    }

    system("PAUSE");
    return EXIT_SUCCESS;
}
Output:
Top is equal to 100:
Now Top is 200C++ Bit Format Flags
The C++ bit format flags changes the characteristics of  .The flags hold the current setting for the . We can turn the flags on or off using built-in function such as
  or
or  . Changing the behavior of the
  object is useful in displaying output only after bit level manipulation.
Here is the list of flags available in C++ .
| Flag Name | Description |
| skipws | skip whitespace while input |
| right | left justify the output |
| internal | pad after sign or base |
| dec | decimal base |
| hex | hexadecimal base |
| oct | octal base |
| showbase | display base for hex and oct |
| showpoint | shows all decimal point for float |
| uppercase | shows hex in uppercase |
| showpos | display a + sign for positive numbers |
| scientific | display float numbers with E |
| fixed | floating point notation |
| unitbuf | flush all streams after cin |
| stdio | flush stdout,stderr after cin |
setf() function
The function sets the bit format flags. It takes the flag name as the argument. The syntax to use this function is given below.
setf(ios::<flag_name>);You can use bitwise or operator to set more than one field.
setf(ios::<field1>| ios::<field2> | ios::<field3>);unsetf() function
The function unsets the bit format flag for object. The general syntax to use this function is given below.
unsetf(ios::<flag_name>);Example #1 : skipws
Your site doesn’t include support for the CodeMirror Blocks block. You can try installing the block, convert it to a Custom HTML block, or remove it entirely.

Install CodeMirror Blocks
Keep as HTML
//using skipws function
#include <cstdlib>
#include <iostream>
#include <iomanip>
using namespace std;
int main()
{
    //Variable declaration

    char animal_name[100];

    //Reading values

    cout << "Enter an animal name:";
    cin >> skipws;
    cin >> animal_name;

    //printing output

    cout << "Number = " << animal_name << endl;

    system("PAUSE");
    return EXIT_SUCCESS;
}
Output:
Enter an animal name:bengal tiger
Number = bengal
Example #2 : right, left, internal and adjustfield
/* Demo of adjustfield, left,right and internal bit format */
#include <cstdlib>
#include <iostream>
#include <iomanip>
using namespace std;
int main()
{
    //variable declaration
    int number1, number2, number3;

    //variable initialization

    number1 = 100;
    number2 = 230;
    number3 = 436;

    //using adjustfield and other bit formats

    cout.setf(ios::showpos);
    cout.setf(ios::left,ios::adjustfield);
    cout.width(10);
    cout << number1 << endl;

    cout.setf(ios::right,ios::adjustfield);
    cout.width(10);
    cout << number2 << endl;

    cout.setf(ios::internal,ios::adjustfield);
    cout.width(10);
    cout << number3 << endl;


    system("PAUSE");
    return EXIT_SUCCESS;
}
Output:
+100
      +230
+      436
Example #3 : dec, hex, oct, and showbase
#include <cstdlib>
#include <iostream>
using namespace std;
int main()
{
    //Variable declaration

    int amount;

    //Variable initialization

    amount = 564;

    //Converting base using showbase, hex, oct and dec

    cout.setf(ios::showbase);
    cout.setf(ios::hex,ios::basefield);
    cout << "Hexadecimal =" << amount << endl;

    cout.setf(ios::oct,ios::basefield);
    cout << "Octal =" << amount << endl;

    cout.setf(ios::dec,ios::basefield);
    cout << "Decimal =" << amount << endl;

    system("PAUSE");
    return EXIT_SUCCESS;
}
Output:
Hexadecimal =0x234
Octal =01064
Decimal =564
Example #4 : scientific, fixed, showpoint and floatfield
/* Demo of all floating point format flags -
floatpoint, showpoint, scientific, fixed
*/
#include <cstdlib>
#include <iostream>
#include <iomanip>
using namespace std;
int main()
{
    //variable declaration

    float pi;
    float radius;
    float area;

    //variable initializtiom

    pi = 3.14159;
    radius = 2.23;
    area = 0.0;

    area = pi * (radius * radius);

    // printing result using bit format flags

    cout.setf(ios::showpoint);
    cout.precision(3);
    cout.setf(ios::scientific,ios::floatfield);
    cout << "Pi=" << pi << endl;
    cout << "Radius=" << radius << endl;
    cout << "Area=" << area << endl;

    cout << endl;
    cout << endl;
    cout.setf(ios::fixed,ios::floatfield);
    cout << "Pi(fixed)=" << pi << endl;
    cout << "Radius(fixed)=" << radius << endl;
    cout << "Area(fixed)=" << area << endl;

    system("PAUSE");
    return EXIT_SUCCESS;
}
Output:
Pi=3.142e+000
Radius=2.230e+000
Area=1.562e+001
Pi(fixed)=3.142
Radius(fixed)=2.230
Area(fixed)=15.623C++ Manipulators
The C++ manipulators are stream functions that modify the characteristics of input and output stream. It is used for formating the input and output stream by changing format flags and values for the stream.
The list of manipulator function is located in  header file. You need to include this header to use the manipulator functions in your program.
The list of C++ standard manipulator functions is as follows.
- endl
- hex, oct, dec
- setbase
- setw
- setfill
- setprecision
- ends
- ws
- flush
- setiosflags
- resetiosflags
The  , and
, and  are defined in
  header file. The rest are defined in
  header files.
endl
The  introduce a new line or a line feed character. It is similar to C programming language
  character and C++ supports the old line feed.
For example,
cout << "This line use line feed" << endl;
cout << number1 <<  endl << number2 << endl;
You can use it anywhere and a new line character is added automatically.
Example Program #1
#include <cstdlib>
#include <iostream>
#include <iomanip>
using namespace std;
int main()
{
     cout << " This is Accounting Software";
     cout << endl;
     cout << " The Author is Chang lee.";
     cout << endl;

system("PAUSE");
return EXIT_SUCCESS;
}
Output
This is Accounting Software
The Author is Chang lee.
setbase()
The  manipulator is a manipulator that changes the base of a number to another base value. The C++ language supports following base values:
- hex (Hexadecimal = 16)
- oct (Octal = 8)
- dec (Decimal = 10)
Other than the above base converters the  can modify base of a variable. The
  , and
, and  manipulator can modify base of input or output numbers.
For example,
int number = 100;
cout << "Hex Value =" << " " << hex << number << endl;
cout << "Octal Value=" << " " << oct << number << endl;
cout << "Setbase Value=" << " " << setbase(16) << number << endl;
The output of the above code is:
Hex Value =  0064
Octal Value =  144
Setbase Value= 0064
Example Program #2
#include <cstdlib>
#include <iostream>
#include <iomanip>
using namespace std;
int main()
{
    //Variable Declaration

    int A,B,C;

    //Variable Initialization

    A = 2078;
    B = 3067;

    // Computing C

    C = A + B;

    // Printing Results

    cout << "A =" << dec << A << endl;
    cout << "B =" << oct << B << endl;
    cout << "C = " << setbase(16) << C << endl;


    system("PAUSE");
    return EXIT_SUCCESS;
}
Output
A =2078
B =5773
C = 1419
setw()
The  is an output manipulator that create whitespace character between two variables. You must specify the an integer value equal to the space required.
setw( int n)For example,
cout << number1 << number2 << endl;
cout << setw(2) << number1 << setw(5) << number2 << endl;
Example Program #3:
Your site doesn’t include support for the CodeMirror Blocks block. You can try installing the block, convert it to a Custom HTML block, or remove it entirely.

Install CodeMirror Blocks
Keep as HTML
#include <cstdlib>
#include <iostream>
#include <iomanip>
using namespace std;
int main()
{
    //variable declaration

    int number1, number2, total;

    //variable initialization

    number1 = 100;
    number2 = 345;

    // expression

    total = number1 + number2;

    //printing output with setw

    cout << endl;
    cout << endl;
    cout << setw(5) << number1 << " + " << setw(5) << number2 << " = "  << setw(6) << total << endl;

    system("PAUSE");
    return EXIT_SUCCESS;
}
Output:
100 + 345 = 445setfill()
The  fill the whitespaces of with a different character. It is an output manipulator like , but the required parameter is a single character. Note that a character is enclosed in between single quotes.
setfill(char ch)For example,
cout<< setfill('*') << endl;
cout << setw(5) << number1  << setw(5) << number2 << endl;
The output of the above will be  character between variable
  and variable
  .
.
Example Program #4:
We will use the above example with slight modifications.
#include <cstdlib>
#include <iostream>
#include <iomanip>
using namespace std;
int main()
{
    //variable declaration

    int number1, number2, total;

    //variable initialization

    number1 = 100;
    number2 = 345;

    // expression

    total = number1 + number2;

    //printing output with setw

    cout << endl;
    cout << endl;
    cout << setfill('*') << endl;
    cout << setw(5) << number1 << " + " << setw(5) << number2 << " = "  << setw(6) << total << endl;

    system("PAUSE");
    return EXIT_SUCCESS;
}
Output:
**100 + **345 = ***445Note the asterisk between variables due to manipulator.
setprecision()
The  is an output manipulator which controls the number of digits to display for a floating-point number after the decimal. The function is defined in the
  header so make sure to include this file in your program.
For example,
float A = 1.34255;
cout << setprecision(3) << A << endl;
The output will be  .
.
Example Program #5:
#include <cstdlib>
#include <iostream>
#include <iomanip>
using namespace std;
int main()
{
    //variable declaration
    float number1;

    //variable initialization

    number1 = 34.3358;

    //display the number using setprecision()
    cout << number1 << endl;
    cout << setprecision(2) << number1 << endl;
    cout << setprecision(3) << number1 << endl;

    system("PAUSE");
    return EXIT_SUCCESS;
}
Output:
34.3358
34
34.3
ends
The  adds a null terminating character (
 ) to a string type value. It has no argument like ; It just adds a
  .
.
Example Program #6:
#include <cstdlib>
#include <iostream>
#include <iomanip>
using namespace std;
int main()
{
    // variable declaration

    int amount;

    // variable initialization

    amount = 330;

    //display as a string

     cout << " \" " << amount << ends << " \" " << endl;

    system("PAUSE");
    return EXIT_SUCCESS;
}
Output:
" 330 "ws
The  is an input stream manipulator that discard any white spaces, therefore, if you have a string with multiple words then the string will display only the first word and trim after that.
Example Program #7:
#include <cstdlib>
#include <iostream>
#include <iomanip>
using namespace std;
int main()
{
    // variable declaration

    char name[125];

    // read variable value

    cout << "Enter Name" << endl;
    cin >> ws;
    cin >> name;

    //display variable with whitespace

     cout << "The Name  is "<< name << endl;


    system("PAUSE");
    return EXIT_SUCCESS;
}
Output:
Enter Name
George Land
The Name is George
Flush
The function clears the output stream. It is an output manipulator means does not work for input stream. The output buffer for console screen is emptied automatically, but the flush is useful in clearing file output buffer after file operations. This function does not take any arguments.
Example Program #8:
#include <cstdlib>
#include <iostream>
#include <iomanip>
using namespace std;
int main()
{

    //using Flush manipulator

    cout << "The Beautiful World of Computer Science" << endl;
    cout << "Learn Programming First" << endl;
    cout.flush();
    cout << "Output Buffer Cleared" << endl;

    system("PAUSE");
    return EXIT_SUCCESS;
}
Output:
The Beautiful World of Computer Science
Learn Programming First
Output Buffer Cleared
Setiosflags and Resetiosflags
The input and output stream has flag bits set by default. The  and
and  helps control the behavior of both streams by modifying the stream flag bits.
The will set a flag bit. Alternatively, you can use function which does the same thing.
setiosflags(long n)The will reset a flag bit, but you may use  function.
setiosflags(long n)The C++ flags are discussed in more detail in the next lesson.
C++ I/O Stream
In C language, the input and output operations are performed using built-in library functions such as printf() and scanf(). But, C++ uses a new method of standard input and output called I/O stream.
A stream is a bytes of characters from memory to display on screen or read from the keyboard to the computer memory. The C++ language uses cin to read inputs from keyboard and cout to display characters on a screen.
The I/O Stream Library
The C++ standard library is a repository for a C++ program to get the desired functions. The  stream library is stored in following header files. These header files are specific to compilers.
Turbo C++ And Borland C++ IO Stream Files


Some other compilers uses extra stream files such as:


The stream library is nothing but a hierarchy of classes and functions for each class is defined. You will learn more about class in future lessons.
 – It is the base class for input and output functions, other classes are derived from this class.
 – This class is derived from ios class for input functions.
 – This class is derived from ios class for output functions.
 – Contains standard input and output function to like
  and
and  in C programming language. The C++ uses
  and
and  objects to perform standard input and output operations ( keyboard or screen output).
 – This class contains functions for formatting the output stream. You will learn more about manipulator functions in next lesson.
C++ I/O Stream Objects
The I/O stream objects are used to perform the input and output operations. They take arguments such as objects, variables, strings, and so on. Basically, all are characters to the stream so there is no conflict with respect to data type.
In C language, every input and output operation has a format specifier –  ,
,  , without which that input or output operation will not work. This is not a requirement in C++ programming language due to iostream.
The C++ uses following objects for input and output.
- cout
- cin
- cerr
- clog
cout
The object performs the output operation with the help of extraction operator( ) to a standard output device (e.g computer screen). The syntax for is:
cout << var 1 << var 2 << ...<< var n;There are many ways to write output statement in C++.
For example,
cout << number << number 2 << number3 ;
cout << "Number =" << number ;
cout << number ;
cout << number2;
The is associated with c standard output – .
cin
The object used to read the input values with the help of insertion operator ( ) from a standard input device such as keyboard.
The syntax for is:
cin >> var 1 >> var 2 >> var n;The examples are as follows.
cin >> number;
cin >>  A >> B >> C;
The is associated with files.
cerr
It is used for reporting error and it has its  flag set which means that the error stream is flushed every time. This flush is performed to write the error into an external device quickly using stderr (standard C I/O).
clog
The clog is slower and not written to the external device quickly, unless the buffer is full. It is also associated with  files.
Summary of IO Streams
| IO stream | Meaning | Associated files |
| cout | standard output | stdout |
| cin | standard input | stdin |
| cerr | standard error reporting | stderr |
| clog | standard log | stderr |