Time Management System
In this article, you will learn about making a time management system which is developed using VB 6 and MS Access.
The system helps to do two simple task – Add new activity and View Activities based on following criteria.
- Important and Urgent
- Important and Not Urgent
- Not Important and Urgent
- Not Important and Not Urgent
The resultant view is based on the criteria selected.
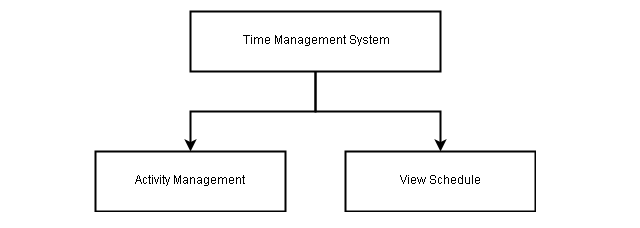
System Diagram
The system diagram for time management has only three forms and a database. The added activity requires activity id, start date, end date, title and description for each activity. Also, you need to specify the criteria for each activity mentioned above.
ER Diagram for Time Management System
The ER diagram contains the entity set and their relationship. The diagram contains a single entity – Activity.
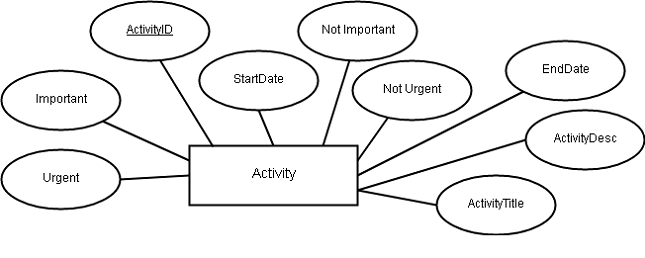
The ER model will be converted into a relational model, discussed in the next section.
Relational Model and Table
The relational model is another representation of the ER model shown above. It is used to describe a schema for a relation or table.

Using the relational model we will make a table for our project. All the information regarding activities will be stored in a single table in the time management system.
Database and Table Creation
Our database for the project is created in MS Access. If you do not have MS Access then install any version above MS Access 2000. Create a new directory and call it AccessDB and also create a 2000-2003 database file and save it as a .mdb.
Open the .mdb database and go to Design View, a Save as dialog box will ask the name of the table, type Activity. You can create field name and data type as per the following diagram.
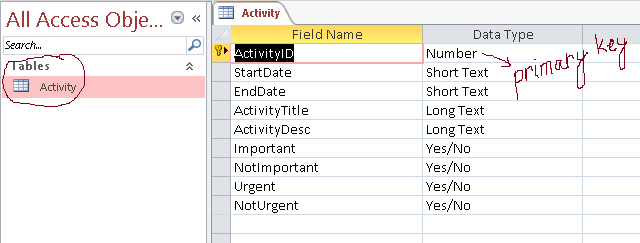
Now that the database design is complete, we must start the form design and coding in VB 6.
Form Design And Coding
The time management system has 3 forms and one module for database connectivity. In this section, we will discuss about designing the forms and coding for the controls that belong to each form.
- Time Management System (frmTimeManagement)
- Activity Management (frmActivityManagement)
- View Schedule (frmViewSchedule)
The time management system is the main screen and the entry point for the software. Activity management is where we manage activities. A user can :
- Add a new activity.
- Delete an activity.
- Modify an activity.
- View schedule based on importance and priority of the activities.
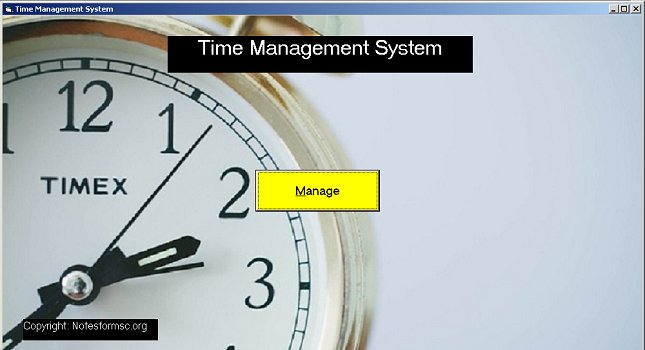
Form Time Management System
Components For Time Management
Form
Form Name: frmTimeManagement
Caption: Time Management System
Picture: Time.png (1024 x 680)
Height: 9000
Width: 15000
Label
Lable Name: lblCopyright
Caption: Copyright-Notesformsc.org
BackColor: Window Text
ForeColor: Highlight Text
Height: 595
Width: 3354
Button
Button Name: cmdManage
Caption: &Manage
Style: 1-Graphical
BackColor: Yellow (&H0000FFFF&)
Height: 1173
Width: 3098
Top: 4330
Left: 6290
Code For Time Management
Private Sub cmdManage_Click()
 frmTimeManagement.Hide
 frmActivityManagement.Show
End Sub
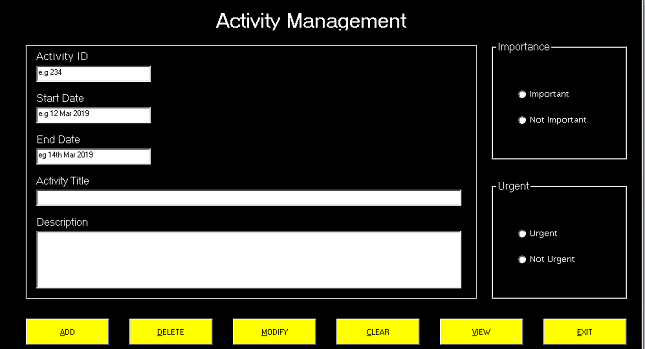
Form Activity Management
Components For Activity Management
Form
Form Name: frmActivitManagement
Caption: Activity Management
BackColor: Window Text
ForeColor: Highlight Text
Height: 9000
Width: 15000
Draw shapes and frames first and then other controls on top of it.
Shapes
Shape Name: Shape 1
BackStyle: 0-Transparent
BackColor: Window Background (&H80000005&)
BorderColor: Window Background (&H80000005&)
BorderStyle: 1-Solid
FillColor: Black (&H00000000&)
FillStyle: 1-Transparent
Height: 5895
Left: 600
Top: 1320
Shape: 0-Rectangle
Width: 10455
Frames
Frame Name: frImportance
Caption: Importance
BorderStyle: 1-Fixed Single
BackColor: Window Text
ForeColor: Highlight Text
Height: 2775
Left: 11400
Top: 1200
Width: 3135
Frame Name: frPriority
Caption: Priority
BorderStyle: 1-Fixed Single
BackColor: Window Text
ForeColor: Highlight Text
Height: 2775
Left: 11400
Top: 4440
Width: 3135
OptionButtons
Name: optImportant
Caption: Important
BackColor: Window Text
ForeColor: Highlight Text
Height: 375
Left: 600
Top: 1080
Width: 2175
Name: optNotImportant
Caption: Not Important
BackColor: Window Text
ForeColor: Highlight Text
Height: 375
Left: 600
Top: 1680
Width: 2175
Name: optUrgent
Caption: Urgent
BackColor: Window Text
ForeColor: Highlight Text
Height: 375
Left: 600
Top: 1080
Width: 2175
Name: optNotUrgent
Caption: Not Urgent
BackColor: Window Text
ForeColor: Highlight Text
Height: 375
Left: 600
Top: 1680
Width: 2175
Labels
Label Name: lblActivityManagement
Caption: Activity Management
BackColor: Window Text
ForeColor: Highlight Text
Height: 495
Left: 4200
Top: 480
Width: 6015
 Label Name: lblActivityID
Caption: ActivityID
BackColor: Window Text
ForeColor: Highlight Text
Height: 375
Left: 840
Top: 1440
Width: 1455
 Label Name: lblStartDate
Caption: Start Date
BackColor: Window Text
ForeColor: Highlight Text
Height: 375
Left: 840
Top: 2400
Width: 1695
Label Name: lblEndDate
Caption: End Date
BackColor: Window Text
ForeColor: Highlight Text
Height: 375
Left: 840
Top: 3360
Width: 1695
Label Name: lblActivityTitle
Caption: ActivityTitle
BackColor: Window Text
ForeColor: Highlight Text
Height: 375
Left: 840
Top: 4320
Width: 2295
Label Name: lblActivityDesc
Caption: Description
BackColor: Window Text
ForeColor: Highlight Text
Height: 375
Left: 840
Top: 5280
Width: 2535
Text Boxes
Name: txtActivityID
Text: 'leave empty'
Height: 375
Left: 840
Top: 1800
Width: 2655
Name: txtStartDate
Text: 'leave empty'
Height: 375
Left: 840
Top: 2760
Width: 2655
Name: txtEndDate
Text: 'leave empty'
Height: 375
Left: 840
Top: 3720
Width: 2655
Name: txtActivityTitle
Text: 'leave empty'
Height: 375
Left: 840
Top: 4680
Width: 9855
Name: txtActivityDesc
Text: 'leave empty'
Height: 1335
Left: 840
Top: 5640
Width: 9855
Buttons
Name: cmdAdd
Caption: &ADD
Style: 1-Graphical
BackColor: Yellow (&H0000FFFF&)
Height: 615
Left: 600
Top: 7680
Width: 1935
Name: cmdDelete
Caption: &DELETE
Style: 1-Graphical
BackColor: Yellow (&H0000FFFF&)
Height: 615
Left: 3000
Top: 7680
Width: 1935
Name: cmdModify
Caption: &MODIFY
Style: 1-Graphical
BackColor: Yellow (&H0000FFFF&)
Height: 615
Left: 5400
Top: 7680
Width: 1935
Name: cmdView
Caption: &VIEW
Style: 1-Graphical
BackColor: Yellow (&H0000FFFF&)
Height: 615
Left: 10200
Top: 7680
Width: 1935
Name: cmdExit
Caption: &EXIT
Style: 1-Graphical
BackColor: Yellow (&H0000FFFF&)
Height: 615
Left: 12600
Top: 7680
Width: 1935
Code For Activity Management
Private Sub cmdADD_Click()
Call loadcon
Dim Impo As Boolean
Dim NotImp As Boolean
Dim Urge As Boolean
Dim NotUrge As Boolean
If optImportant.Value = True Then
Impo = True
End If
If optImportant.Value = False Then
Impo = False
End If
If optNotImportant.Value = True Then
NotImp = True
End If
If optNotImportant.Value = False Then
NotImp = False
End If
If optUrgent.Value = True Then
Urge = True
End If
If optUrgent.Value = False Then
Urge = False
End If
If optNotUrgent.Value = True Then
NotUrge = True
End If
If optNotUrgent.Value = False Then
NotUrge = False
End If
con.Execute ("INSERT INTO Activity(" & _
" ActivityID, StartDate, EndDate, ActivityTitle, ActivityDesc, " & _
" Important, NotImportant, Urgent, NotUrgent)" & _
" VALUES (" & txtActivityID & ", " & _
" '" & txtStartDate & "', " & _
" '" & txtEndDate & "', " & _
" '" & txtActivityTitle & "'," & _
" '" & txtActivityDesc & "'," & _
" " & Impo & ", " & _
" " & NotImp & "," & _
" " & Urge & "," & _
" " & NotUrge & ")")
MsgBox ("Record Inserted")
con.Close
End Sub
Private Sub cmdClear_Click()
txtActivityID.Text = " "
txtStartDate.Text = " "
txtEndDate.Text = " "
txtActivityTitle.Text = " "
txtActivityDesc.Text = " "
optImportant.Value = False
optNotImportant.Value = False
optUrgent.Value = False
optNotUrgent.Value = False
con.Close
End Sub
Private Sub cmdDelete_Click()
Call loadcon
con.Execute ("DELETE * FROM Activity WHERE ActivityID = " & txtActivityID & " ")
MsgBox ("Task Deleted")
con.Close
End Sub
Private Sub cmdExit_Click()
Unload frmTimeManagement
Unload frmActivityManagement
Unload frmViewSchedule
End Sub
Private Sub cmdModify_Click()
Call loadcon
Dim Impo As Boolean
Dim NotImp As Boolean
Dim Urge As Boolean
Dim NotUrge As Boolean
If optImportant.Value = True Then
Impo = True
End If
If optImportant.Value = False Then
Impo = False
End If
If optNotImportant.Value = True Then
NotImp = True
End If
If optNotImportant.Value = False Then
NotImp = False
End If
If optUrgent.Value = True Then
Urge = True
End If
If optUrgent.Value = False Then
Urge = False
End If
If optNotUrgent.Value = True Then
NotUrge = True
End If
If optNotUrgent.Value = False Then
NotUrge = False
End If
con.Execute ("UPDATE Activity SET " & _
" StartDate = '" & txtStartDate & "'," & _
" EndDate = '" & txtEndDate & "'," & _
" ActivityTitle = '" & txtActivityTitle & "'," & _
" ActivityDesc = '" & txtActivityDesc & "'," & _
" Important = " & Impo & " ," & _
" NotImportant = " & NotImp & "," & _
" Urgent = " & Urge & "," & _
" NotUrgent = " & NotUrge & " WHERE ActivityID = " &
Val(txtActivityID) & "")
MsgBox ("Updated")
End Sub
Private Sub cmdView_Click()
frmActivityManagement.Hide
frmViewSchedule.Show
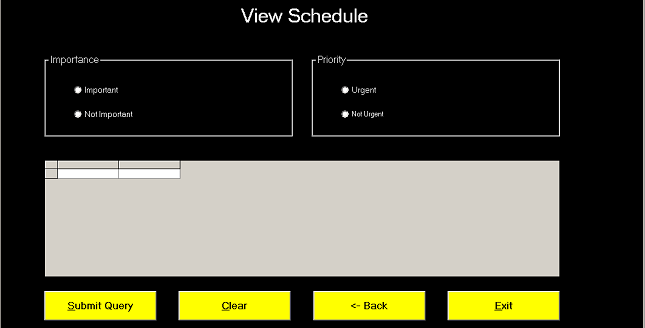
End SubForm View Schedule – Time Management System
When you click the view button in the activity management , the view schedule form is shown and activity management form is hidden.
Components For View Schedule
Form
Form Name: frmViewSchedule
Caption: View Schedule
BackColor: Window Text
ForeColor: Highlight Text
Height: 9000
Width: 15000
Label
Label Name: lblViewSchedule
Caption: View Schedule
BackColor: Window Text
ForeColor: Highlight Text
Height: 615
Left: 4080
Top: 600
Width: 6855
Always create frames first and then other controls on top of it.
Frames
Frame Name: frImp
Caption: Importance
BackColor: Window Text
BorderStyle: 1-Fixed Single
Height: 2055
Left: 1080
Top: 1800
Width: 6135
Frame Name: frPriority
Caption: Priority
BackColor: Window Text
BorderStyle: 1-Fixed Single
Height: 2055
Left: 7680
Top: 1800
Width: 6135
Option Buttons
Name: optImp
Caption: Important
BackColor: Window Text
ForeColor: Highlight Text
Height: 375
Left: 720
Top: 720
Width: 3855
Name: optNotImp
Caption: Not Important
BackColor: Window Text
ForeColor: Highlight Text
Height: 375
Left: 720
Top: 1320
Width: 3855
Name: optUrgent
Caption: Urgent
BackColor: Window Text
ForeColor: Highlight Text
Height: 375
Left: 720
Top: 720
Width: 3855
Name: optNotUrgent
Caption: Not Urgent
BackColor: Window Text
ForeColor: Highlight Text
Height: 375
Left: 720
Top: 1320
Width: 3855
Buttons
Name: cmdSubmitQuery
Caption: &Submit Query
Style: 1-Graphical
BackColor: Yellow (&H0000FFFF&)
Height: 735
Left: 1080
Top: 7680
Width: 2775
Name: cmdClear
Caption: &Clear
Style: 1-Graphical
BackColor: Yellow (&H0000FFFF&)
Height: 735
Left: 4400
Top: 7680
Width: 2775
Name: cmdBack
Caption: <-- Back
Style: 1-Graphical
BackColor: Yellow (&H0000FFFF&)
Height: 735
Left: 7720
Top: 7680
Width: 2775
Name: cmdExit
Caption: &Exit
Style: 1-Graphical
BackColor: Yellow (&H0000FFFF&)
Height: 735
Left: 11040
Top: 7680
Width: 2775
Data Grid
Name: DataGrid1
Height: 2895
Left: 1080
Top:4440
Width: 12735
Code For View Schedule
Private Sub cmdBack_Click()
    Unload Me
    frmActivityManagement.Show
 End Sub
 Private Sub cmdClear_Click(Index As Integer)
    optImp.Value = False
    optNotImp.Value = False
    optUrgent.Value = False
    optNotUrgent.Value = False
    con.Close
 End Sub
 Private Sub cmdExit_Click(Index As Integer)
    Unload Me
    Unload frmActivityManagement
    Unload frmTimeManagement
    con.Close
 End Sub
 Private Sub cmdSubmitQuery_Click(Index As Integer)
   Call loadcon
   rs.CursorLocation = adUseClient
   rs.CursorType = adOpenStatic
   If optImp.Value = False And optNotImp.Value = False And optUrgent.Value =   False And optNotUrgent.Value = False Then
   MsgBox ("Select Importance and Priority ! Try again")
    Unload Me
    frmActivityManagement.Show
 End If
 If optImp.Value = True And optUrgent.Value = True Then
   rs.Open "SELECT  * FROM Activity WHERE Important = -1 AND Urgent = -1", con, adOpenDynamic, adLockPessimistic
   Set DataGrid1.DataSource = rs
 End If
 If optNotImp.Value = True And optUrgent.Value = True Then
   rs.Open "SELECT  * FROM Activity WHERE NotImportant = -1 AND Urgent = -1 ", con, adOpenDynamic, adLockPessimistic
   Set DataGrid1.DataSource = rs
 End If
 If optNotImp.Value = True And optNotUrgent.Value = True Then
   rs.Open "SELECT  * FROM Activity WHERE NotImportant = -1 AND NotUrgent = -1", con, adOpenDynamic, adLockPessimistic
   Set DataGrid1.DataSource = rs
 End If
 If optImp.Value = True And optNotUrgent.Value = True Then
   rs.Open "SELECT  * FROM Activity WHERE Important = -1 AND NotUrgent = -1",   con, adOpenDynamic, adLockPessimistic
   Set DataGrid1.DataSource = rs
 End If
 End Sub
 Private Sub Form_Load()
   optImp.Value = False
   optNotImp.Value = False
   optUrgent.Value = False
   optNotUrgent.Value = False
 End Sub
Module For Database Connectivity
A separate module is required to establish a connection with the database. This will enable access to the database and run query on it. In our project, the database is accessDB.mdb or the name you gave to your database earlier.
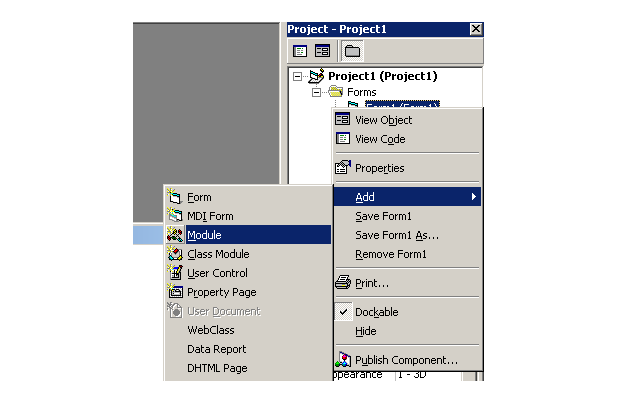
To create a module, go to Project Explorer > [right click] Modules < [mouse over] Add > [click] Module.
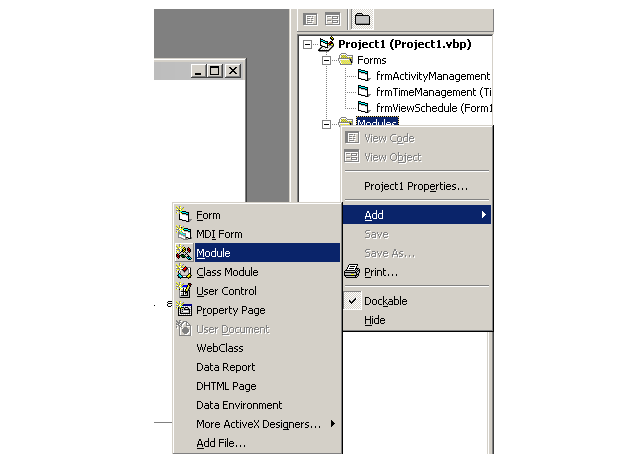
Add following code to the new module.
Public con As New ADODB.Connection
 Public rs As New ADODB.Recordset
 Public constr As String
 Public Sub loadcon()
 constr = "Provider=Microsoft.Jet.OLEDB.4.0;Data Source=C:\AccessDB\ActivityDB.mdb;Persist Security Info=False"
 con.Open constr
 End Sub
Note: The"C:\AccessDB\ActivityDB.mdb" is the path to the database location. In your case, it might be different depending on where you store the MS access database file.
Attendance Management System Using MS Access and VB 6 Part 5
Attendance Management System Using MS Access and VB 6 Part 5 – This is the final part of the attendance management project. You will learn about MDI form and creating a module for database connection in this part.
Now that we have created all our form successfully by following previous articles of this project, you must assemble them in one place. The MDI form is a special kind of form in Visual Basic 6 which display only one form at a time. Also, there is an option to create a custom menu for your project.
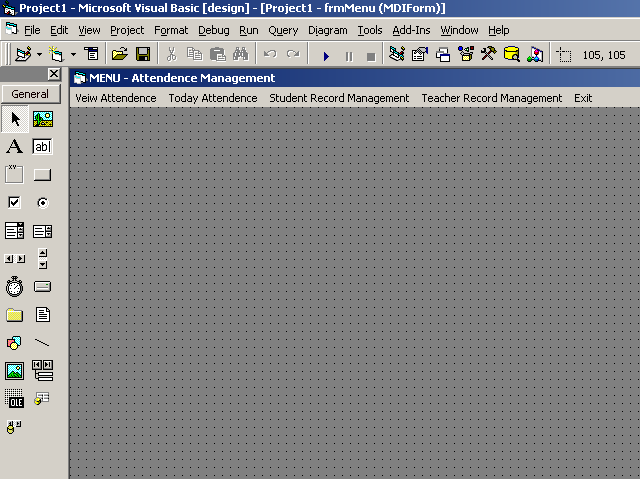
Creating MDI From For Attendance Management
The first step is to create an MDI Form from Project Explorer. Note that you cannot create more than one MDI Form.

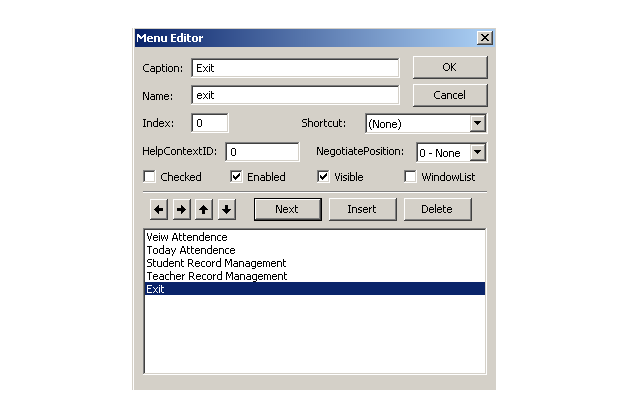
Right-click Form Name and click Add, and select MDI Form. A new form will appear similar to one shown below. In your case, the form will not have menus. In this section we will learn to create menus for Attendance Management system, moreover, each of the menus is visible to specific users, and not others depending on their privilege.
View Attendance Menu
The view attendance menu is for students. To create the menu, click the Menu Editor on the standard toolbar. Enter following details for view attendance menu.
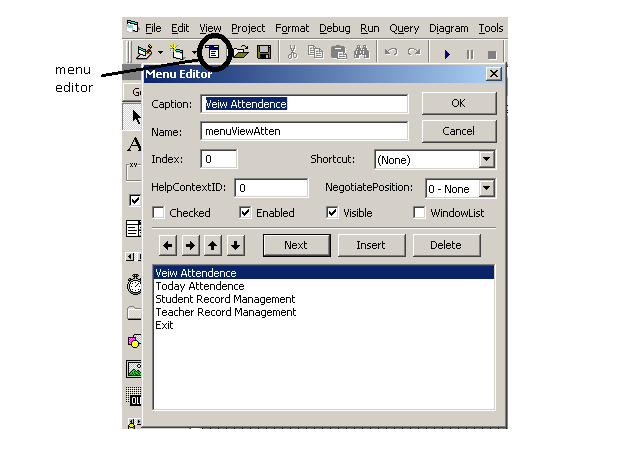
Code For ViewAttendance
Enter following code for view attendance menu.
Private Sub menuViewAtten_Click(Index As Integer)
If frmSplash.userlogin >= 900 Then
frmTodayAttendance.Hide
frmViewAttendance.Show
End If
frmStudent.Hide
frmViewAttendance.Show
frmTodayAttendance.Hide
frmTeacherRecord.Hide
End Sub
Today Attendance Menu
The today attendance menu is only for teacher to mark current attendance and it is not visible to even admin. Create another menu with following details.
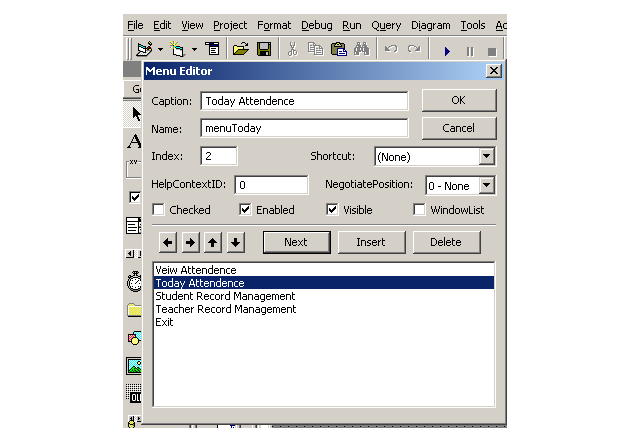
Code for Today Attendance
Add the following code to today attendance code editor.
Private Sub menuToday_Click(Index As Integer)
If frmSplash.userlogin >= 900 Then
frmTodayAttendance.Show
frmViewAttendance.Hide
End If
frmStudent.Hide
frmViewAttendance.Hide
frmTodayAttendance.Show
frmTeacherRecord.Hide
End Sub
Student Record Management Menu
The next menu – student record management is used only by admins to update, add, or delete student records. Create another menu for student record management.
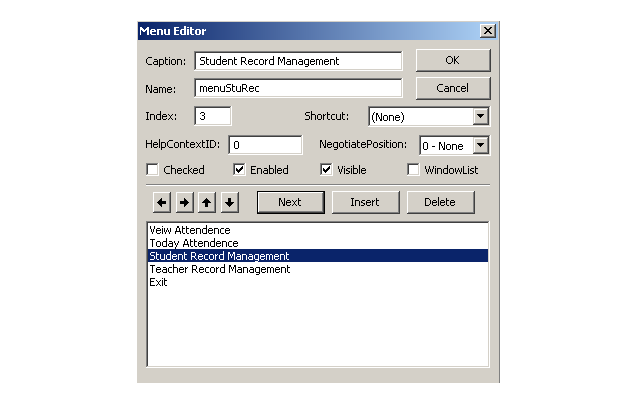
Code For Student Record Management
Private Sub menuStuRec_Click(Index As Integer)
frmStudent.Show
frmViewAttendance.Hide
frmTodayAttendance.Hide
frmTeacherRecord.Hide
End Sub
Teacher Record Management Menu
The teacher record management is the responsibility of admin, therefore, only they can view this menu. Now, create a new menu from menu editor using following details.
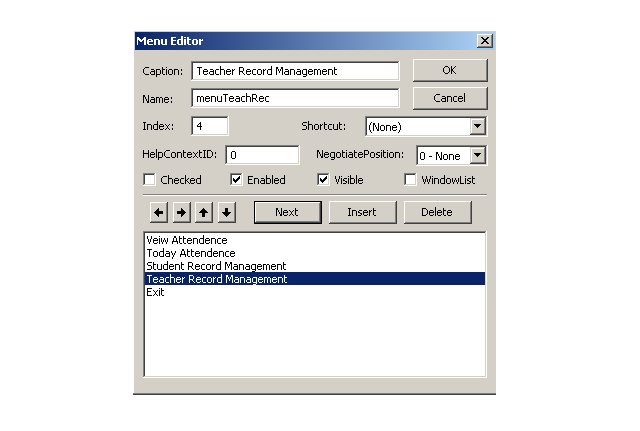
Code For Teacher Record Management
Private Sub menuTeachRec_Click(Index As Integer)
frmStudent.Hide
frmViewAttendance.Hide
frmTodayAttendance.Hide
frmTeacherRecord.Show
End Sub
Menu Exit
This menu item exit the MDI form. Create a new menu item using the following detail.
Code For Menu Exit
Private Sub exit_Click(Index As Integer)
Unload Me
End Sub
Code For MDI Form Load
Private Sub MDIForm_Load()
If frmSplash.userlogin >= 100 And frmSplash.userlogin < 900 Then
menuStuRec.Item(3).Enabled = False
menuTeachRec.Item(4).Enabled = False
menuToday.Item(2).Enabled = False
menuViewAtten.Item(0).Enabled = True
ElseIf frmSplash.userlogin >= 900 Then
menuStuRec.Item(3).Enabled = False
menuTeachRec.Item(4).Enabled = False
menuToday.Item(2).Enabled = True
menuViewAtten.Item(0).Enabled = True
Else
menuStuRec.Item(3).Enabled = True
menuTeachRec.Item(4).Enabled = True
menuToday.Item(2).Enabled = False
menuViewAtten.Item(0).Enabled = True
End If
End Sub
The form load event checks the user login id and allow only specific menu items. If a student has logged in then all other menu except view attendance is disabled. If a teacher is logged in then all record management menu will be disabled automatically.
Student Attendance Management System Using MS Access and VB 6 Part – 4
Student Attendance Management System Using MS Access and VB 6 Part 4 – In this article, we will continue to build the interface for attendance management system that will meet the user requirements.
You will build the following interfaces.
- View Attendance (frmViewAttendance)
- Today’s Attendance (frmTodayAttendance)
- Student Record Management (frmStudent)
- Teacher Record Management (frmTeacherRecord)
Let us get started.
View Attendance
The view attendance interface allows students, teachers, and admin to view attendance between specific dates, count the hours present, and display if they have the eligibility to attend the exams.
The total number of hours of class for a student is 300 hours. If the student is able to get at least 150 hour present then he or she is eligible to attend the exam. The program display how many hour to complete to qualify and number of hours present in the class.
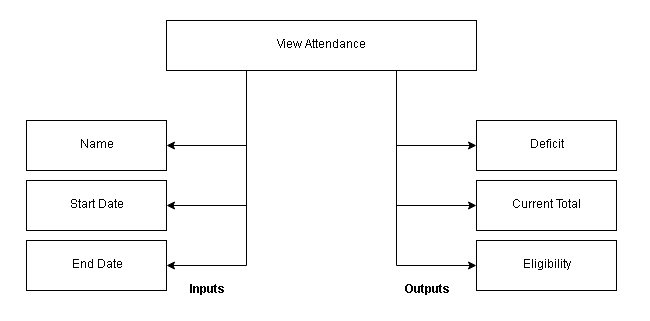
System Diagram For View Attendance
The view attendance interface requires three input values – name, start date, and end date of attendance taken. It display current total when a student was present and deficit- remaining hours to be eligible for exam. Finally, the eligibility of a student to appear in the exam as mentioned earlier.
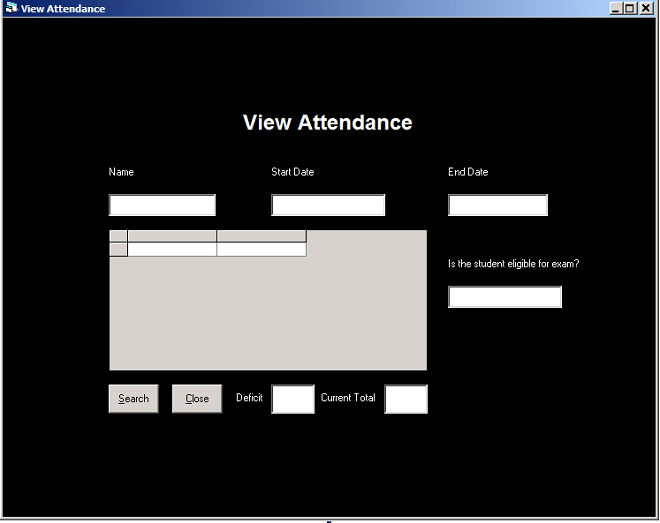
Form Design(frmViewAttendance)
The next step is to create a form called frmViewAttendance that matches with the above system diagram. You can create a form design given below. It is not necessary that your form should exactly like the following figure. You may try a different design as well.
Components for View Attendance
The components for view attendance interface are listed below.
Form Details
Name : frmViewAttendance
Caption : View Attendance
BackColor: Windows Text
Labels
Name: lblHead
Alignment : 2-Center
Caption: View Attendance
BackColor: Windows Text
ForeColor: Highlight Text
Font : Arimo 18px Bold
Name: lblName
Alignment : 0-Left Justify
Caption: Name
BackColor: Windows Text
ForeColor: Highlight Text
Name: lblStartDate
Alignment : 0-Left Justify
Caption: Start Date
BackColor: Windows Text
ForeColor: Highlight Text
Name: lblEndDate
Alignment : 0-Left Justify
Caption: End Date
BackColor: Windows Text
ForeColor: Highlight Text
Name: lblDeficit
Alignment : 0-Left Justify
Caption: Deficit
BackColor: Windows Text
ForeColor: Highlight Text
Name: lblCurrentTotal
Alignment : 0-Left Justify
Caption: Current Total
BackColor: Windows Text
ForeColor: Highlight Text
Name: lblEligible
Alignment : 0-Left Justify
Caption: Is the student eligible for exam ?
BackColor: Windows Text
ForeColor: Highlight Text
Textboxes
Name : txtSname
Text : 'none'
Name : txtSdate
Text : 'none'
Name : txtSdate
Text : 'none'
Name : txtEdate
Text: 'none'
Name : txtDeficit
Text : 'none'
Name : txtCurrent
Text : 'none'
Name : txtEligible
Text : 'none'
Buttons
Name : cmdSearch
Caption : &Search
BackColor : Button Highlight
Style : 1-Graphical
Name : cmdClose
Caption : &Close
BackColor : Button Highlight
Style : 1-Graphical
Data-grid Control
Name : DGViewAttendance
Code for View Attendance
Dim rs1 As New ADODB.Recordset
Dim total As Integer
Dim deficit As Integer
Public Sub openrecords()
rs.CursorLocation = adUseClient
rs.CursorType = adOpenStatic
rs.Open "SELECT Student.[SID],Student.[Sname],Attendance.[Adate],Attendance.[APresent] FROM Attendance,Student WHERE Student.[Sid]= Attendance.[SID] And Student.[Sname] = '" & txtSname & "' And ( Attendance.[Adate] Between  # " & Format(txtSdate.Text, "mm/dd/yyyy") & " # And  # " & Format(txtEdate.Text, "mm/dd/yyyy") & " # )", con, adOpenDynamic, adLockPessimistic
rs1.Open "SELECT Count(APresent)FROM Attendance,Student WHERE Student.[Sid]= Attendance.[SID] And Student.[Sname] = '" & txtSname & "' And ( Attendance.[Adate] Between  # " & Format(txtSdate.Text, "mm/dd/yyyy") & " # And  # " & Format(txtEdate.Text, "mm/dd/yyyy") & " # )", con, adOpenDynamic, adLockPessimistic
End Sub
Private Sub cmdCLOSE_Click()
Unload frmMenu
Unload frmViewAttendance
Unload frmTodayAttendance
rs.Close
con.Close
'closing connection
End Sub
Private Sub cmdSearch_Click()
'making connection
Call loadcon
Call openrecords
Dim Present As String
Present = "YES"
total = 300
deficit = total - rs1.Fields(0).Value
txtCurrent.Text = rs1.Fields(0).Value
txtDeficit.Text = Str(deficit)
If deficit <= 150 Then
txtEligible.Text = "ELIGIBLE FOR EXAM"
txtEligible.ForeColor = vbGreen
Else
txtEligible.Text = "NOT ELIGIBLE"
txtEligible.ForeColor = vbRed
Set DGViewAttendance.DataSource = rs
End If
End Sub
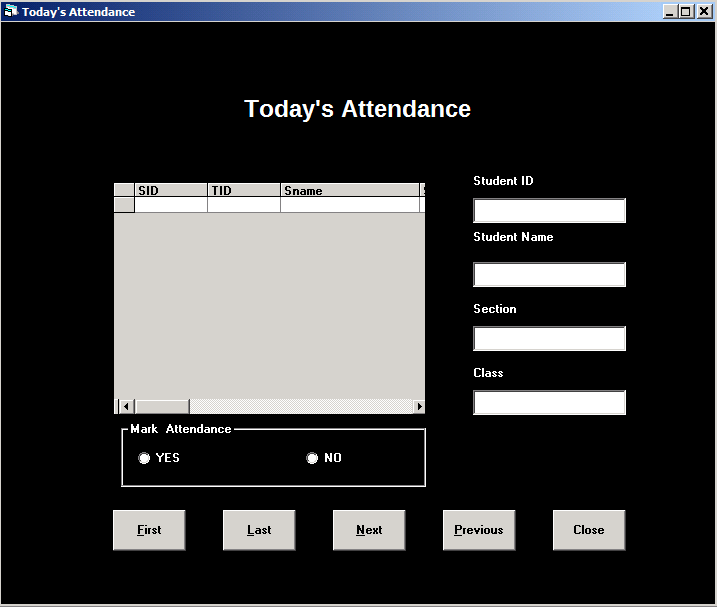
Today’s Attendance
The today’s attendance is only visible to teachers. When the teacher log into the system, his or her students are listed automatically. The teacher can browse through the student data and mark attendance.
System Diagram for Today’s Attendance
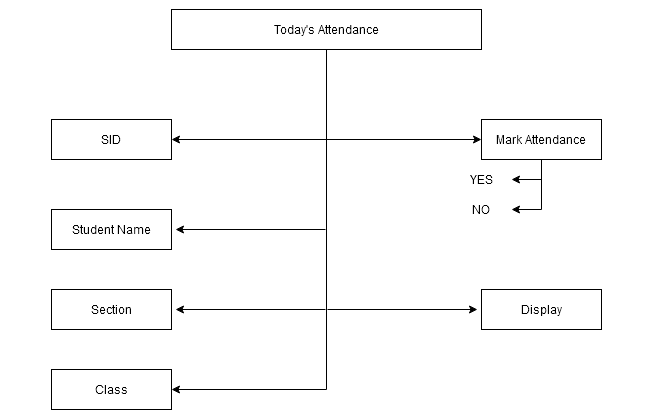
There is not input required for today’s attendance other than the teacher must log into the system with their own id. Only those who log into the system will get their student list. One teacher cannot see students of other teachers.
Form Design (frmTodayattendance)
The next step is to design a form based on the system diagram. You may come up with your own design.
Components for Today Attendance
Here is the list of components used to build the today’s attendance interface.
Form Details
Name : frmTodayAttendance
Caption: Today's Attendance
BackColor: Windows Text
Labels
Name : lblTodayMain
Caption: Today's Attendance
BackColor: Windows Text
ForeColor : Highlight Text
Font : Arimo 18px Bold
Name : lblTSid
Caption: Student ID
BackColor: Windows Text
ForeColor : Highlight Text
Name : lblTSname
Caption: Student Name
BackColor: Windows Text
ForeColor : Highlight Text
Name : lblTodaySection
Caption: Section
BackColor: Windows Text
ForeColor : Highlight Text
Name : lblTodayClass
Caption: Class
BackColor: Windows Text
ForeColor : Highlight Text
Textboxes
Name : txtTSid
Text : 'none'
Name : txtTodaySname
Text : 'none'
Name : txtTodaySection
Text : 'none'
Name : txtTodayClass
Text : 'none'
Data-Grid Control
Name : DGToday
Frame Control
The frame control is for marking attendance and it has two option buttons. Once we create frame, right click on the frame and click-“send to back“. After which you can create option button on top of it.
Name : frameMarkAttendance
Caption: Mark Attendance
BackColor :Window Text
ForeColor : Highlight Text
Option Buttons
Name : OptionYes
Caption : YES
BackColor :Window Text
ForeColor :Highlight Text
Font : MS Sans-serif 8px Bold
Name : OptionNo
Caption : NO
BackColor :Window Text
ForeColor :Highlight Text
Font : MS Sans-serif 8px Bold
Buttons
Name : cmdFirst
Caption : &First
BackColor: Button Highlight
Style : 1-Graphical
Name : cmdLast
Caption : &Last
BackColor: Button Highlight
Style : 1-Graphical
Name : cmdNext
Caption : &Next
BackColor: Button Highlight
Style : 1-Graphical
Name : cmdPrevious
Caption : &Previous
BackColor: Button Highlight
Style : 1-Graphical
Name : cmdClose
Caption : &Close
BackColor: Button Highlight
Style : 1-Graphical
Code for Today Attendance
Option Explicit
Public contoday As New ADODB.Connection
Public rstoday As New ADODB.Recordset
Public sqltodaystr As String
Public Sub CreateConnection()
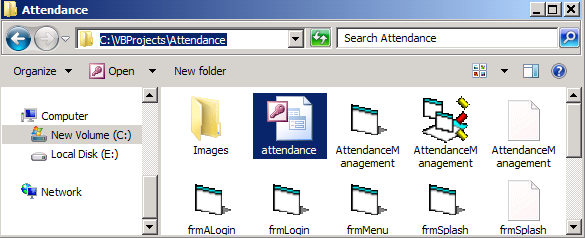
sqltodaystr = "Provider=Microsoft.Jet.OLEDB.4.0;Data Source=C:\VBProjects\Attendance\attendance.mdb;Persist Security Info=False"
contoday.Open sqltodaystr
End Sub
Public Sub OpenRecordset()
Dim tid As Integer
tid = frmSplash.userlogin
rstoday.CursorLocation = adUseClient
rstoday.CursorType = adOpenStatic
rstoday.Open "SELECT Teaches.[SID],Teaches.[TID],Student.[Sname],Student.[Section],Student.[Class] FROM Student,Teaches WHERE Teaches.[TID] = " & tid & " And Student.[Sid] = Teaches.[SID]", contoday, adOpenDynamic, adLockPessimistic
Set DGToday.DataSource = rstoday
rstoday.ActiveConnection = Nothing
End Sub
Private Sub cmdCLOSE_Click()
Unload Me
rstoday.Close
contoday.Close
End Sub
Private Sub cmdFirst_Click()
rstoday.MoveFirst
txtTSid.Text = rstoday.Fields("Sid").Value
txtTodaySname.Text = rstoday.Fields("Sname").Value
txtTodaySection.Text = rstoday.Fields("Section").Value
txtTodayClass.Text = rstoday.Fields("Class").Value
End Sub
Private Sub cmdLast_Click()
rstoday.MoveLast
txtTSid.Text = rstoday.Fields("Sid").Value
txtTodaySname.Text = rstoday.Fields("Sname").Value
txtTodaySection.Text = rstoday.Fields("Section").Value
txtTodayClass.Text = rstoday.Fields("Class").Value
End Sub
Private Sub cmdNext_Click()
rstoday.MoveNext
If rstoday.EOF = True Then
rstoday.MoveFirst
End If
txtTSid.Text = rstoday.Fields("Sid").Value
txtTodaySname.Text = rstoday.Fields("Sname").Value
txtTodaySection.Text = rstoday.Fields("Section").Value
txtTodayClass.Text = rstoday.Fields("Class").Value
End Sub
Private Sub cmdPrevious_Click()
rstoday.MovePrevious
If rstoday.BOF = True Then
rstoday.MoveLast
End If
txtTSid.Text = rstoday.Fields("Sid").Value
txtTodaySname.Text = rstoday.Fields("Sname").Value
txtTodaySection.Text = rstoday.Fields("Section").Value
txtTodayClass.Text = rstoday.Fields("Class").Value
End Sub
Private Sub Form_Load()
CreateConnection
OpenRecordset
End Sub
Private Sub OptionNo_Click()
Call loadcon
Dim Curr_date As Date
Dim Absent As String
Dim todaytid As Integer
todaytid = frmSplash.userlogin
Absent = "NO"
Curr_date = Format(Now, "mm/dd/yyyy")
con.Execute ("INSERT INTO Attendance VALUES(" & _
"#" & Curr_date & "#," & _
"" & txtTSid & "," & _
"" & todaytid & "," & _
"'" & Absent & "')")
MsgBox ("Record Added")
OptionYes.Value = False
OptionNo.Value = False
con.Close
End Sub
Private Sub OptionYes_Click()
Call loadcon
Dim Curr_date As Date
Dim Present As String
Dim todaytid As Integer
todaytid = frmSplash.userlogin
Present = "YES"
Curr_date = Format(Now, "mm/dd/yyyy")
con.Execute ("INSERT INTO Attendance VALUES(" & _
"#" & Curr_date & "#," & _
"" & txtTSid & "," & _
"" & todaytid & "," & _
"'" & Present & "')")
MsgBox ("Record Added")
OptionYes.Value = False
OptionNo.Value = False
con.Close
End Sub
Student Record Management
The student record management is the job of admin staff. The admin can add new students, update student records, and delete the student information from the database.
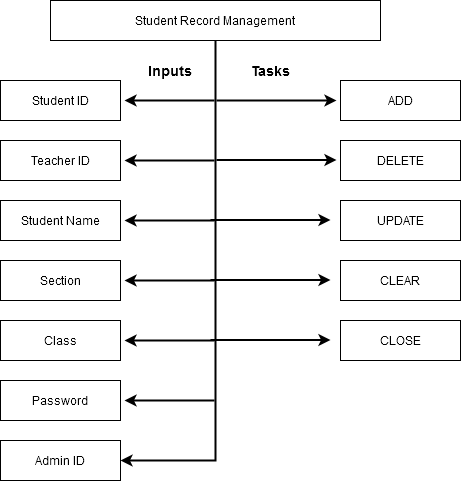
System Diagram for Student Record Management
The system diagram for student record management has two parts – inputs and tasks. The inputs for the system is student details, and once the input is received, the admin can perform one of the following tasks.
- ADD
- UPDATE
- DELETE
- CLEAR
- CLOSE
Here is the system diagram.
Form Design (frmStudent)
The next step is to use the system diagram as a guide and design the following form.
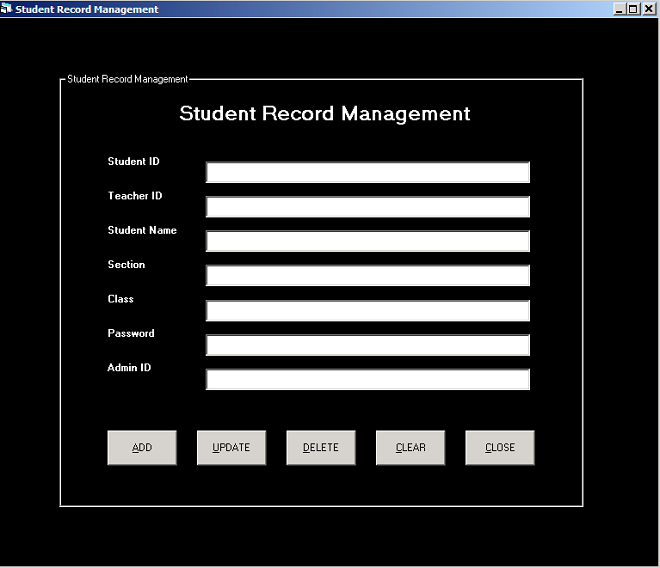
In the next section, we will discuss each component of the form in detail.
Component for Student Record Management
Here are the components for student management form.
Form Details
Name : frmStudent
Caption : Student Record Management
BackColor : Window Text
Now we need a frame control to organize our other controls. First create a frame and then right click and select “Send to Back”. Start creating other controls such as labels, textboxes and button on top of it. If you do not want a frame skip this step and continue with rest of the controls.
Frame Control
Name : frameStudentRecord
Caption : Student Record Management
BackColor : Window Text
ForeColor : Highlight Text
Labels
Name : lblStudentMain
Caption : Student Record Management
BackColor : Window Text
ForeColor : Highlight Text
Font : Arimo 18px Bold
Name : lblSSID
Caption : Student ID
BackColor : Window Text
ForeColor : Highlight Text
Font : Arimo 8px Bold
Name : lblSTID
Caption : Teacher ID
BackColor : Window Text
ForeColor : Highlight Text
Font : Arimo 8px Bold
Name : lblSSname
Caption : Student Name
BackColor : Window Text
ForeColor : Highlight Text
Font : Arimo 8px Bold
Name : lblSection
Caption : Section
BackColor : Window Text
ForeColor : Highlight Text
Font : Arimo 8px Bold
Name : lblClass
Caption : Class
BackColor : Window Text
ForeColor : Highlight Text
Font : Arimo 8px Bold
Name : lblPassword
Caption : Password
BackColor : Window Text
ForeColor : Highlight Text
Font : Arimo 8px Bold
Name : lblAID
Caption : Admin ID
BackColor : Window Text
ForeColor : Highlight Text
Font : Arimo 8px Bold
Textboxes
Name :txtSID
Text :'none'
Name :txtSTID
Text :'none'
Name :txtSname
Text :'none'
Name :txtSection
Text :'none'
Name :txtClass
Text :'none'
Name :txtSpass
Text :'none'
Name :txtAID
Text :'none'
Buttons
Name : cmdADD
Caption : &ADD
BackColor : Button Highlight
Style : 1-Graphical
Name : cmdUpdate
Caption : &UPDATE
BackColor : Button Highlight
Style : 1-Graphical
Name : cmdDelete
Caption : &DELETE
BackColor : Button Highlight
Style : 1-Graphical
Name : cmdClear
Caption : &CLEAR
BackColor : Button Highlight
Style : 1-Graphical
Name : cmdClose
Caption : &CLOSE
BackColor : Button Highlight
Style : 1-Graphical
Code for Student Management System
Option Explicit
Private Sub cmdADD_Click()
Call loadcon
con.Execute ("INSERT INTO Student VALUES(" & txtSID & ",'" & txtSname & " ','" & txtSection & " ' ,'" & txtClass & " ' ,' " & txtSpass & " ', " & txtAID & " );")
con.Execute ("INSERT INTO Teaches VALUES (" & txtSID & "," & txtSTid & ");")


    MsgBox ("Record Added")
    con.Close

End Sub
Private Sub cmdCLEAR_Click()
txtSname = " "
txtSID = " "
txtSTid = " "
txtSection = " "
txtClass = " "
txtSpass = ""
txtAID = " "
End Sub
Private Sub cmdCLOSE_Click()
Unload frmStudent
Unload frmTeacherRecord
End Sub
Private Sub cmdDelete_Click()
Call loadcon
con.Execute "DELETE * FROM Attendance WHERE SID = " & txtSID & ""
con.Execute "DELETE * FROM Teaches WHERE SID = " & txtSID & ""
con.Execute "DELETE * FROM Student WHERE Sid = " & txtSID & ""
MsgBox ("Record Deleted!")
con.Close
End Sub
Private Sub cmdUPDATE_Click()
Call loadcon
con.Execute "UPDATE Student SET Student.[Sname] = '" & txtSname & "', Student.[Section] = '" & txtSection & "',Student.[Class], Student.[Password] = '" & txtSpass & "' WHERE SID = " & txtSID & "; "
MsgBox ("Record Updated ")
End Sub
Private Sub txtSID_GotFocus()
txtSTid.Enabled = False
txtAID.Enabled = False
End Sub
Private Sub txtSname_GotFocus()
txtSTid.Enabled = False
txtAID.Enabled = False
End Sub
Teacher Record Management
The teacher record management is similar to student management. To maintain the records of old and new teaching staff is the job of administrators.
System Diagram for Teacher Record Management
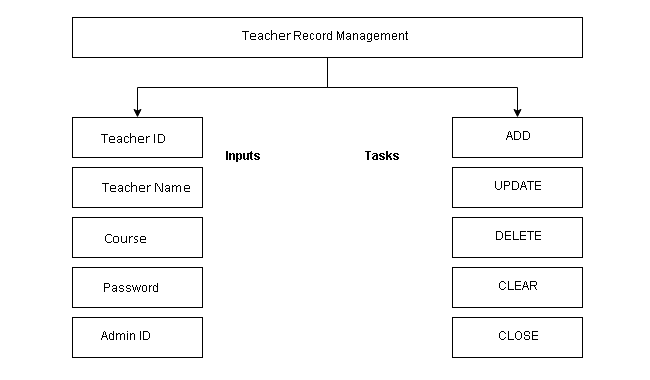
Form Design (frmTeacherRecord)
The next step is to design a form similar to given below.
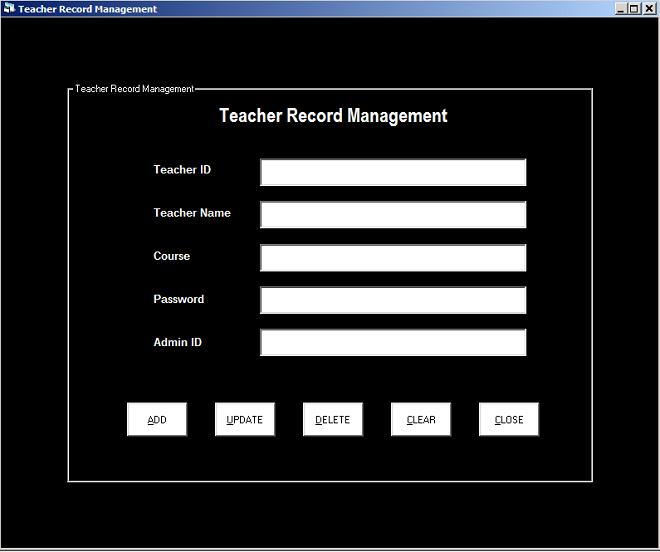
In the section below, we will discuss the components used in the interface – Teacher Record Management.
Components for Teacher Record Management
Here is the list of components for above interface.
Form Details
Name : frmTeacherRecord
Caption : Teacher Record Management
BackColor : Window Text
Frame Control
You can organize the form using the frame control. First create the control and then right click and ‘Send-to-back’. After that you can simply add other controls on top of the frame.
Name : frameTeacher
Caption : Teacher Record Management
BackColor : Window Text
ForeColor : Highlight Text
Labels
Name : lblTeacherMain
Alignment : 2-Center
Caption : Teacher Record Management
BackColor : Window Text
ForeColor : Highlight Text
Font : Arimo 18px Bold
Name : lblTID
Alignment : 0-Left Justify
Caption : Teacher ID
BackColor : Window Text
ForeColor : Highlight Text
Font : Arimo 10px Bold
Name : lblTNAME
Alignment : 0-Left Justify
Caption : Teacher Name
BackColor : Window Text
ForeColor : Highlight Text
Font : Arimo 10px Bold
Name : lblCOURSE
Alignment : 0-Left Justify
Caption : Course
BackColor : Window Text
ForeColor : Highlight Text
Font : Arimo 10px Bold
Name : lblPASS
Alignment : 0-Left Justify
Caption : Password
BackColor : Window Text
ForeColor : Highlight Text
Font : Arimo 10px Bold
Name : lblAID
Alignment : 0-Left Justify
Caption : Admin ID
BackColor : Window Text
ForeColor : Highlight Text
Font : Arimo 10px Bold
Textboxes
Name :txtTID
Text : 'none'
Name :txtTNAME
Text : 'none'
Name :txtCOURSE
Text : 'none'
Name :txtTpass
Text : 'none'
Name :txtAID
Text : 'none'
Buttons
Name : cmdADD
Caption :&ADD
BackColor : Window Text
Style : 1-Graphical
Name : cmdUpdae
Caption :&UPDATE
BackColor : Window Text
Style : 1-Graphical
Name : cmdDELETE
Caption :&DELETE
BackColor : Window Text
Style : 1-Graphical
Name : cmdCLR
Caption :&CLEAR
BackColor : Window Text
Style : 1-Graphical
Name : cmdCLOSE
Caption :&CLOSE
BackColor : Window Text
Style : 1-Graphical
Code for Teacher Record Management
Private Sub cmdADD_Click()
Call loadcon
con.Execute ("INSERT INTO Teacher VALUES(" & txtTID & ",'" & txtTNAME & " ','" & txtCOURSE & " ' ,' " & txtTpass & " ', " & txtAID & " );")
    MsgBox ("Record Added")
End Sub
Private Sub cmdCLOSE_Click()
Unload frmTeacherRecord
Unload frmStudent
End Sub
Private Sub cmdCLR_Click()
txtTID.Text = ""
txtTNAME.Text = ""
txtCOURSE.Text = ""
txtTpass.Text = ""
txtAID.Text = ""
End Sub
Private Sub cmdDelete_Click()
Call loadcon
con.Execute ("DELETE * FROM Attendance WHERE TID = " & txtTID & " ")
con.Execute ("DELETE * FROM Teaches WHERE TID = " & txtTID & " ")
con.Execute ("DELETE * FROM Teacher WHERE Tid = " & txtTID & " ")
MsgBox ("Record Deleted!")
con.Close
End Sub
Private Sub cmdUPDATE_Click()
Call loadcon
con.Execute "UPDATE Teacher SET Teacher.Tname = '" & txtTNAME & "', Teacher.Course = '" & txtCOURSE & "', Teacher.Password = '" & txtTpass & "' WHERE Tid = " & txtTID & "; "
MsgBox ("Record Updated ")
con.Close
End Sub
In the next part, you will learn to put all the above forms in one place called MDI form. The MDI form integrates your VB project forms together.
Student Attendance Management System Using VB 6 Part – 3
In Student Attendance Management System Using VB 6 Part 3, we will learn to create an interface for the attendance system that will meet the user requirements.
Here is the list of interfaces that we need to create.
- Login for Student (frmLogin)
- Login for Teacher (frmTLogin)
- Login for Admin (frmALogin)
- Main Screen (frmSplash)
- View Attendance (frmViewAttendance)
- Today’s Attendance (frmTodayAttendance)
- Student Record Management (frmStudent)
- Teacher Record Management (frmTeacherRecord)

For each of the above interfaces which also the VB form we will list out the following things.
- System Diagram
- Form Design
- Components and its properties
- Visual basic code
The system design is a high-level overview of individual components which show how each component of interface is related.
Connect To MS Access Database
Before we do anything we must first establish connection with MS Access database that we created earlier. If you did not create a database go to attendance management part-2 and create a database first.
To connect to database we will create a VB 6 module. Modules in VB are files that contain source codes. You can use them throughout your project without repeating them on each form. We must create a single module to connect with ms access database automatically.
To create a module, go to project explorer, right-click Form, select Add, and click Module.
Code For Module.bas
Now we must add code so that our VB project can programmatically connect to the MS Access database.
Public con As New ADODB.Connection
Public rs As New ADODB.Recordset
Dim rsgrid As New ADODB.Recordset
Public constr As String
Public Sub loadcon()
constr = "Provider=Microsoft.Jet.OLEDB.4.0;Data Source=C:\VBProjects\Attendance\attendance.mdb;Persist Security Info=False"
con.Open constr
MsgBox ("connected")
End Sub
The function loadcon() is called whenever database connectivity is required. All connections must be closed as soon as form unloads
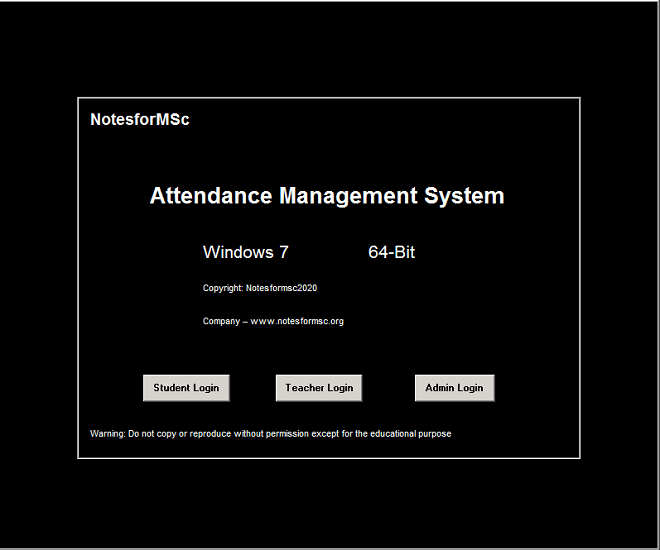
Main Screen
The main screen is the first screen that a user is going to see. This section discusses the design of the Student Attendance Management System Using VB 6 Part 3 main splash screen.
System Diagram for Main Screen
Form Design (frmSpalsh)
The splash screen is a special screen. You can add a splash screen from Standard Toolbar > Form > under Add Form, select Add a Splash and modify the form according to your project.
Components for Main Screen
The splash screen comes with pre-configured labels. You need to modify them and add some new controls in this project. Here are the list of components.
Form Details
Name : frmSplash
Caption : Attendance Management System
BackColor : Window Text
ForeColor : Highlight Text
Frame Control
Now you need to add a frame control and right click and click “send to back”. Existing controls are not visible;therefore, delete them and create identical labels on top of frame control. If you wish, skip frame control and continue creating rest of the controls.
Name : frameMain
Caption : 'leave empty'
BackColor : Window Text
Labels
Name : lblCompanyProduct
Caption : NotesforMSc
BackColor : Window Text
ForeColor : Highlight Text
Font : Arimo 14px Bold
Name : lblProductName
Caption : Attendance Management System
BackColor : Window Text
ForeColor : Highlight Text
Font : Arimo 20px Bold
Name : lblPlatform
Caption : Windows 7
BackColor : Window Text
ForeColor : Highlight Text
Font : Arimo 16px Regular
Name : lblPlatform
Caption : 64-Bit
BackColor : Window Text
ForeColor : Highlight Text
Font : Arimo 16px Regular
Name : lblCopyright
Caption : Copyright:Notesformsc2020
BackColor : Window Text
ForeColor : Highlight Text
Font : Arimo 8px Regular
Name : lblCompany
Caption : Company-www.Notesformsc.org
BackColor : Window Text
ForeColor : Highlight Text
Font : Arimo 8px Regular
Name : lblWarning
Caption : Warning: Do not copy or reproduce without permission except for the educational purpose
BackColor : Window Text
ForeColor : Highlight Text
Font : Arimo 8px Regular
Buttons
Name : cmdStu
Caption : Student Login
BackColor : Button Highlight
Style : 1-Graphical
Name : cmdTeach
Caption : Teacher Login
BackColor : Button Highlight
Style : 1-Graphical
Name : cmdAdmin
Caption : Admin Login
BackColor : Button Highlight
Style : 1-Graphical
Code For Main Screen
Option Explicit
Public userlogin As Integer
Private Sub cmdAdmin_Click()
frmALogin.Show
End Sub
Private Sub cmdStu_Click()
frmLogin.Show
End Sub
Private Sub cmdTeach_Click()
frmTULogin.Show
End Sub
Private Sub Form_KeyPress(KeyAscii As Integer)
    Unload Me

End Sub
Private Sub Form_Load()
    lblVersion.Caption = "Version " & App.Major & "." & App.Minor & "." & App.Revision
    lblProductName.Caption = App.Title

End Sub
Private Sub Frame1_Click()
    Unload Me
End Sub
Note that above code may give error because login forms are not created yet. Continue to create login forms.
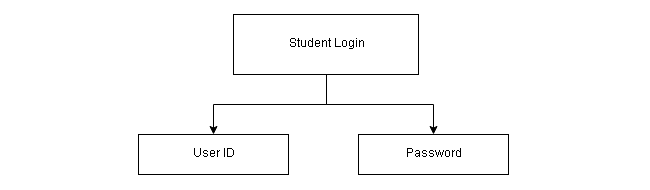
Student Login
System Diagram For Student Login
The student login has two inputs – user id and password.
The easiest way to create a login form is to click Standard toolbar on VB project editor and click Form > select Log in Dialog from Add Form Window. The login in dialog comes with a preexisting code which you can modify later. In this example project, we have used the login dialog.
Form Design(frmLogin)
The second option is to create a new form and design the login screen yourself. Later , you can modify the appearance for the form.

Components for Student Login
The components for student login is listed below.
Form Details
Name : frmLogin
Caption :Login
BackColor : Window Text
ForeColor : Highlight Text
Labels
Name : lblUserID
Caption : SID
BackColor : Window Text
ForeColor : Highlight Text
Name : lblPassword
Caption : Password
BackColor : Window Text
ForeColor : Highlight Text
Textboxes
Name : txtSID
Text : 'leave blank'
Name : txtPassword
Text : 'leave blank'
All other properties remain same.
Code for Student Login
Option Explicit
Public LoginSucceeded As Boolean
Private Sub cmdCancel_Click()
 'set the global var to false ' to denote a failed login
 LoginSucceeded = False
 Me.Hide
 End Sub
 Private Sub cmdOK_Click()

 'making connection

 Call loadcon

rs.Open "SELECT * FROM Student ", con, adOpenDynamic, adLockReadOnly
While Not rs.EOF
 If rs!SID = Val(txtSID) Then
 'check for correct password
 If rs!Password = txtPassword Then
 frmSplash.userlogin = rs!SID
  'place code to here to pass the 'success to the calling sub 'setting a global var is the easiest LoginSucceeded = True
 frmMenu.Show
 Unload Me
  'closing connection and recordset
  rs.Close
  con.Close

 Exit Sub
 Else
 MsgBox "Invalid Password, try again!", , "Login"
 txtPassword.SetFocus
 SendKeys "{Home}+{End}"
 End If
 End If
 rs.MoveNext
 Wend
End Sub
 Private Sub Form_Load()
 frmSplash.Hide
 End Sub
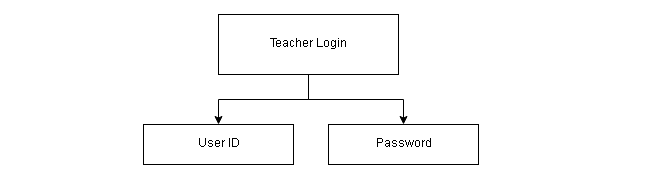
Teacher Login
System Diagram for Teacher Login
Form Design(frmTLogin)
You can create a form from the Standard Toolbar > Form > Log in Dialog and modify the form and its code. The second option is to create a new form and write login code which is difficult/
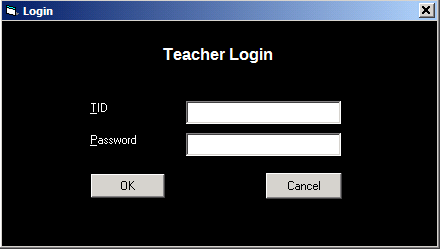
Components for Teacher Login
The components for teacher login is listed below. These are controls used in the form design according to the system diagram.
Form Details
Name : frmTULogin
Caption : Login
BackColor : Window Text
Labels
Name : lblTeacherLogin
Alignment : Center
Caption : TeacherLogin
BackColor : Window Text
ForeColor : Hightlight Text
Font : Arimo 12px Bold
Name : lblTID
Caption : TID
BackColor : Window Text
ForeColor : Hightlight Text
Name : lblTPassword
Caption : Password
BackColor : Window Text
ForeColor : Hightlight Text
Textboxes
Name : txtTID
Text : 'leave blank'
Name : txtPassword
Text : 'leave blank'
All other properties and controls stay the same. Note that the ‘leave blank‘ means you must remove any text already there.
Code for Teacher Login
The code for teacher login is created by modifying the preexisting code of “login dialog” form.
Option Explicit
Public LoginSucceeded As Boolean
Private Sub cmdCancel_Click()
'set the global var to false ' to denote a failed login
LoginSucceeded = False
Me.Hide
End Sub
Private Sub cmdOK_Click()
'making connection
Call loadcon
rs.Open "SELECT * FROM Teacher ", con, adOpenDynamic, adLockReadOnly
While Not rs.EOF
If rs!tid = Val(txtTID) Then
'check for correct password
If rs!Password = txtPassword Then
frmSplash.userlogin = rs!tid
'place code to here to pass the 'success to the calling sub 'setting a global var is the easiest LoginSucceeded = True
frmMenu.Show
Unload Me
'closing connection and recordset
rs.Close
con.Close
Exit Sub
Else
MsgBox "Invalid Password, try again!", , "Login"
txtPassword.SetFocus
SendKeys "{Home}+{End}"
End If
End If
rs.MoveNext
Wend
End Sub
Private Sub Form_Load()
frmSplash.Hide
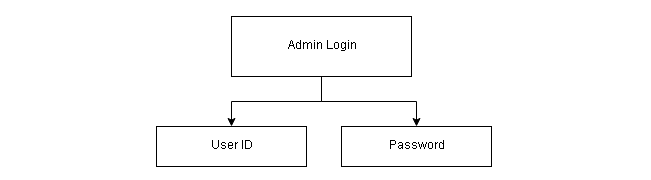
End SubAdministrator Login
System Diagram for Admin Login
The admin is the user with highest privileges, but the login behavior of administrator staff is the same as everyone.
Form Design (frmALogin)
Create the login form in the same way that you did for student and teacher. See section above.

Component for Admin Login
The list of components for admin login is given below.
Form Details
Name : frmALogin
Caption : Login
BackColor : Window Text
Labels
Name : lblAdminLogin
Caption : Admin Login
BackColor : Window Text
ForeColor : Highlight Text
Font : Arimo 12px Bold
Name : lblAID
Caption : AID
BackColor : Window Text
ForeColor : Highlight Text
Name : lblAPassword
Caption : Password
BackColor : Window Text
ForeColor : Highlight Text
TextBoxes
Name :txtAID
Text : 'leave blank'
Name :txtPassword
Text : 'leave blank'
Code for Admin Login
Option Explicit
Public LoginSucceeded As Boolean
Private Sub cmdCancel_Click()
 'set the global var to false ' to denote a failed login
 LoginSucceeded = False
 Me.Hide
 End Sub
 Private Sub cmdOK_Click()

 'making connection
   Call loadcon
  rs.Open "SELECT * FROM Admin ", con, adOpenDynamic, adLockReadOnly
While Not rs.EOF
 If rs!AID = Val(txtAID) Then
 'check for correct password
 If rs!Password = txtPassword Then
 frmSplash.userlogin = rs!AID
 'place code to here to pass the 'success to the calling sub 'setting a global var is the easiest LoginSucceeded = True
 frmMenu.Show
 Unload Me
  'closing connection and recordset
  rs.Close
  con.Close

 Exit Sub
 Else
 MsgBox "Invalid Password, try again!", , "Login"
 txtPassword.SetFocus
 SendKeys "{Home}+{End}"
 End If
 End If
 rs.MoveNext
 Wend
End Sub
 Private Sub Form_Load()
 frmSplash.Hide
 End Sub
In the next part we will continue building the interface for the attendance management system.
Student Attendance Management System Using VB 6 Part – 1
This is a 5 part series where we will learn to build Student Attendance Management System Using VB 6 using ms access as the back-end database and visual basic 6.0 as a front end.
Part 2: Attendance Management System: Database Creation
This series goes through following stages and each of the stages is explained in a separate article in details.
- Requirement Analysis
- Database design, creating relations and relationships
- Interface design and Coding
- MDI form and Modules
- Testing and Project completion
Before you start the project make sure that you have visual basic 6 installed and working. You also require MS Access any version above 2003-2007.
If you have a higher version of MS Access, then save your files in MS Access 2003-2007 format (.mdb).
Let us start building the application.
Requirement Analysis
The first thing before making any application is to understand the customer requirement and its called a requirement analysis. The end product is a document called SRS, but for this document, we will not create any such document.
This part will only analyze the customer requirement in details and project constraints that will affect the application to built.
In this case,
” The client is a college that wants an attendance management system. The customer wants the separate login for students, teachers, and admin staff. The student must be able to view only their own and other student attendance. The must be able to check attendance between certain date ranges (say semester) and find out how much is the deficit, current total and eligibility to sit in the exam.
The teachers can mark daily attendance for themselves and for other teachers if they are replacing them. They should be able to view attendance for their students as well.
The admin staff has full privilege they can view attendance, manage student records and teacher records but cannot mark attendance.”
You read the verbatim and make a note of all the important points that may be necessary for the project.
There are three kinds of users in this system – student, teacher and admin staff. So we now list out all the requirements of each user.
Student
- Need separate login
- View attendance
- View friend’s attendance
Teacher
- Need separate login
- View attendance for a student
- Mark attendance only for teacher that has logged in.
Admin Staff
- Need separate login
- View attendance
- Manage student database
- Manage the teacher database
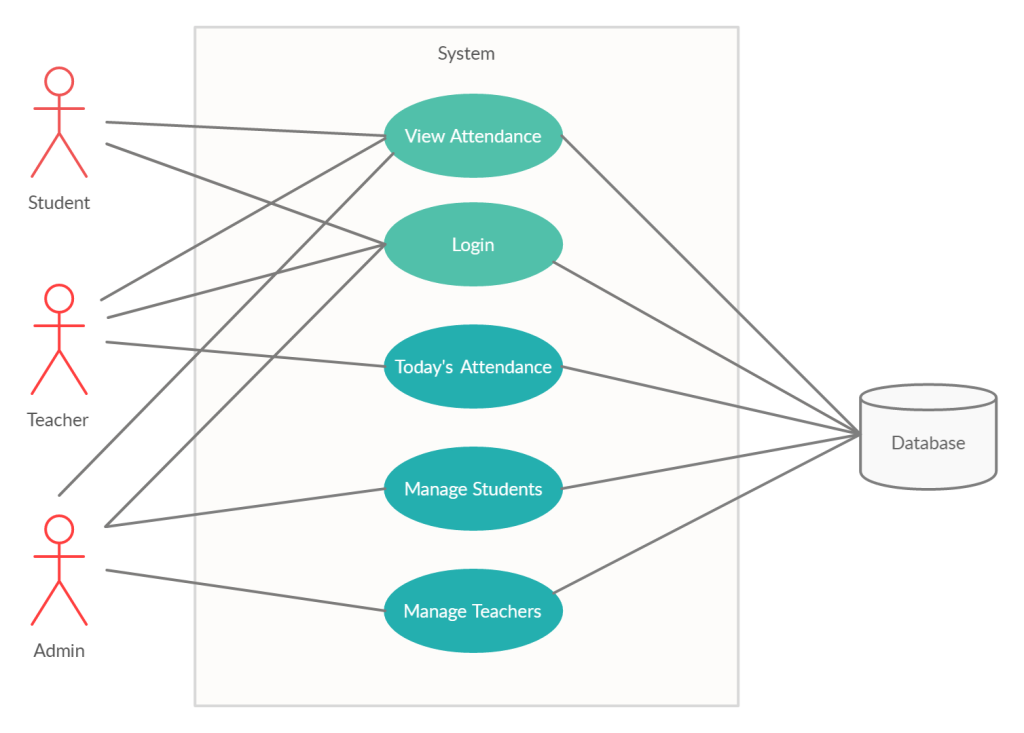
Based on the requirement analysis, we can create a high-level diagram for the attendance management system and identify how the user will use the system. This is called a use-case diagram.
Use-Case Diagram
The use-case diagram identifies the goal of the system in meeting user requirements. In this section, we will create a use-case diagram for the attendance management system.
The first step is to identify the actors. An actor is a user with a specific role. Earlier we identified 3 actors.
- Student
- Teacher
- Admin (short for administrator)
Based on the requirement analysis we could identify primary tasks of the system.
- Login
- View Attendance
- Mark Today Attendance
- Manage Student Records
- Manage Teacher Records
Let’s make the use-case diagram for the attendance management system.
Now that we have a clear picture of what the system must do to meet the user requirements. We have to look at the attendance management system in more detail.
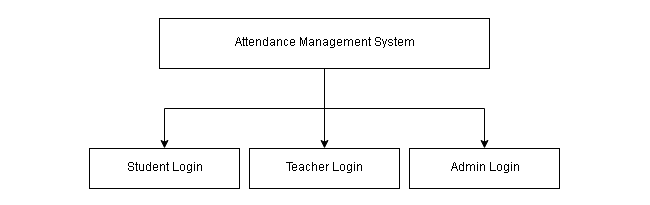
System Diagram for Attendance Management
One way to show the details of the system is through a system diagram that provides a high-level view of the system. The system diagram shows the parts of the system that interact with each other.
We wish to create a system diagram that shows the hierarchical relationship between the components of the system.
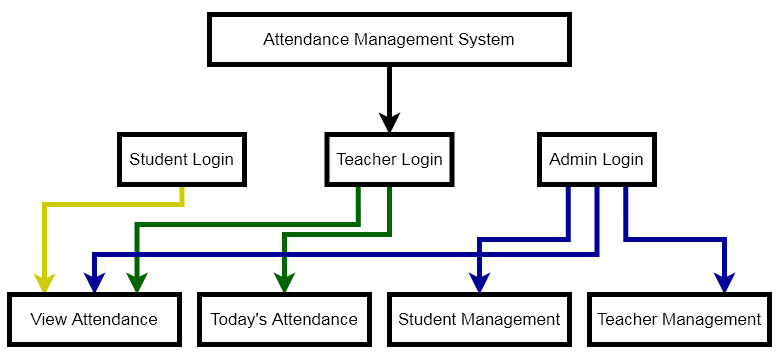
In future articles, we will discuss the system diagram for each of the components and see how they help in building interfaces for our project.
Attendance Management Using MS Access and VB 6 Part – 2
In the previous article, you learned about the client requirements about the attendance management system.Now You will create a database for the attendance management.
Visit following links to learn about the other parts of the attendance management system.
Part 1: Attendance management system: requirement analysis
This section is available in the premium PDF version.
In this article, we will design the database for attendance management system which is required to store student information, teacher information, admin information, attendance details including passwords for login.
ER Diagram for Attendance Management
Every database design starts with identifying the entity set and the relationship between those entity sets. We already found following entity for the database.
- Student
- Teacher
- Admin
The entity sets have a relationship with each other such as:
- a teacher teaches many students
- a student has many teachers
- teacher manage attendance for students
- admin manages students
- admin manages teachers
Based on the above information we can draw an er diagram for the system.
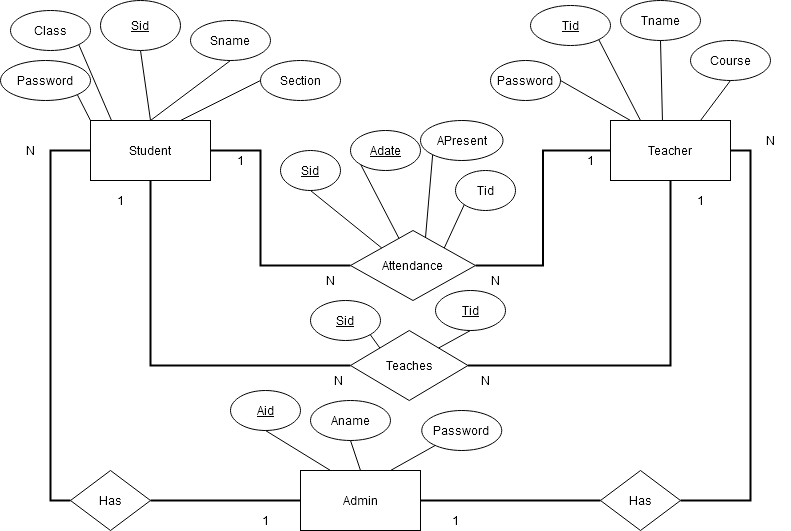
The ER diagram provides us with basic entity-relationship. It is not detailed because it does not show how to represent a relationship between entity sets while creating relations or tables.
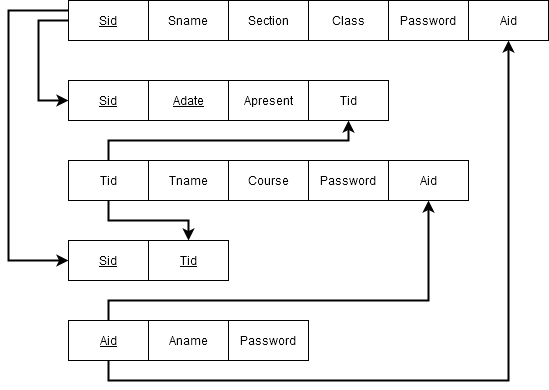
Relational Model of Attendance Management System
Before you can create tables for the application, you must create another model that represents all possible relations within the database. It is basically, a practice of converting the ER model into a relational model.
All entities, relationship with attributes becomes tables and all attributes are fields of the table. The attributes with an underline are the primary key for that table.
Relations and Relationships
This project uses Microsoft Access as the back-end database. You must save your database files in access 2003-2007 (.mdb) format;therefore, create a new database file in the following location. See image below.
The visual basic 6 application can conveniently connect to the database and fetch all necessary records.
Let’s create all relations for the project.
Admin table
Open MS Access in Design view, create a new table with following fields and data types. Set the AID as the primary key for the table by clicking on the key icon on the toolbar.

Note that the AID is not an autonumber if you are using autonumber then code to retrieve the records with change.
Student Table
Now you have to create a student table in Design view again. The student table has Sid as the primary key.
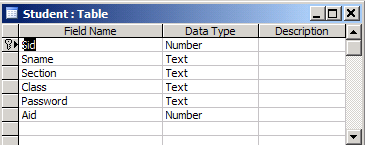
Sid is not an autonumber, selecting autonumber for data type will change the code to retrieve the data.
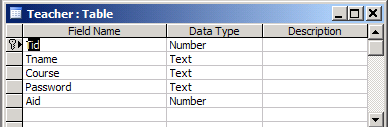
Teacher Table
Create a table for Teacher staff and set the Tid as the primary key. So far all tables have single field as primary key so it should not be difficult to create tables.
Attendance Table
Create the Attendance table which has 2 attributes working as the primary key. Therefore, select both SID and Adate and set as primary.

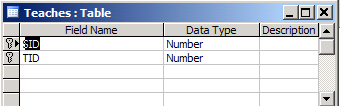
Teaches Table
Create a table for Teachers relationship based on the relational model and set SID and TID as the primary key for the table.
Creating Relationships between Tables
You can create relationships among table in ms access using the relationship tool under Database Tools tab. Add the tables for which you want to define relationships and create a relationship between specific fields.
You can also choose the type of relationship such as:
- one-to-one
- one-to-many
- many-to-many
Create a relationship for attendance management system that matches the following figure. Before you join tables make sure that the TABLES ARE POPULATED WITH DATA, otherwise, you will get errors.
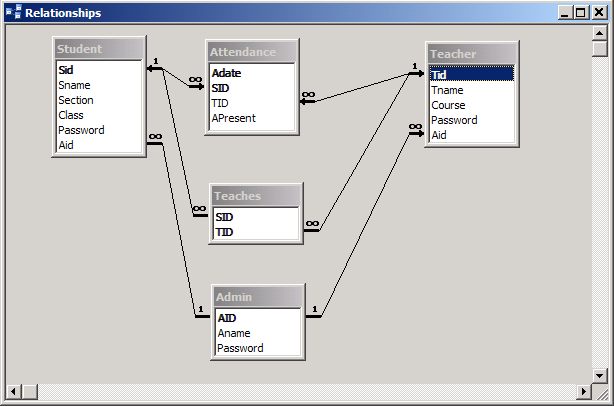
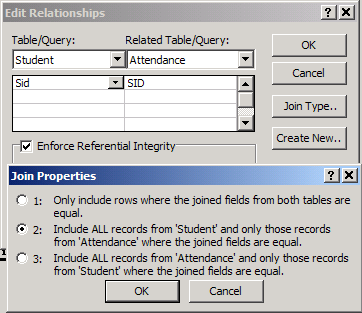
There are many types of relationships available in MS Access. But, for this project use following settings for relationships or JOINs between all tables.
Student to Other Tables

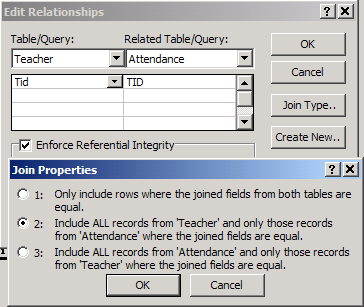
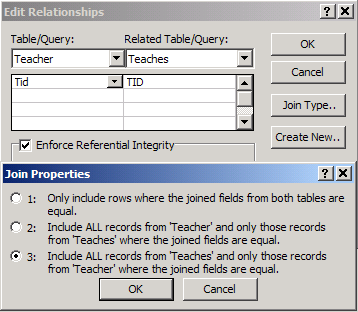
Teachers to Other tables
Admin to Student and Teacher JOINs
The join between Admin to Student table and Teacher table is identical. See the diagram below.
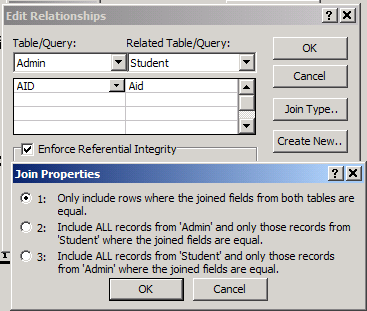
Create a similar connection or join between Admin and Teacher table in Relationship tool.
🔒 This section is part of the premium PDF download.
It includes full table designs, screenshots, and complete VB6 code.
📥 Download Full Attendance Management System (PDF)In the next part, we will build a visual basic interface to communicate with database and meet the user requirements by manipulating data.
Daily Wage Calculator in Vb 6
In this example, we are going to build an application to calculate the daily wage of temporary employees.
To compute the daily wage we need following inputs
- The number of Hours Employee worked.
- Hourly pay rate
The application computes the gross pay and displays it on the screen.
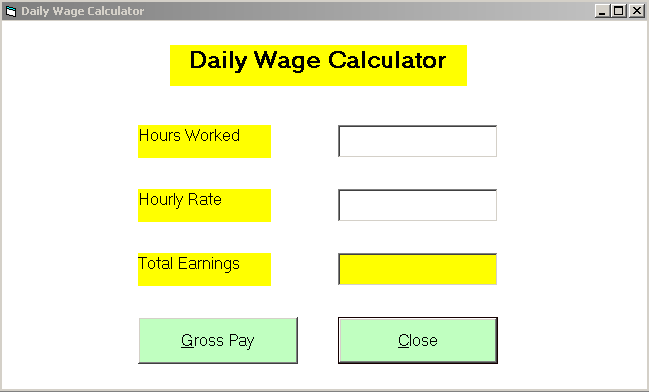
Wage Calculator Interface
To design the interface we go step by step.
Step 1: Open a new vb form and name it Daily Wage Calculator and save the project as wage_calculator. The following diagram shows the new form which we renamed.
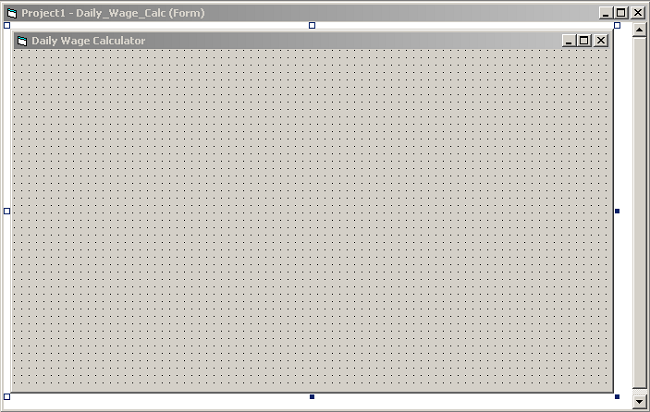
You will get a new form as soon as you open the standard VB project windows. To change the name and caption of the form, go to property window located to the right-bottom of the project window.
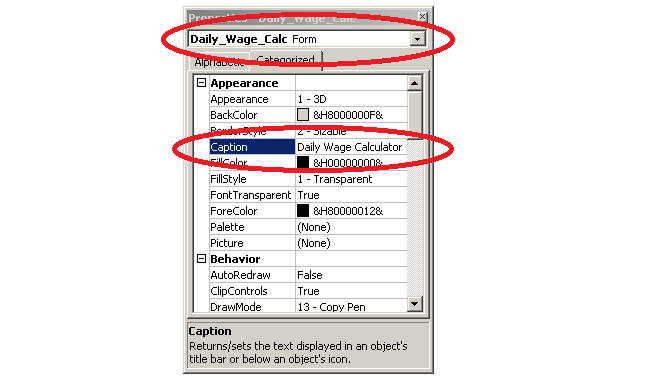
In the property window, change the form name to Daily_Wage_Calc and caption to Daily Wage Calculator.
Step 2: Add Controls
Now its time to add more control. To complete the interface you need – two textboxes, 5 labels, and two command buttons.
The detailed settings for each control element are given below.
Textboxes
Name: txtHoursWorked
Caption: ' '
Height: 500
Width: 2400
Name: txtHoulyRate
Caption: ' '
Height: 500
Width: 2400
Labels
Name : lblTotEarnDisplay
Caption: ' '
Height: 500
Width: 2400
Name: lblHoursWorked
Caption: Hours Worked
Height: 495
Width: 1995
Name: lblHourlyRate
Caption: Hourly Rate
Height: 495
Width: 1995
Name: lblTotEarning
Caption: Total Earnings
Height: 495
Width: 1995
Command Buttons
Name: cmdGross
Caption: &Gross Pay
Height: 700
Width: 2400
Name: cmdClose
Caption: &Close
Height: 700
Width: 2400
The interface will look like the following after adding all the controls.
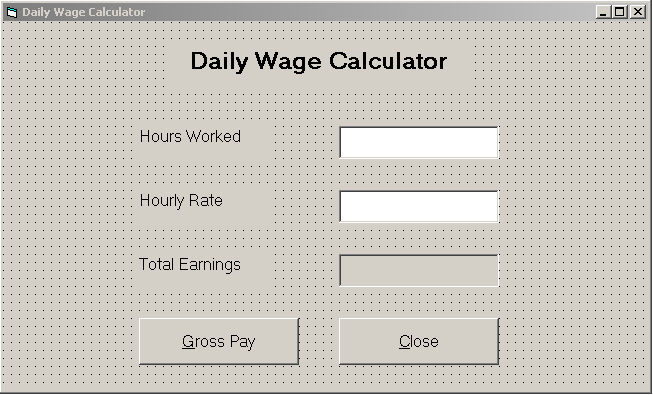
To align or to adjust the spacing between the controls go to Format tab > select Align or select Horizontal or Vertical spacing options.
You can add color to background and foreground in the property window so that the application look better visually.
Coding the Daily Wage Calculator Application
The application design is ready but it does not do anything. You need to write code for the application to work.
Step 3: Understand the logic and write code for the wage calculator application. You can do this in the following stages,
- Get the inputs from textboxes
- Store them in variables
- Compute the gross pay
- Display the output
First, we declare three variables to get the input values and use them later. We will store them in the variables.
Dim hours As Integer
Dim rate As Integer
Dim gross As Integer
Code for textboxes
Now write the code for textboxes are follows.
Private Sub txtHoursWorked_Change()
hours = Val(txtHoursWorked.Text)
End Sub
Private Sub txtHourlyRate_Change()
rate = Val(txtHourlyRate.Text)
End Sub
Code for Command Buttons
The code for command buttons is given below. To compute gross pay, the value of hours rate
rate gross$.
\begin{aligned}gross pay = hours \hspace{3px} worked \times hourly \hspace{3px} rate\end{aligned}The code for command button gross pay. Note than the caption for lblTotEarningDisplay is used to display the output.
Private Sub cmdGross_Click()
gross = hours * rate
lblTotEarnDisplay.Caption = Str(gross)
End Sub
The code for command button close is as follows.
Private Sub cmdClose_Click()
Unload Daily_Wage_Calc
End Sub
Test the Application
Now that we have coded the application, it is time to test the program.
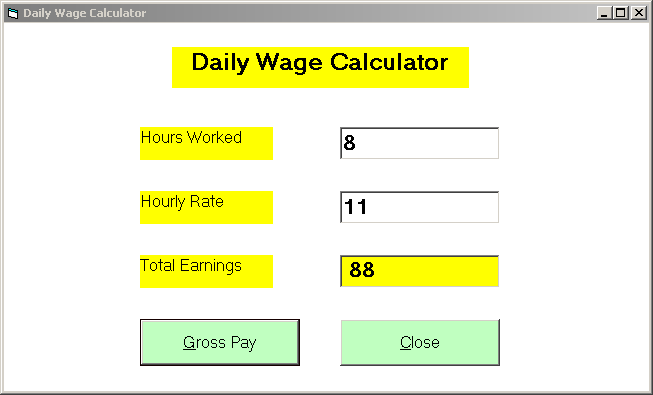
The calculator is correctly calculating the daily wage of an employee given the inputs required.