HTML Fieldset
The HTML form and form elements help us get user inputs. But too many controls confuse the users when they visit an HTML page with a form. In this article, you will learn about fieldset which groups controls together to give a clean look.
Fieldset tag
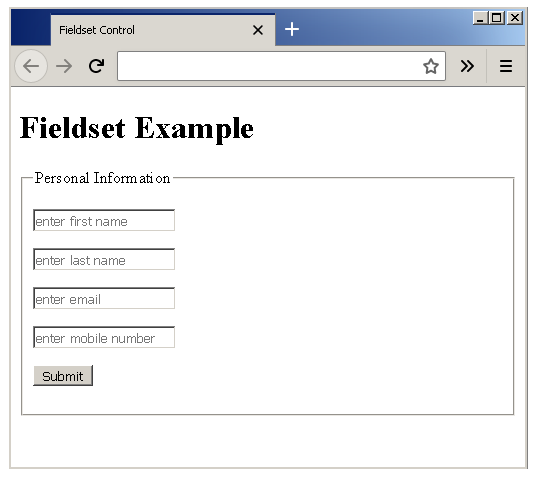
The <mark style="background-color:rgba(0, 0, 0, 0);color:#a80c0c" class="has-inline-color"><fieldset></mark> tag is used to group HTML form elements together. The HTML elements under fieldset will appear to be in a box. To understand what fieldset is create an HTML page – example-fieldset.html and insert the following codes.
<!DOCTYPE html>
<html>
<head>
     <title>Fieldset Control</title>
</head>
<body>
     <h1>Fieldset Example</h1>
     <form action="example.php">
     <fieldset>
          <legend>Personal Information</legend>
          <p><input type = "text" name="First Name" placeholder="enter first name"/></p>
          <p><input type = "text" name="Last Name" placeholder="enter last name"/></p>
          <p><input type = "email" name="Email" placeholder="enter email"/></p>
          <p><input type = "text" name="Mobile" placeholder="enter mobile number"/></p>
          <p><input type="submit" name="Submit" value="Submit"/></p>
     </fieldset>
     </form>
</body>
</html>
The fieldset has another tag – <mark style="background-color:rgba(0, 0, 0, 0);color:#b70e0e" class="has-inline-color"><legend>...</legend></mark> which gives a meaningful title to the group. In the example above, you are trying to collect user personal information, then the legend is Personal Information.
Output
The example shows all the control that collect personal information of a user, then it is appropriate to set the fieldset legend to Personal Information.
HTML Form
HTML form elements are used to collect information from users. A user can enter email address, first name, last name, or click a button to get something done.
In other words, form elements are a way to interact with a web user. The result of an interaction with form element is an action or an event that call for an action. For example, a mouse click is an event that happens when you click on a button on the HTML page.
How form works?
There are many types of form elements, each with a specific purpose. You can divide form task into two.
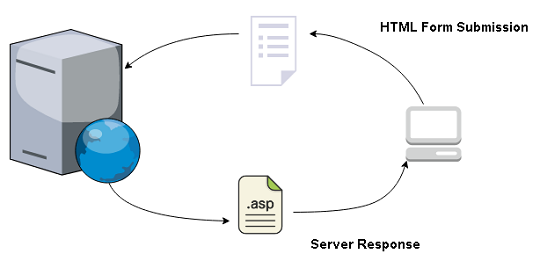
- Collect information from user, validate and send it to a sever.
- Information sent to server are
<mark style="background-color:rgba(0, 0, 0, 0);color:#c00808" class="has-inline-color">name/value</mark>pair. For example,<mark style="background-color:rgba(0, 0, 0, 0);color:#af0909" class="has-inline-color">username = "bob"</mark> - The server processes the request using server-side programming such as C#, PHP, ASP, etc. and return a response in a new page.
- The server also stores the information in the local database.
Types of Form Control
Based on the functions, you can classify form controls into 4 categories.
- Search Control
- Text Input Control
- Choice Control
- Button Control
- Email and URL input
- File Upload
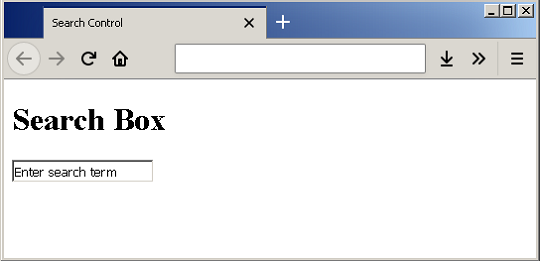
Search Control
The search box will help you to search for information on a website. The syntax to add a search control is given below.
<form>
     <input type="search" name="search box" value="Enter search term" />
</form>
For example, create an HTML page – example-search-box.html and insert the following code.
<!DOCTYPE html>
<html>
<head>
     <title> Search Control</title>
</head>
<body>
     <h1>Search Box </h2>
     <form>
          <input type="search" name="search box" value="Enter search term" />
     </form>
</body>
</html>
Output
Text Input Control
There are many ways you can enter textual information on an HTML page. It is required to create collect personal information of users.
- Text box – add single line
- Password box – to enter password.
- Text area box – to enter short description containing multiple lines.
Syntax for the above text input controls are given below.
<form>
     <input type="text" name="text box" placeholder =" Name" />
     <input type = "password" name= "password box" placeholder="enter password" />
     <textarea name="desc" rows="7" cols="50" placeholder="enter description">
     </textarea>
</form>
Using the above syntax, let us create an HTML page – example_text_input.html.
<!DOCTYPE html>
<html>
<head>
<title> Text Controls</title>
</head>
<body>
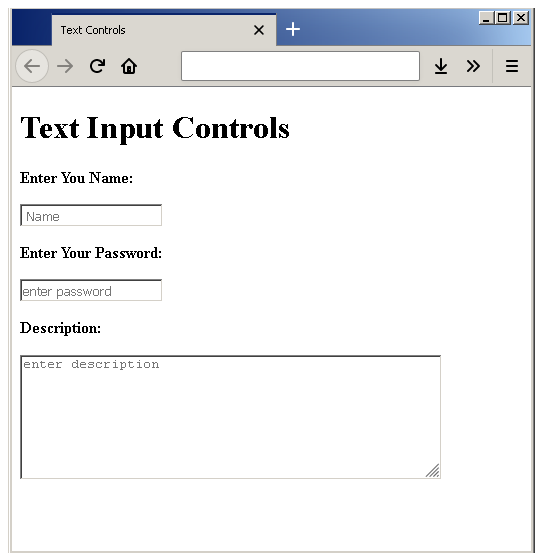
<h1>Text Input Controls</h2>
<form>
<strong>Enter You Name:</strong>
<p><input type="text" name="text box" placeholder =" Name" /></p>
<strong>Enter Your Password:</strong>
<p><input type = "password" name= "password box" placeholder="enter password" /></p>
<strong>Description:</strong>
<p><textarea name="desc" rows="7" cols="50" placeholder="enter description"></textarea></p>
</form>
</body>
</html>Output
Choice Control
Choice control means HTML elements that ask to select input from a pre-configured list of options. A name/value pair will be sent to the server when the form is submitted.
- Radio button
- Check box
- Drop-Down box
When radio button is used, users are given a list of options and they can select only one option. However, in the case of check boxes, you can make more than one selection. The drop-down list is another way of selecting an item. It is not different from radio buttons because it gives only one item to be selected. In both cases, the list of items is static.
Let us learn to use them with an example, create an HTML document – example-choice.html and insert the following code.
<!DOCTYPE html>
<head>
     <title>Choice Controls</title>
</head>
<body>
     <h1>Choice Control Example </h1>
     <form action="">
          <strong>Name:</strong>
          <p><input type="text" name="Name" placeholder="enter your name"/></p>
          <strong>Age:</strong>
          <p><input type="text" name="Age" placeholder="enter your age"/></p>
          <h3>Radio Button</h3>
               <p>Question: How do you travel everyday?</p>
               <p><input type="radio" name="vehical" value="car"> Car</p>
               <p><input type="radio" name="vehical" value="bike"> Bike</p>
               <p><input type="radio" name="vehical" value="train"> Train</p>
          <h3>Check Boxes</h3>
               <p>Question: Which fruit do you like to eat?</p>
               <p><input type="checkbox" name="fruit" value="apple"> Apple</p>
               <p><input type="checkbox" name="fruit" value="orange"> Orange</p>
               <p><input type="checkbox" name="fruit" value="mango"> Mango</p>
          <h3>Drop-Down List</h3>
          <p>Question: Select your favorite Sports?</p>
          <div><select>
               <option value="cricket">Cricket</option>
               <option value="football">Football</option>
               <option value="swimming">Swimming</option>
               <option value="baseball" selected>Baseball</option>
          </select></div>
     </form>
</body>
</html>
Output
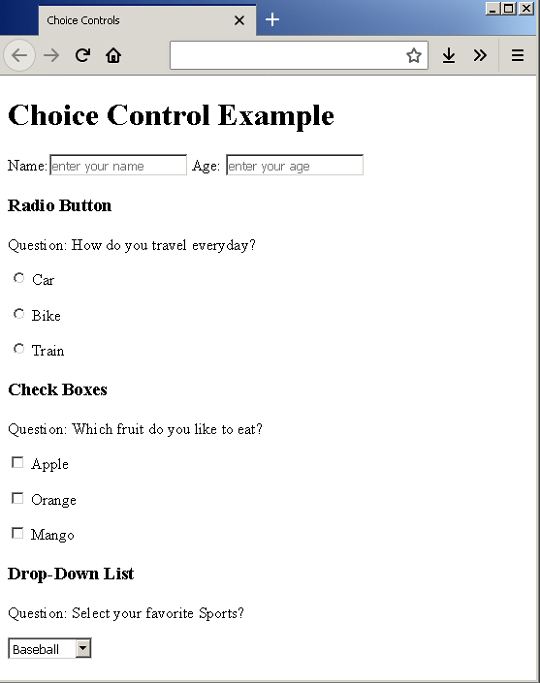
In the above example, if you click on the drop-down list you get a list of options to select from. But, only one item can be selected at a time.
Button Controls
Buttons are used to submit the form, reset the form so that users can enter fresh information, and trigger any other events like open a new HTML document, etc.
Three types of button exists.
- Submit button
- Reset
- Image button
We shall see the difference between all three button with examples. Create an HTML document – example-buttons.html and insert the following code.
<!DOCTYPE html>
<html>
<head>
     <title>Button Controls </title>
</head>
<body>
     <h1>Button Control Examples</h1>
     <form action=" ">
          Name: <input type="text" name="firstname" placeholder="enter your firstname"/>
          Tell Us About Yourself:<br/>
          <textarea name="about" rows="5" cols="30"></textarea><br/>
          <input type="submit" name="submit" value="Send"/>
          <input type="reset" name="reset" value="Reset" />
     </form>
</body>
</html>
Output
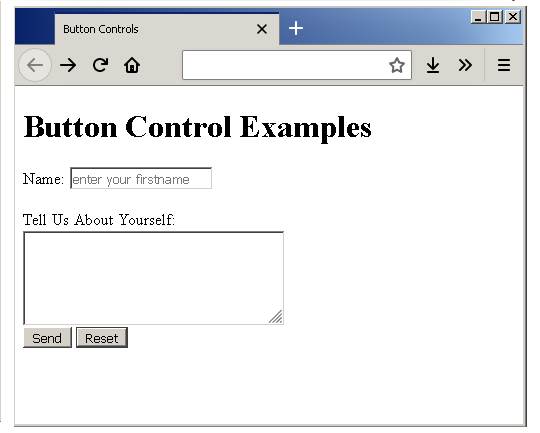
As an experiment, you can add some text and click on the reset button, the entered values get erased immediately. Or you can click on the Send button and this will open the google website. This is because the form action is set to google.
<form action = "http://www.google.com/">...</form>
HTML Email and URL Input
HTML has allows to enter email and url input. When a user enter these details it is validated if the browser supports validation. Otherwise, browser treats them as textboxes.
<!DOCTYPE html>
<html>
<head>
     <title>Email Input Control</title>
</head>
<body>
     <h1> Email Example</h1>
     <input type = "email" name="Email" placeholder=" enter your email"/>
     <input type="submit" name="Submit" value="Submit"/>
</body>
</html>
The email input and url input must be in the correct format. Consider the following example – example-email.html.
Output
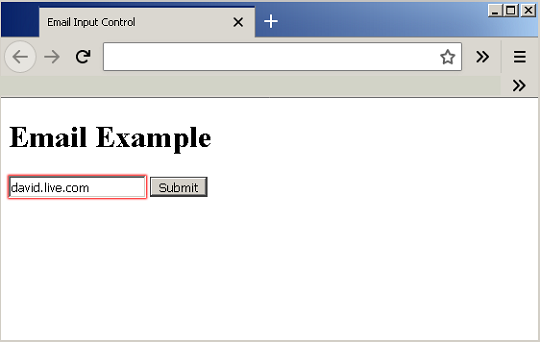
As you can see that the control is created, but when the user enters a wrong input – <mark style="background-color:rgba(0, 0, 0, 0);color:#a40b0b" class="has-inline-color">david.live.com</mark>, it is highlighted in red indicating an error. Similarly, create an example for url control – example-URL.html and insert the following code.
<!DOCTYPE html>
<html>
<head>
     <title>URL Input Control</title>
</head>
<body>
     <h1> URL Example</h1>
     <input type = "url" name="URL" placeholder=" enter your website"/>
     <input type="submit" name="Submit" value="Submit"/>
</body>
</html>
Output
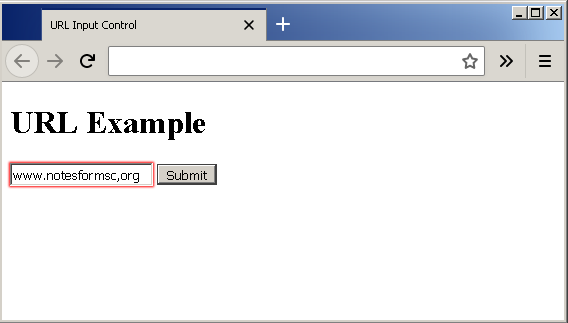
Once again a wrong input is shown in red, because the URL format is incorrect.
File Upload Control
Lastly, we have file upload control that allows users to upload file of different type to a website. Let us create a page – example-file-upload.html and insert the following code.
<!DOCTYPE html>
<html>
<head>
     <title>File Upload Control</title>
     <style>
     #file-upload{
          border:1px solid gray;
          padding:10px;
          }
     #upload{
          background-color:lightgray;
          padding:2px;
          }
     </style>
</head>
<body>
     <h1> File Upload Example</h1>
     <form id="file-upload" action="file.php">
          <p><input type = "file" id="upload" placeholder=" upload a file"/></p>
          <p><input type="submit" name="Submit" value="Submit"/></p>
     </form>
</body>
</html>
In the above example, a little CSS is added to decorate the upload control.
Output
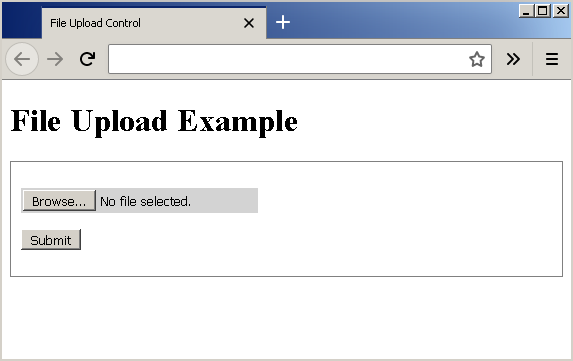
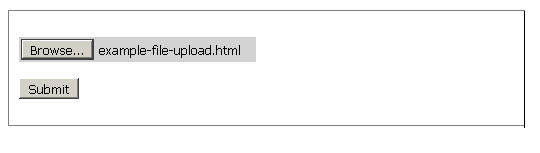
The file upload control gives a text box with a browse button. When you click on the browse it will open the windows explorer so that you can upload your file. The “No file selected” is replaced with path to the file you choose to upload.
The <mark style="background-color:rgba(0, 0, 0, 0);color:#b91313" class="has-inline-color">submit </mark>button is to submit the form as discussed earlier.
HTML Table
A web document allows you to present your information in the form of a table. HTML table is defined using <table> tag. In this lesson, you will learn about HTML table, table row, table heading, and table data.
Table Syntax
The HTML syntax to create a table is given below.
<table>
    <tr>
        <th>
         <td>
                Numbers
       </td>
        <th>
    </tr>
    <tr>
        <td>
                One
        </td>
    </tr>
    <tr>
        <td>
                Two
        </td>
    </tr>
   </table>
The table contains following components.
<mark style="background-color:rgba(0, 0, 0, 0);color:#c41313" class="has-inline-color"><table></mark> = HTML tag to define the table.
<mark style="background-color:rgba(0, 0, 0, 0);color:#b41010" class="has-inline-color"><tr></mark> = defines the table row.
<mark style="background-color:rgba(0, 0, 0, 0);color:#b81111" class="has-inline-color"><th></mark> = defines the table heading.
<mark style="background-color:rgba(0, 0, 0, 0);color:#b71717" class="has-inline-color"><td></mark> = tag to provide table data
<mark style="background-color:rgba(0, 0, 0, 0);color:#b41717" class="has-inline-color">Numbers</mark> = table data
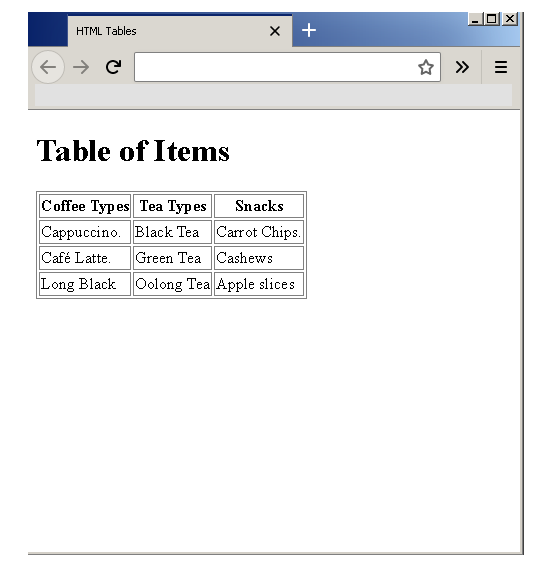
For example, you can create a new HTML document – example-tables.html and define a table.
<!DOCTYPE html>
<html>
<head>
     <title>HTML Tables</title>
     <style>
          table, th, td {
               border: 1px solid gray;
               cell-padding:20px;
          }
     </style>
</head>
<body>
     <h1>Table of Items</h1>
     <table>
          <tr>
               <th>Coffee Types</th>
               <th>Tea Types</th>
               <th>Snacks</th>
          </tr>
          <tr>
               <td>Cappuccino.</td>
               <td>Black Tea</td>
               <td>Carrot Chips.</td>
          </tr>
          <tr>
               <td>Café Latte.</td>
               <td>Green Tea</td>
               <td>Cashews</td>
          </tr>
          <tr>
               <td>Long Black</td>
               <td>Oolong Tea</td>
               <td>Apple slices</td>
          </tr>
     </table>
</body>
</html>
Output
We used a little bit of CSS to correctly display the table. The following CSS code
<style>
     table, th, td {
           border: 1px solid gray;
           cell-padding: 20px;
     }
</style>
will give gray border and 2opx padding to each cell, heading and the entire table.
Column Span (colspan Attribute)
Some table attributes are worth noticing such as colspan. If there is a need to span more than one column for a single data unit use <mark style="background-color:rgba(0, 0, 0, 0);color:#c21a1a" class="has-inline-color">colspan</mark>. Create an HTML page called example-colspan.html insert the code below.
<!DOCTYPE html>
<html>
<head>
<title> Colspan </title>
<style>
table, th, td {
border: 1px solid gray;
cellpadding: 20px;
}
</style>
</head>
<body>
<h1> Class Schedule for Jan and Feb</h1>
<table>
<tr><th></th><th>January</th><th>February</th></tr>
<tr><th>10 am - 11 am</th><td>Data Structures</td><td>HTML</td></tr>
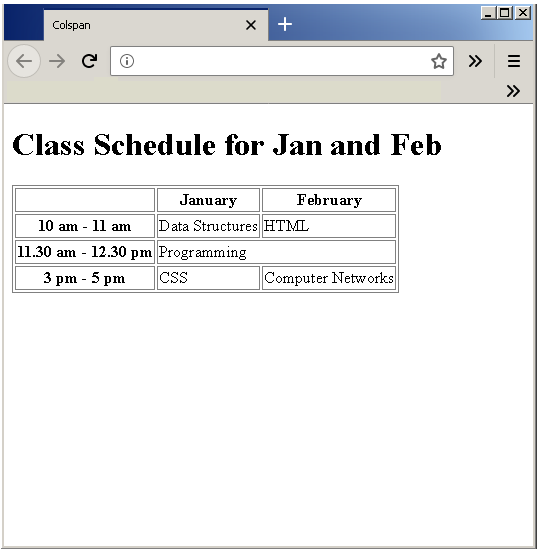
<tr><th>11.30 am - 12.30 pm</th><td colspan = "2">Programming</td><td></td></tr>
<tr><th>3 pm - 5 pm</th><td>CSS</td><td>Computer Networks</td></tr>
</table>
</body>
</html>Output
You can see that the cell with value “Programming” span two columns.
Row Span (rowspan attribute)
Just like colspan, the <mark style="background-color:rgba(0, 0, 0, 0);color:#b21414" class="has-inline-color">rowspan </mark>is useful when you have to span two rows. We can modify the above HTML table and make cell with value “Programming” to span two row as well.
Make another HTML called example-rowspan.html and insert the following codes.
<!DOCTYPE html>
<html>
<head>
<title> Rowspan </title>
<style>
table, th, td {
border: 1px solid gray;
cellpadding: 20px;
}
</style>
</head>
<body>
<h1> Class Schedule for March and April</h1>
<table>
<tr><th></th><th>March</th><th>April</th></tr>
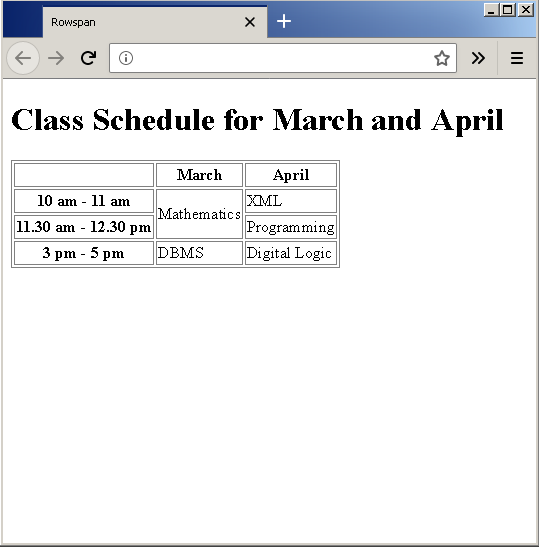
<tr><th>10 am - 11 am</th><td rowspan="2">Mathematics</td><td>XML</td></tr>
<tr><th>11.30 am - 12.30 pm</th><td>Programming</td></tr>
<tr><th>3 pm - 5 pm</th><td>DBMS</td><td>Digital Logic</td></tr>
</table>
</body>
</html>Output
You can see that the cell with value “Mathematics” span two rows.
HTML List
HTML lists elements are used to display a list of items. You can display a to-do list, a grocery list, any kind of lists that contain textual information. Image lists are also possible, but that is something you will learn in CSS tutorial.
Lists are of two types
- Ordered Lists
- Unordered Lists
Ordered Lists
In this type of lists, the list items are ordered using numbers starting from 1 by default. But, you can specify other types of numeric symbols as well.
- Lower Alphabets
- Upper Alphabets
- Lower Roman
- Upper Roman
We shall see examples of each one of them. Create an HTML page called example-ordered-list.html and add the following code.
<!DOCTYPE html>
<html>
<head>
<title>Ordered List Example</title>
</head>
<body>
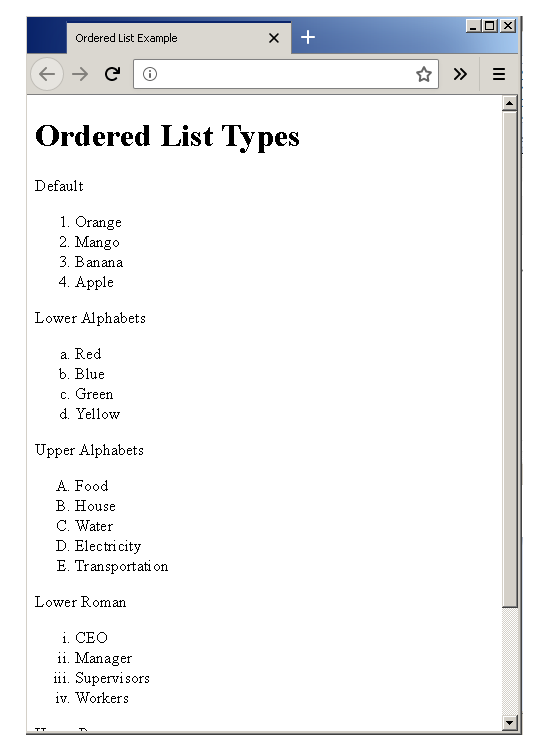
<h1>Ordered List Types</h1>
<p> Default </p>
<ol>
<li>Orange</li>
<li>Mango</li>
<li>Banana</li>
<li>Apple</li>
</ol>
<p>Lower Alphabets</p>
<ol type="a">
<li>Red</li>
<li>Blue</li>
<li>Green</li>
<li>Yellow</li>
</ol>
<p>Upper Alphabets</p>
<ol type="A">
<li>Food</li>
<li>House</li>
<li>Water</li>
<li>Electricity</li>
<li>Transportation</li>
</ol>
<p>Lower Roman</p>
<ol type="i">
<li>CEO</li>
<li>Manager</li>
<li>Supervisors</li>
<li>Workers</li>
</ol>
<p>Upper Roman</p>
<ol type="I">
<li>Football</li>
<li>Cricket</li>
<li>Shooting</li>
<li>Athletics</li>
</ol>
</body>
</html>Output
Unordered List
Unordered list is a bulleted list with different shapes for the bullets. The different types of bullets are as follows.
- Default (bullet)
- Circle
- Disc
- Square
We shall see an example for each one these. Create a new HTML document called example-unordered-list.html.
<!DOCTYPE html>
<html>
<head>
<title>Unordered List </title>
</head>
<body>
<h1>Unorder List Types</h1>
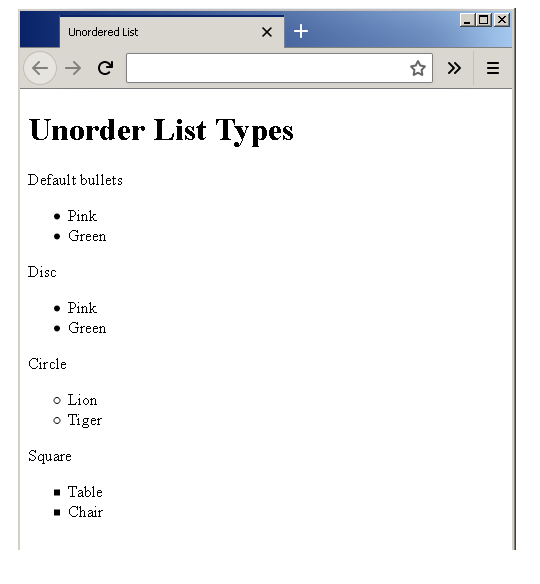
<p>Default bullets</p>
<ul>
<li>Pink</li>
<li>Green</li>
</ul>
<p>Disc</p>
<ul style="list-style-type:disc">
<li>Pink</li>
<li>Green</li>
</ul>
<p>Circle</p>
<ul style="list-style-type:circle">
<li>Lion</li>
<li>Tiger</li>
</ul>
<p>Square</p>
<ul style="list-style-type:square">
<li>Table</li>
<li>Chair</li>
</ul>
</body>
</html>Output
HTML Links
HTML links are called hyperlinks. The hyperlinks connect HTML page to one another so that you can jump from one page to another page.
We recommend to learn the basics of HTML before you begin this lesson. If you know HTML basics, skip following links and continue reading.
HTML Anchor Tag
Links are added using the <mark style="background-color:rgba(0, 0, 0, 0);color:#a90606" class="has-inline-color"><a>...</a></mark> tag, also called the anchor tags. The syntax for<mark style="background-color:rgba(0, 0, 0, 0);color:#9c0606" class="has-inline-color"> <a></mark> tag is given below.
<a href="http://www.example.com/index.html"
title= "Example Page" target=" _blank" > Example Page </a>
The example has following HTML components.
<mark style="background-color:rgba(0, 0, 0, 0);color:#9d0808" class="has-inline-color"><a></mark> = HTML tag for link element.
<mark style="background-color:rgba(0, 0, 0, 0);color:#b10303" class="has-inline-color">href </mark>= to specify Uniform Resource Locator (URL).
<mark style="background-color:rgba(0, 0, 0, 0);color:#be0b0b" class="has-inline-color">title </mark>= to specify title of the link element.
<mark style="background-color:rgba(0, 0, 0, 0);color:#bc0e0e" class="has-inline-color">target </mark>= to specify where to open the document. By default opens in the same document.
<mark style="background-color:rgba(0, 0, 0, 0);color:#b70606" class="has-inline-color">Example Page</mark> = the “text information” when clicked will open the link in a new document.
For example, create a new html page – example-links.html and insert the following HTML codes.
<!DOCTYPE html>
<html>
    <head>
        <title> Add HTML links </title>
    </head>
    <body>
        <p>Fruit and Vegetables are good for health.
        Learn about fruits and Vegetables.</p>
        <h1>Fruits</h1>
        <p><a href="http://www.example.com/Mango.html title ="Mango Fruit" target="_blank" >Mango</a></p>
        <p><a href="http://www.example.com/Apple.html title ="Apple Fruit" target="_blank" >Apple</a></p>
        <p><a href="http://www.example.com/Banana.html title ="Banana Fruit" target="_blank" >Banana</a></p>
        <h1>Vegetables</h1>
        <p><a href="http://www.example.com/Potato.html title ="Potato" target="_blank" >Potato</a></p>
        <p><a href="http://www.example.com/Carrot.html title ="Carrot" target="_blank" >Carrot</a></p>
        <p><a href="http://www.example.com/Onion.html  title ="Onion" target="_blank" >Onion</a></p>
    </body>
</html>
Output
Each of the link element is enclosed within a paragraph tag <mark style="background-color:rgba(0, 0, 0, 0);color:#b30f0f" class="has-inline-color"><p>...</p></mark> because the link element <a>…</a> is inline, where paragraph is a block element and starts with a new line every time.
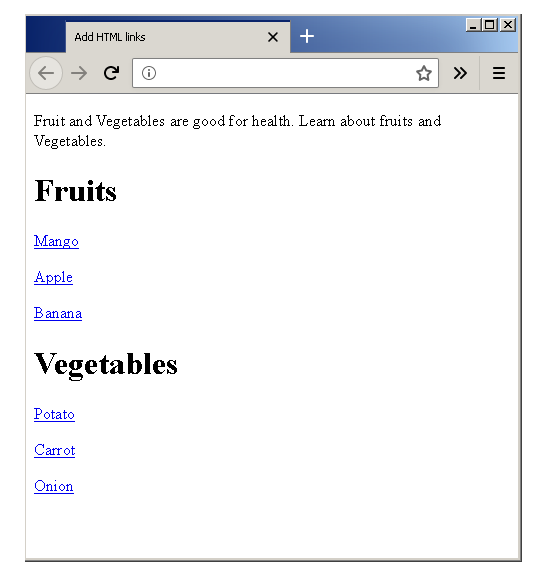
Image Links
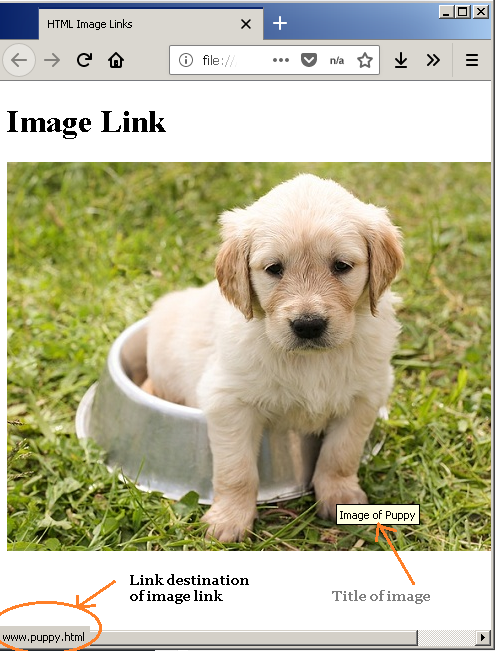
Links are not limited to text, but you can set an image link. When you click on a image link, the effect is same as clicking a textual link. A new HTML document opens up.
For example, create a new HTML page called example-image-link.html. Insert following code into the HTML document.
<!DOCTYPE html>
<html>
    <head>
        <title>HTML Image Links</title>
    </head>
    <body.
    <h1> Image Link</h1.
    <a href="http://www.puppy.html">
    <img src="puppy.jpg" alt="puppy"
    title="Image of Puppy" width="540" height="389" />
    </a>
    </body>
</html>
Output
When you highlight an image link, the title of the image and destination URL of the image are displayed.
Target Attributes
The target attribute tells us where to open the destination HTML document. The possible values for target attribute are as follows.
<mark style="background-color:rgba(0, 0, 0, 0);color:#bb0e0e" class="has-inline-color">_blank</mark>– open document in a new browser window or tab.<mark style="background-color:rgba(0, 0, 0, 0);color:#c80808" class="has-inline-color">_self </mark>– open document in .same browser windows or tab.<mark style="background-color:rgba(0, 0, 0, 0);color:#ab0909" class="has-inline-color">_parent </mark>– open the document in parent frame.<mark style="background-color:rgba(0, 0, 0, 0);color:#bc0808" class="has-inline-color">_top </mark>– open the document in full body of the window.<mark style="background-color:rgba(0, 0, 0, 0);color:#ba0909" class="has-inline-color">frame name</mark>– open the document in a named frame.
Local Links
Sometimes the links are from the HTML pages stored in local computer, not from internet. In this case, the <mark style="background-color:rgba(0, 0, 0, 0);color:#e21111" class="has-inline-color">http:// </mark>prefix is not required, unless you are hosting an HTML page locally.
For example, create an HTML page called example-local-links.html and insert the following codes.
<DOCTYPE html>
<html>
    <head>
        <title> HTML Local Links </title>
    </head>
    <body>
        <h1>Most Popular Sports</h1>
        <p><a href="Baseball.html">Baseball </a></p>
        <p><a href="Cricket.html">Cricket</a></p>
        <p><a href="Football.html">Football</a></p>
    </body>
</html>
Output
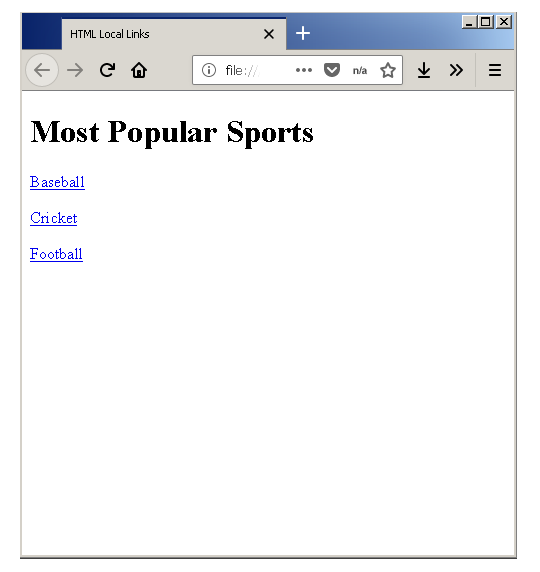
The links are the same, but the target page is stored locally.
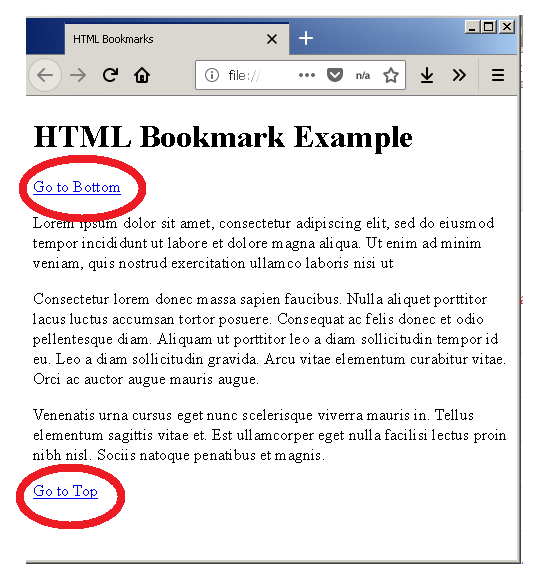
Bookmarks
The bookmarks are special links created using <mark style="background-color:rgba(0, 0, 0, 0);color:#c40b0b" class="has-inline-color">id </mark>attribute. It is a two-step process.
- Select an element and give an
<mark style="background-color:rgba(0, 0, 0, 0);color:#b90808" class="has-inline-color">id</mark>to the element. - Use the
<mark style="background-color:rgba(0, 0, 0, 0);color:#c90a0a" class="has-inline-color">id </mark>value as link destination.
For example, create an HTML document called example-bookmarks.html. Enter the following HTML codes and save the file.
Bookmark within Same Page
<!DOCTYPE html>
<html>
    <head>
        <title>HTML Bookmarks</title>
    </head>
    <body>
    <h1>HTML Bookmark Example</h1>
    <a href="#bottom" > Go to Bottom</a>
    <p id="top">
        Lorem ipsum dolor sit amet,
        consectetur adipiscing elit,
        sed do eiusmod tempor incididunt ut labore
        et dolore magna aliqua.
        Ut enim ad minim veniam,
        quis nostrud exercitation ullamco laboris nisi ut
        aliquip ex ea commodo consequat.
        Duis aute irure dolor in reprehenderit in voluptate
        velit esse cillum dolore eu fugiat nulla pariatur.
        Excepteur sint occaecat cupidatat non proident,
        sunt in culpa qui officia deserunt
        mollit anim id est laborum.
    </p>
    <p>
        Consectetur lorem donec massa sapien faucibus.
        Nulla aliquet porttitor lacus luctus accumsan
        tortor posuere. Consequat ac felis donec et odio
        pellentesque diam. Aliquam ut porttitor leo a diam
        sollicitudin tempor id eu. Leo a diam sollicitudin
        tempor id eu nisl nunc. Sed cras ornare arcu dui
        vivamus arcu felis bibendum. In eu mi bibendum neque egestas.
        Arcu dictum varius duis at consectetur lorem donec.
        Tristique et egestas quis ipsum suspendisse ultrices
        gravida. Arcu vitae elementum curabitur vitae.
        Orci ac auctor augue mauris augue.
    </p>
    <p id="bottom">
        Venenatis urna cursus eget nunc scelerisque
        viverra mauris in. Tellus elementum sagittis
        vitae et. Est ullamcorper eget nulla facilisi
        etiam. Consectetur adipiscing elit duis tristique
        sollicitudin nibh sit amet commodo. Leo vel orci
        porta non pulvinar neque laoreet suspendisse.
        Tristique et egestas quis ipsum suspendisse.
        Cras sed felis eget velit aliquet sagittis id
        consectetur. Blandit massa enim nec dui nunc
        mattis. Auctor eu augue ut lectus arcu. Aliquet
        lectus proin nibh nisl. Sociis natoque penatibus
        et magnis.
    </p>
    <a href="#top" > Go to Top</a>
    </body>
</html>
Output
HTML Image
In the previous lesson, you learned that the primary element of an HTML document is text. But text content does not always the best way to present the information. Images in the form of a logo, heading, charts, and diagrams are used to compliment the textual information.
While using images with HTML, you need to consider following things.
- How to add images to HTML document?
- How to position the image?
- How to specify width and height of an image?
- How to align images in an HTML document?
- How to choose format, size and resolution of an image?
How to add images to HTML document?
It is very simple to add an image to an HTML document. You have to use the <mark style="background-color:rgba(0, 0, 0, 0);color:#d82424" class="has-inline-color"><img></mark> tag. The correct syntax to use the <mark style="background-color:rgba(0, 0, 0, 0);color:#f82424" class="has-inline-color"><img></mark> tag is given below.
<img src=" " alt=" " title =" " caption = " " width=" " height=" "/>
Where,
<mark style="background-color:rgba(0, 0, 0, 0);color:#dd1212" class="has-inline-color">src </mark>= source file, including path to the image file.
<mark style="background-color:rgba(0, 0, 0, 0);color:#db1616" class="has-inline-color">alt </mark>= alternate text for image.
<mark style="background-color:rgba(0, 0, 0, 0);color:#e83a3a" class="has-inline-color">title </mark>= title of the image.
<mark style="background-color:rgba(0, 0, 0, 0);color:#db1212" class="has-inline-color">caption </mark>= a caption for image.
<mark style="background-color:rgba(0, 0, 0, 0);color:#bc1111" class="has-inline-color">width </mark>= width of the image.
<mark style="background-color:rgba(0, 0, 0, 0);color:#e61b1b" class="has-inline-color">height </mark>= height of the image.
For example, let us add an image to an HTML page.
For this, you have to create an HTML page called example_image.html.
<!DOCTYPE html>
<html>
<head>
<title>Adding Image to HTML</title>
</head>
<body>
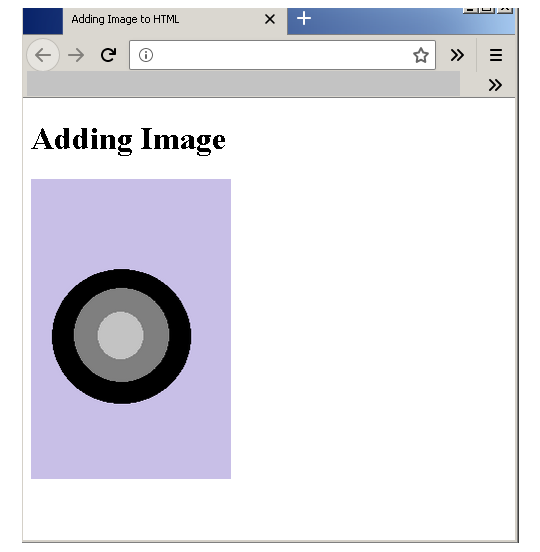
<h1> Adding Image </h1>
<!-- Adding img tag -->
<img src="circle.png" alt="circle"
title="Image of a Circle"
caption= "An Image of a Circle" width="200" height="300" />
</body>
</html>Output
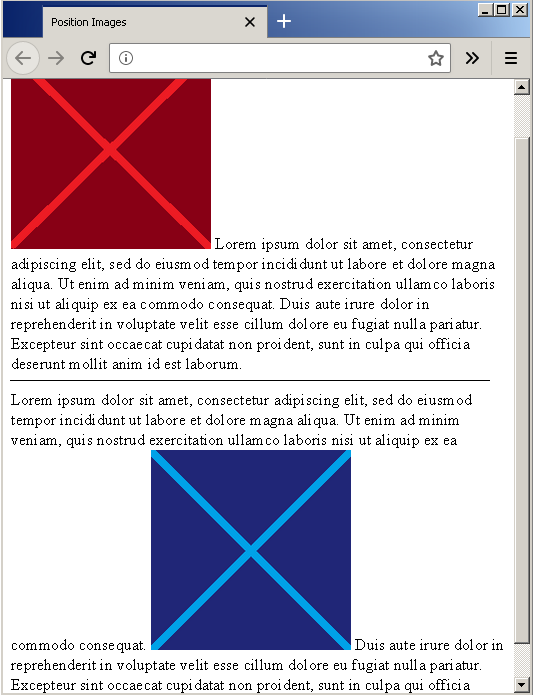
How to position the image?
In the previous example, you just added the image to an HTML page, and after than you can add text content. The image is added separately. However, images are inline elements and usually placed inside the paragraph.
- Images are placed at the beginning of the paragraph.
- Sometimes images are placed in the middle of the paragraph.
For example, consider the following HTML code for a page – example_image_position.html.
<!DOCTYPE html>
<html>
    <head>
        <title> Position Images </title>
    </head>
    <body>
        <p>
        <img src="square" alt="square" title="dark red square"
        width="200" height="200" />
        Lorem ipsum dolor sit amet, consectetur adipiscing elit,
        sed do eiusmod tempor incididunt ut labore et dolore magna aliqua.
        Ut enim ad minim veniam, quis nostrud exercitation ullamco
        laboris nisi ut aliquip ex ea commodo consequat.
        Duis aute irure dolor in reprehenderit in voluptate
        velit esse cillum dolore eu fugiat nulla pariatur.
        Excepteur sint occaecat cupidatat non proident,
        sunt in culpa qui officia deserunt mollit anim id est laborum.
        </p>
        <p>
        Lorem ipsum dolor sit amet,
        consectetur adipiscing elit,
        sed do eiusmod tempor incididunt ut labore et dolore
        magna aliqua. Ut enim ad minim veniam, quis
        nostrud exercitation ullamco laboris nisi ut
        aliquip ex ea commodo consequat.
        <img src="blue square" alt="blue square" title="
        dark blue square" width="200" height="200" />
        Duis aute irure dolor in reprehenderit in voluptate velit esse cillum
        dolore eu fugiat nulla pariatur. Excepteur sint occaecat cupidatat
        non proident, sunt in culpa qui officia deserunt mollit
        anim id est laborum.
        </p>
    </body>
</html>
Output
The output shows that the red square is placed at the beginning of the paragraph and the blue square is placed in the middle of a paragraph.
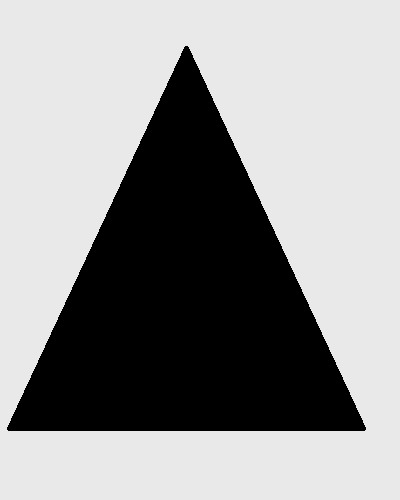
How to specify width and height of an image?
Sometimes the size of an image is not that you want, you can change the original images size while using <mark style="background-color:rgba(0, 0, 0, 0);color:#ee5f5f" class="has-inline-color"><img> </mark>tags. The properties <mark style="background-color:rgba(0, 0, 0, 0);color:#ca2323" class="has-inline-color">width </mark>and <mark style="background-color:rgba(0, 0, 0, 0);color:#ac0707" class="has-inline-color">height </mark>of <mark style="background-color:rgba(0, 0, 0, 0);color:#b20505" class="has-inline-color"><img></mark> tag can do that for you. It will render a different width and height than the original images size.
If the image is larger, display the image with smaller width and height, not the other way around. The width and the height are calculated in pixels.
For example, consider the following HTML – example-width-height.html, which add an image whose original size is <mark style="background-color:rgba(0, 0, 0, 0);color:#b50a0a" class="has-inline-color">400px X 500 px</mark>. But the width is set to <mark style="background-color:rgba(0, 0, 0, 0);color:#a90c0c" class="has-inline-color">200px</mark>, and the height is set to <mark style="background-color:rgba(0, 0, 0, 0);color:#a90303" class="has-inline-color">300px</mark>, different from original size.
<!DOCTYPE html>
<html>
    <head>
        <title>Image Width and Height</title>
    </head>
    <body>
        <img src="triangle.png" alt="triangle"
        title="black triangle"
        caption="Image of a Black triangle"
        width="200" height="300" />
    </body>
</html>
Output
The size of the image displayed is <mark style="background-color:rgba(0, 0, 0, 0);color:#b80f0f" class="has-inline-color">200px X 300px</mark> which is smaller than the original image size.
HTML Text
The HTML text elements are to display text information in an HTML page. Every text document (e.g., MS Word) have headings, subheadings, and text contents in the form of sentence, paragraphs.
HTML Headings
HTML has the following headings and sub-headings where <h1> being the largest and <h6> being the smallest heading. The size and font type of each can be modified with CSS.
<h1> - Largest heading
<h2>
<h3>
<h4>
<h5>
<h6> - Smallest heading
Text Contents
The text contents are paragraphs with sentences and quotes. In HTML, following tags are used
<p> - for paragraph
<blockquote> or <q> - for quote
Formatting Text Contents
HTML elements other than headings and paragraphs are used to format the text contents inside an HTML documents.
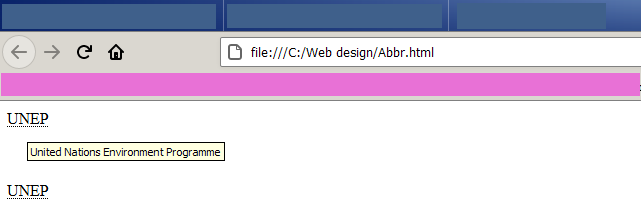
Acronyms and Abbreviations: The text content sometimes contains acronyms or abbreviations. It is short form of a longer name or title. The HTML uses two tags to display the full title of the abbreviation.
<acronym> …. <acronym>
<abbr> … </abbr>
Example #1
Here are some examples of formatting text contents.
<acronym title="United Nations Environment Programme">UNEP</acronym>
<abbr title="United Nations Environment Programme">UNEP</abbr>
Output # 1
Italic Text Contents
There are many HTML tags that shows text contents in italic, but their purpose are different. Here is a list of such HTML tags.
| HTML Tags | Description |
|---|---|
| <i> | Shows the text in italic. |
| <em> | Put emphasis to a text content |
| <dfn> | Definition of a term (the term in italic) |
| <address> | Address of the author in italic |
| <cite> | Shows a reference to a piece of work – a book, web page, journal or any text content. |
Example #2
Here are examples of italicized text.
Italic text (<i></i>)
<p> This paragraph contains <i>Italic </i> word.</p>
This paragraph contains italic word.
Emphasis (<em></em>)
<p>In this paragraph, a word is <em>important</em> so it is emphasized.</p>
In this paragraph, a word is important, so it is emphasized.
Definition (<dfn></dfn>)
<p> <dfn>Orange<dfn> is a citrus fruit.</p>
Orange is a citrus fruit.
Address (<address></address>)
<address>
   <p>First Name : John</p>
   <p>Last Name: Peterson</p>
   <p>City: London</p>
   <p>Street: 101, Baker street</p>
   <p>Phone: 111-3344<p>
   <p>Email: <a href="mailto:[email protected]"> john</a></p>
</address>
First Name : John
Last Name: Peterson
City: London
Street: 101, Baker street
Phone: 111-3344
Email: john
Citation (<cite></cite>)
<p> Mark Twain was an American writer. He wrote <cite>The Adventures of Tom Sawyer</cite> in 1876.</p>
Mark Twain was an American writer. He wrote The Adventures of Tom Sawyer in 1876.
Bold Text Contents
Some text contents are shown in bold to put more emphasis or to show importance of the text. The HTML tags used to do this are
| HTML Tags | Description |
|---|---|
| <b> | Show a text in bold. |
| <strong> | Bold a text to show strong importance. |
Example #3
These are some examples of bold text content.
Bold (<b></b>)
<p>This is a <b>bold text</b> content. </p>
This is a bold text content.
Strong (<strong></strong>)
<p> This text has certain <strong>words</strong> that has strong importance. </p>
This text has certain words that has strong importance.
Superscript & Subscript
The superscript and the subscript are very important when you want to write a scientific or mathematical equation.
To write “A squared” which is A2 and “A subscript 2” is A2 use following tags
| HTML Tags | Description |
|---|---|
| <sub> | For subscript |
| <sup> | For superscript |
Example #4
These are examples of subscripts and superscripts.
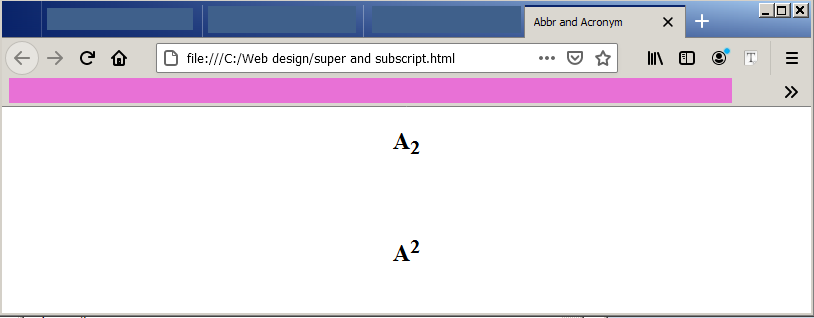
Subscript (<sub></sub>)
<p>A<sub>2</sub>
Superscript (<sup></sup>)
<p>A<sup>2</sup>
Computer Code Tag
There is a tag that can be used to show computer codes.
| HTML Tag | Description |
|---|---|
| <code> | To display computer codes |
Example #5
The example below shows how to use <code> tag to display computer codes.
Computer Code (<code></code>)
<p>The following is computer code. </p>
<code>#include "stdio.h"</code>
The following is computer code.
#include "stdio.h"
Inserting and Deleting text
We want to show that a text form the document is inserted or deleted. This is possible with two HTML tags given below.
| HTML Tags | Description |
| <ins> | Shows inserted text |
| <del> | Shows deleted text |
Example #6
The examples of inserting and deleting text is given below.
Insert (<ins></ins>)
<p> This text is inserted <ins> globe </ins> and it is underlined. </p>
This text is inserted globe and it is underlined.
Delete (<del></del>)
<p>The line has a word which is <del>removed </del> or deleted and it is strike out. </p>
The line has a word which is removed or deleted, and it is strike out.
Tags not supported in HTML 5
There are text related tags which are not supported in HTML 5 and you can use them on HTML elements from CSS (Cascading Style sheet)
| HTML Tag | HTML 4.01 | HTML 5 |
|---|---|---|
| <big> | Yes | No |
| <font> | Yes | No |
| <center> | Yes | No |
Note: There are other HTML standards and browsers for which these tags are used differently.
HTML Attributes
In this article, you will learn about HTML attributes. They are not so important anymore since all the styling is done using CSS, but still, some of the attributes are very useful in manipulating HTML tags through DOM (document object model) using CSS or JavaScript.
Before you start, learn the basic structure of HTML document by reading previous articles.
HTML Attribute Types
Each HTML elements have attributes that provide some more information about the element. These attributes are of two types
- Local Attribute
- Global Attributes
Local Attributes are element specific and only applies to a set of elements. The global attributes are those attributes which applies to any HTML element.
- ->The attributes are defined in the opening tag of an HTML element.
For example,
<p title="introduction"> Sports are important to maintain physical health</p>
<p>it is a form of exercise, but with fun.</p>
- ->Attributes are name/value pair, which is name = “value”.
In the above example,
title = "introduction"
Common Global Attributes
There are many global attributes from HTML 4 and HTML 5. We will discuss the most frequently used global attributes. The list of common global attribute is given below.
- title
- lang
- id
- class
- style
title attribute
This define the title of the HTML attribute. If the title of the HTML element is defined then hovering your mouse over the element will reveal the title.
Consider the following example,
<!DOCTYPE html>
<html>
<head>
<title>Example - title attribute</title>
</head>
<body>
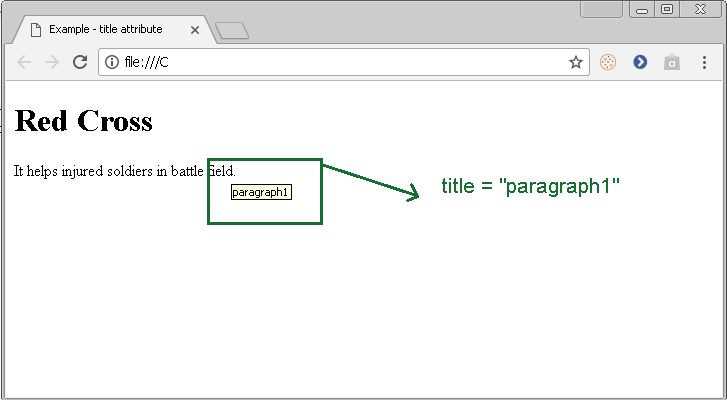
<h1>Red Cross</h1>
<p title="paragraph1">It helps injured soldiers in battle field. </p>
</body>
</html>Output-title attribute
The output of HTML title attribute is given in the following figure.
lang attribute
This attribute specify the language of the text content inside an HTML element.
For example
<!DOCTYPE html>
<html>
<head>
<title>Example - lang attribute</title>
</head>
<body>
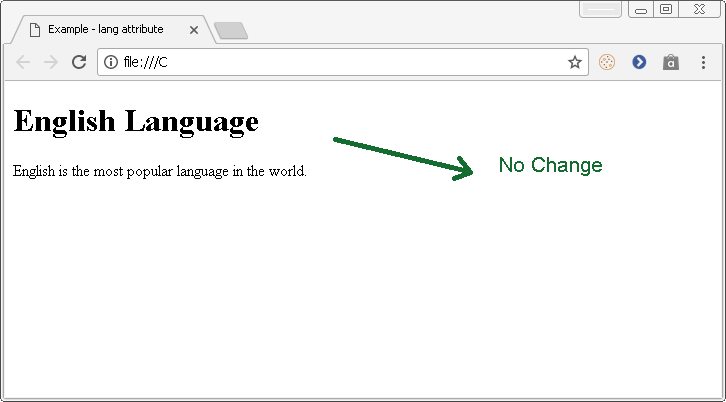
<h1>English Language</h1>
<p lang="en" >English is the most popular language in the world.</p>
</body>
</html>It does not seems to be useful, because do not change anything.
Output-lang attribute
The output of the above program, the lang attribute is given in following figure.
id attribute
The id attribute is used with JavaScript and CSS codes. The CSS (Cascading Style sheet) gives style to an HTML element. It changes the element’s appearances with simple css commands. The JavaScript is make changes to HTML elements dynamically.
The id attribute is used to identify the specific element for which you want to write script or change css styling from a group of similar elements.
In the following example,
We will change the text and color of an HTML element with id attribute and JavaScript or CSS.
<!DOCTYPE html>
<html>
<head>
<title>Example – id attribute </title>
<!-- CSS Code -->
<style>
#head{
color: red;
}
</style>
<!-- End of CSS xode -->
</head>
<body>
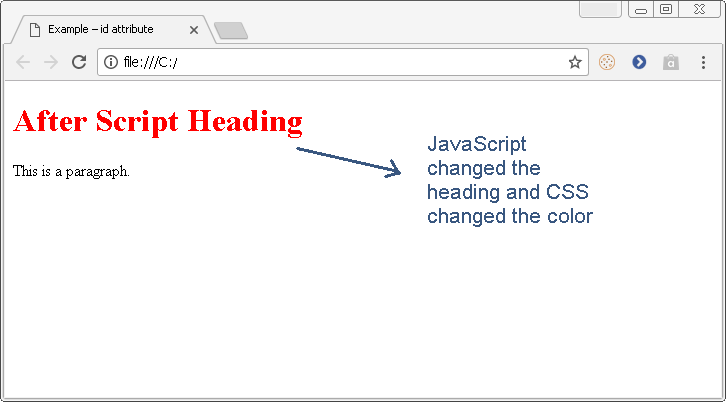
<h1 id ="head"> Before Script Heading</h1>
<p>This is a paragraph. </p>
<!-- JavaScript Code -->
<script type="text/JavaScript">
message = "After Script Heading Value";
var el = document.getElementById("head")
el.textContent = message;
</script>
<!-- End of JavaScript code -->
</body>
</html>Output – Id Attribute
The output of the program – ID attribute is given in the following diagram.
class attribute
In the previous example, we saw an example to changing the style of header using id attribute. The id attribute is used when we want to change something about a unique HTML element.
In other cases, when you want the changes for a group of elements, you can use the class attribute. The class attribute covers more than one element that share common features.
For example,
You may want to apply some setting common to all sections or divisions in an HTML document.
<!DOCTYPE html>
<html>
<head>
<title>Example – class attribute </title>
<!-- CSS Code -->
<style type="text/css">
.section1 {
background-color: cyan;
color: blue;
}
.section2 {
background-color: black;
color: white;
}
</style>
<!-- End of CSS -->
</head>
<body>
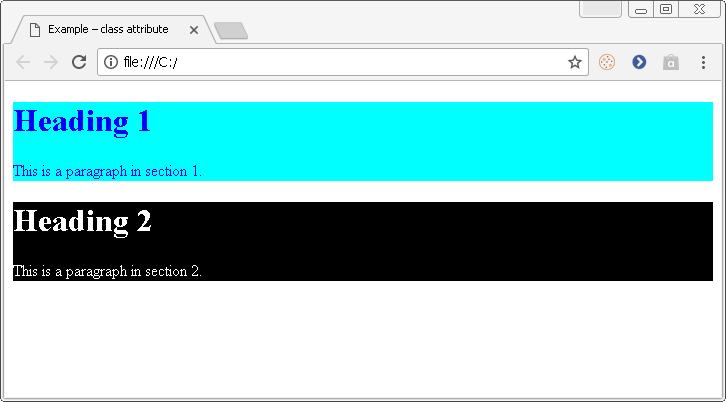
<div class='section1'>
<h1>Heading 1</h1>
<p> This is a paragraph in section 1. </p>
</div>
<div class='section2'>
<h1>Heading 2</h1>
<p> This is a paragraph in section 2. </p>
</div>
</body>
</html>Output-class attribute
The output of the class attribute program is given below.
style attribute
HTML allows inline styling of elements, that is, you can change the color, border, size and other styles for an HTML element with a single attribute called style. The style attribute uses same kind of syntax as CSS.
In the following example we will change the color of an HTML element and display the output in the browser.
<!DOCTYPE html>
<html>
<head>
<title>Example – style attribute</title>
</head>
<body>
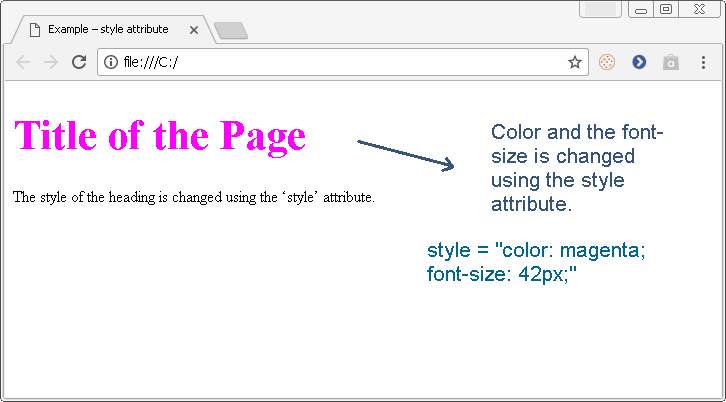
<h1 style="color: magenta; font-size: 42px ;"> Title of the Page</h1>
<p> The style of the heading is changed using the 'style' attribute. </p>
</body>
</html>Output- style attribute
The output of the program with style attribute is given below. The color and font attribute is changed using the style attribute.
References
- Duckett, Jon. 2011. HTML & CSS: Design and Build Web Sites. Wiley .
- W3Schools. n.d. HTML Tutorial. Accessed Feb 2, 2018. https://www.w3schools.com/html/default.asp.
HTML Block and Inline Elements
The HTML elements are to display text, links, images, audio and video information through a browser. There are elements that contribute to the structure of the HTML documents and elements that do not affect the structure.
Block Elements
The HTML elements that take the entire width in a browser so that the next element starts from a new line is called a block element. The block level elements define the structure of the HTML document.
List of Block Level HTML Elements
The list of common block level element is given below.
| Name | HTML tag | Description |
|---|---|---|
| Division or Section | <div> | Define a section or a container in HTML document |
| Headings and sub-headings | <h1>,<h2>,<h3>,<h4>,<h5>,<h6> | Define the headings for HTML documents |
| Paragraphs | <p> | Paragraph element in an HTML document. |
| Lists | <ol>, <ul> | List elements in HTML document. |
| Table | <table> | Define a table and its contents. |
| Form | <form> | Define a form for HTML document with inputs. |
Example of an HTML page with Block Elements
<!DOCTYPE html>

<html>

    <head>

        <title>Block Elements Example</title>

    </head>

    <body>

        <h1>Header 1</h1>

        <p>This is a paragraph which is another HTML block element.</p>

        <p>A new paragraph starts in a new line or block. </p>

    </body>

</html>
Output in Browser
The output of the above program is given in following figure.

Inline Elements
The HTML elements that add meaning to the information in a document is called inline element. The inline element does not change the structure of the document and fit inside a block level element easily.
List of Common Inline Elements
A list of common inline elements is given below. This list is only related to text content in an HTML document. There are several others which we will discuss in future lessons.
| Name | HTML tag | Description |
|---|---|---|
| Bold | <strong>, <b> | Display the font weight in an HTML document. |
| Emphasis | <em> , <i> | Display italic text |
| Anchor or Link | <a> | Define a link with anchor text |
| Span | <span> | Used when no inline tags available. Works as a custom tag. |
| Abbreviation | <abbr> | Define abbreviations for HTML document. |
Example of an HTML document with Inline Elements.
In the following example, we have used inline elements to display some text in bold and emphasized a few of them.
<! DOCTYPE html>
<html>
<head>
<title>Example Inline Element</title>
</head>
<body>
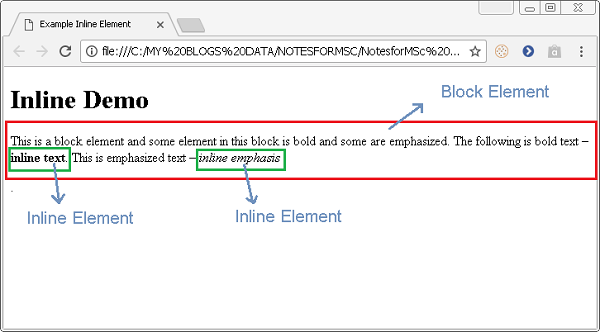
<h1>Inline Demo</h1>
<p>This is a block element and some element in this block is bold and some are emphasized. </p>
<p>The following is bold text – <strong> inline text</strong> </p>.
<p>This is emphasized text – <em> inline emphasis</em></p>.
</body>
</html>Output for Example
References
- Duckett, Jon. 2011. HTML & CSS: Design and Build Web Sites. Wiley .
- W3Schools. n.d. HTML Tutorial. Accessed Jan 31, 2018. https://www.w3schools.com/html/default.asp.
How to Create Example HTML Pages
In this article, you will learn to run the example HTML pages from your local computer offline. In this way, you can try all examples in the HTML tutorial locally on your computer.
To execute the HTML example programs, read the 5 given steps below. Each of these steps is explained in detail in the following sections.
- Create a folder to save your HTML file.
- Create a file using Notepad or Sublime Text or any text editor.
- Write your HTML code.
- Save HTML file in the folder you created earlier.
- Open in browser and view the results.
Before you begin, learn about an HTML document structure.
Creating a folder to save your HTML file
To save your HTML file create a folder on your computer. Give a proper name to the file. For example, if you are working on example 1 then create a folder called Example01.
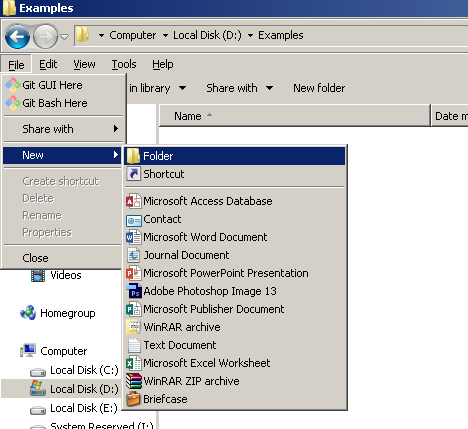
On a windows computer, go to My Computer , if you have windows XP or any earlier version operating system. For later version like windows 7, click Computer and click the drive icon – C: or D: where you want to save the HTML file.
Go to file on windows XP or press Alt key on windows 7 or later and then click File and then click New > select Folder. Give name to the new folder.
On a Mac X, you can create a folder on desktop or click Finder and go to the location where you want to create the folder.
Click File > New Folder and give a name to the folder.
Create a file using Notepad or Sublime Text
The next step in creating the HTML examples is to open a text editor in windows or Mac OS X computer.
On Windows,
Go to start > Click Search > Click Notepad to create a text document.
On Mac OS X,
Go to Applications > Click TextEdit and save it in the folder created earlier.
There is a third option, you can download Notepad++ or Sublime Text for Mac OS X or Windows and start writing your code.
Write Your HTML Code
When you create a text editor file, save it as example.txt and then write following example code.
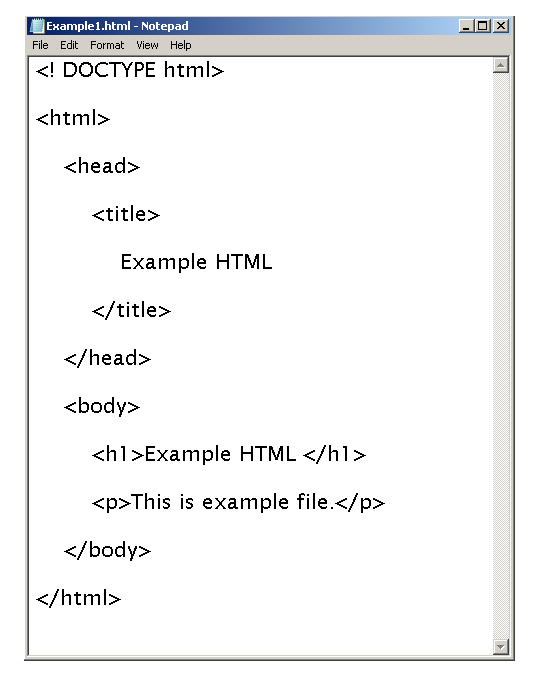
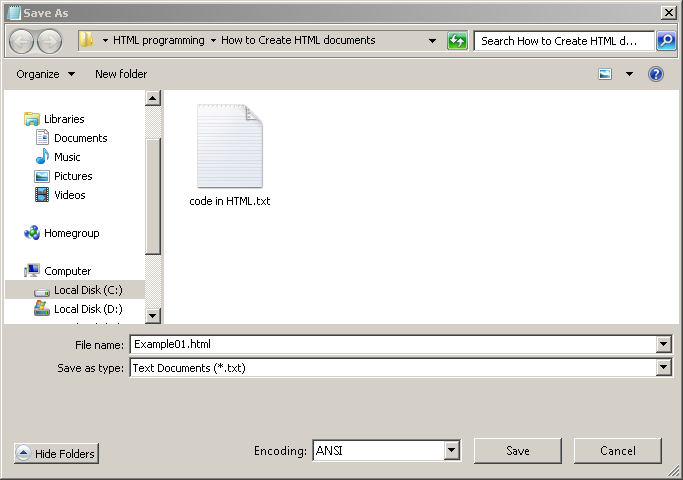
Save your file as HTML page
The next step is to save your file as HTML file. To save the file click on file > click Save as > Type the name of the file followed by .html extension.
For example,
Exercise01.html
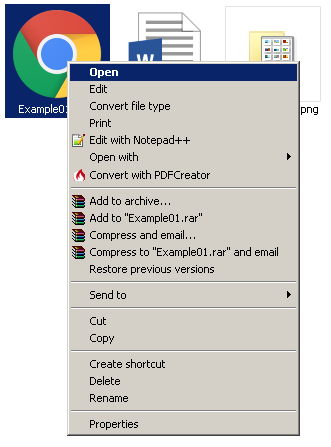
Open the file in Browser and View the results
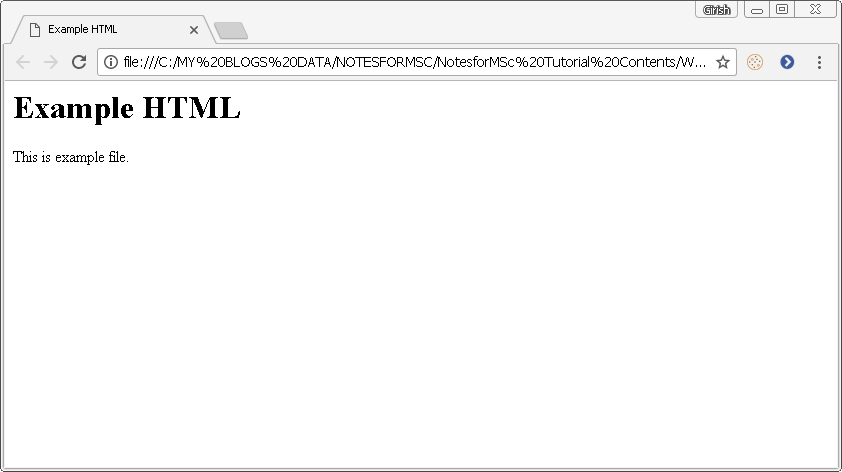
To browse the HTML page, right click > select Open. The file will open in your default browser. Check for any possible error.
The output of the HTML file is given below.