HTML form elements are very useful in collecting information from users, but the a textbox or a radio button is useless without a proper label. The HTML label clear the intention for each form control element. In this article, you will learn about positioning labels, and how to use labels in an HTML form.
HTML Label tag
The HTML label is implemented using <mark style="background-color:rgba(0, 0, 0, 0);color:#a30c0c" class="has-inline-color"><label>...</label></mark> or<mark style="background-color:rgba(0, 0, 0, 0);color:#b91010" class="has-inline-color"> <label> </mark>tags. The <mark style="background-color:rgba(0, 0, 0, 0);color:#a21919" class="has-inline-color"><label></mark> tag in used in conjunction with any input control so there is no need for a <mark style="background-color:rgba(0, 0, 0, 0);color:#b01717" class="has-inline-color"></label></mark> tag.
For example,
<label> UserName: <input type="text" name="username" placeholder="enter username"/>
The second way to specify label is given below.
<label for="username" > UserName:</label>
<input type="text" name="username" placeholder="enter name"/>
The second method is more specific way to label form controls. The labels are separate and tied to element using for attribute.
Positioning Label
There are two ways to position you labels.
- Above or left position
- Right position
Above or Left Position
Not all form controls should have labels above or left. If the control is textbox or drop-downs, then keep the label left or above.
Right Position
When the control is radio buttons, or check boxes then keep the label to the right of each individual radio or check box. What difference it makes, you may ask? It makes lot of difference because every control must be aligned to some other elements. This will give aesthetically pleasing look to the form. So, you must align vertically or horizontally.
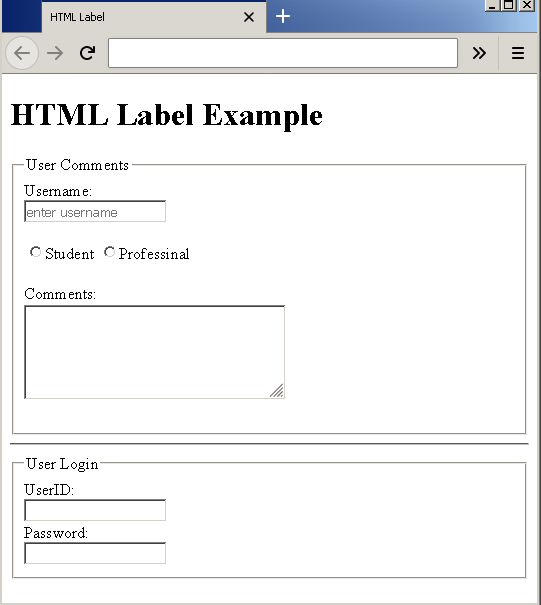
Example Form with Labels
In this example, you will create a blog comment form with login box. Create an HTML page – example-label.html and insert the following code.
<!DOCTYPE html>
<html>
<head>
    <title>HTML Label</title>
</head>
<body>
<h1>HTML Label Example</h1>
     <form action="example.php">
<fieldset>
          <legend>User Comments</legend>
          <label for="username">Username:</label><br/>
          <input type="text" name="username" placeholder="enter username"/><br/><br/>
          <input type="radio" name="student"/><label>Student
          <input type="radio" name="professional"/><label>Professinal<br/><br/>
          <label for="comments">Comments:</label><br/>
          <textarea name="comments" rows="5" cols="30">
          </textarea><br/><br/>
     </fieldset>
  <hr>
     <fieldset>
          <legend>User Login</legend>
          <label>UserID:<br/>
          <input type="text" name="userid" placeholder=" "/><br/>
          <label>Password:<br/>
          <input type="password" name="pwd" placeholder=" "/><br/>
     </fieldset>
   </form>
</body>
</html>
Output