Table of Contents
As a software developer or a upcoming developer, knowledge of Git and GitHub is most essential skill. This article will help you get started if you already installed and configured Git on your computer. Also, I assume you are familiar with command-line tools and know how to use them. We will setup a local repository using Git and let you explore the version control system (VCS) on your own.
Note that this article is intended for beginners only. If you feel that it’s too easy for you, its still worth reviewing the steps in this article.
About Git and GitHub
Before I start with the main topic, let’s understand a bit about Git and GitHub. Git is a software called Version Control System(VCS). It simply keep track of all the changes in your project. It will store different versions of your code and help restore them efficiently. That’s why Git is one of the most popular way to manage software projects.
How Git works
Git has most of the abilities of other version control systems like Centralized Version Control Systems(CVCSs) and Local Version Control Systems(LVCSs).
The Centralize Version Control depends on a single server that keeps your project (a repository) and all its developers stay connected and synced for modifying, updating the project files.
All is fine with CVCSs until, you lose connection to the central server. You cannot work on files locally unless a connection is established between the developer and the CVCS. Not only that sometimes connection to the central server is slow which creates latency in updating information.
The LVCS gives you lot of freedom to work on projects, but real challenges are merging files, inconsistency and mistakes or accidents leading to mismanagement and confusion.
Git on the other hand, is both local system and a central system with lot of security and consistency in storing data. That’s why Git is called Distributed Version Control System(DVCS). Any change in the project will be shared with all the people working on the project and stay up to date. GitHub acts like a centralized server to create repositories and share with anyone. Yet, every developer connected to Git repository is able to work independently.
Difference between Git and Other VCSs
The main difference between Git other VCSs like Subversion(a centralized version control system) , and RCS(a local version control system) is the way it stores data. The Subversion and RCS store data in files and changes as revisions which are also documents.
Git saves changes to the files as Snapshots. Whenever you make changes to project file and save it, and perform commit, a snapshot and a reference to snapshot is created.
Suppose you created a snapshot by making change to a file a.txt and committing it. Later you made another change and something went wrong, you can use the previous commit(snapshot) to restore your file – a.txt.
All operation on Git are local and not like central system which has connection problems, latency issues. Git allow you to continue working on the project and update later. Git also allow you to clone a remote repository like GitHub to your computer and work on those files independently.
What is Git workflow
A typical Git workflow consists of three stages.
- Modified – In this stage you create or change or update existing project files.
- Staged – You finished modifications and set the files for your next commit.
- Committed – You have saved the project files and Git snapshot is ready.
All the three stages have their own command, and you can check the status with command git status and git log. Once all changes are committed , you can even sync it with the remote repository with git push or git push origin main.
Setting up local repository using Git
You can make a git repository on your computer – Windows, Linux and Mac. So, there are two ways to setup local Git repository.
- Use existing folder as Git repository.
- Clone a remote repository.
Let’s create a local repository on your computer. The method varies depending on the system you are using. We leave the cloning part for another article.
Setting up local repository in Windows
Before we begin, I assume you have git installed and configured it. We are going to use command prompt on Windows. For this experiment, I am using a Windows 10 system.
To setup a local git repository on Windows computer, first you need to make a project folder , then make that project folder your git repository. Finally, test the git workflow by creating a new file to make sure everything is working file.
Step 1: Make a project directory
This project directory will be your local Git repository.
Go to Search, and type cmd and when command prompt shows up , open it. When you open command prompt on Windows, it shows you the default path: C:\Users\<your username. You can change the default current directory by typing cd\. This will take you to C drive of your computer.
Your current working directory should be your C: directory or partition , if you have more than one partition, you can change the working directory any other partition or any other folder using the cd command. Once you are in C: directory, create a new project folder using following command.
mkdir myGitProject myGitProject is the folder name.
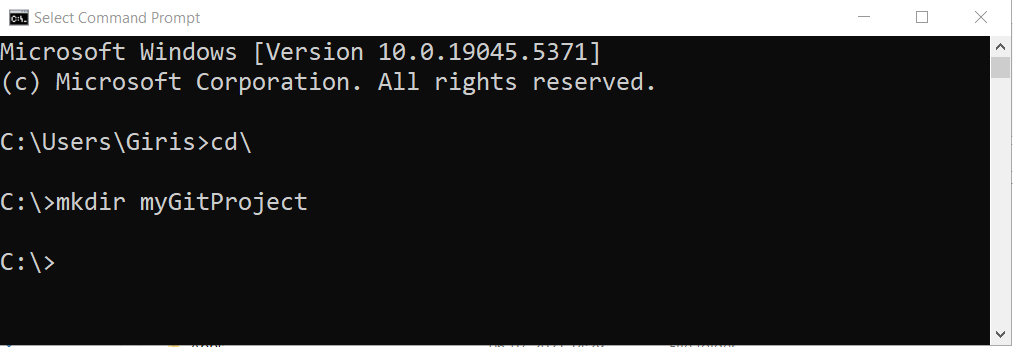
You can open the C: drive and check if there is a myGitProject folder, if it is not visible, make sure you refresh the Windows.
Step 2: Change the current directory to myGitProject
Use the following command to change your current working directory to myGitProject folder. Before you change the directory, make sure that you are in C: directory.
cd gitGitProject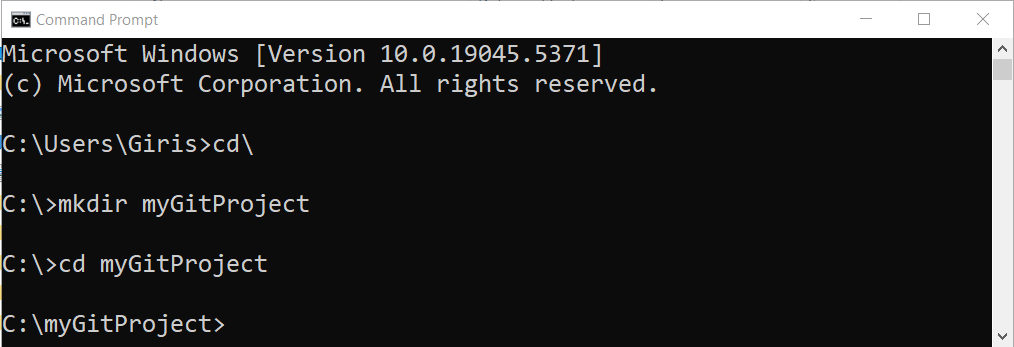
Step 3: Create local git directory
Its time to convert you project folder into a git repository by running following command.
git init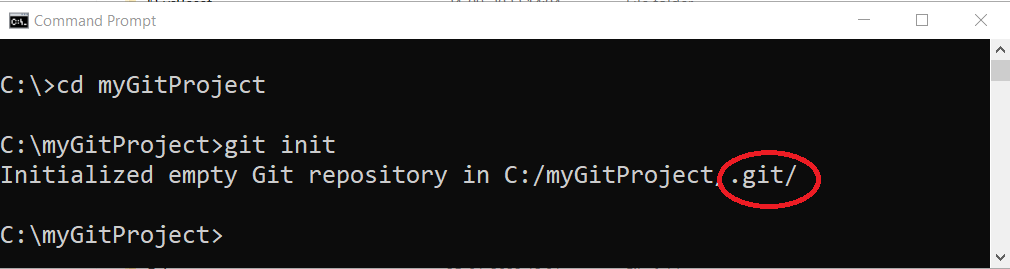
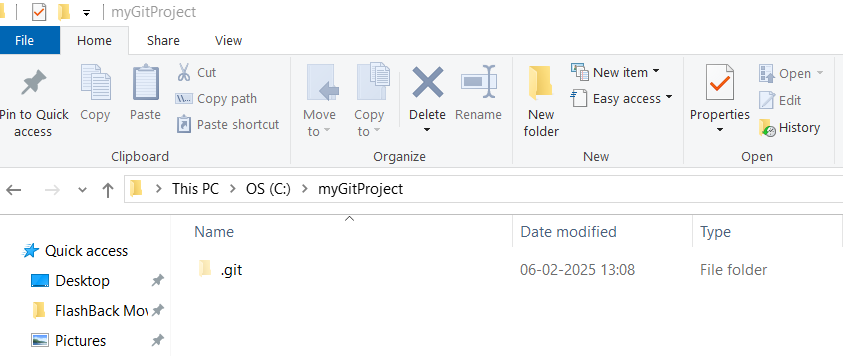
After the git init command , empty git repository is created inside myGitProject folder. You can go to C:\myGitProhect folder and verify that a .git folder exists. This is your local git repository.
You local git repository is empty, there is nothing to test whether your git is working. Next few steps are to test the Git workflow in the new repository.
Testing the Git workflow
Step 4: Create a new file
Create a new text file using Notepad or any text editor of your liking, make sure you save it as a .txt file in the myGitProject directory. You can call this file anything, here I am using test-file.txt as file name.
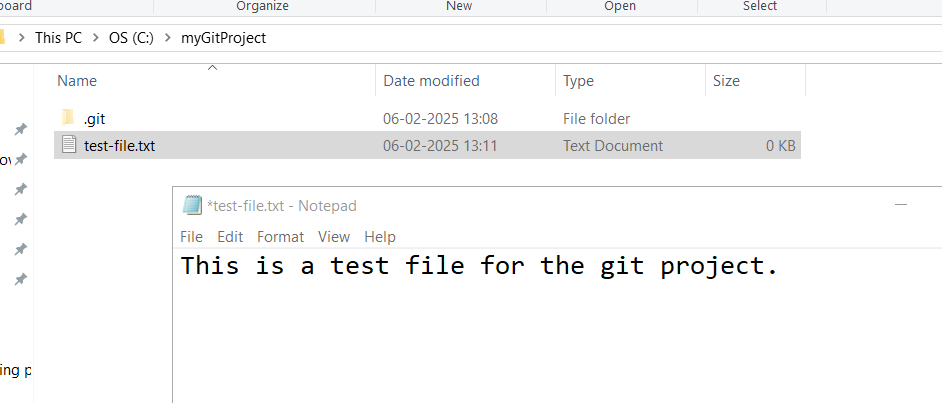
You must add some content to this test file and save it. This is your first project file which we are going to commit using Git. After modifying the test file, you have completed the first stage of Git workflow.
Step 5: Add the test file to staging area
The second stage in Git workflow is to add the modified test file to Git staging area. Once file is staged, it is ready to commit. Use following command to add the test file.
git add <your file-name.txt> Note that the filename should not contain any space or invalid character.

You will not receive any confirmation for the git add command. To confirm that the staging was successful, use git status command which will return the current status of your working directory and staging area.
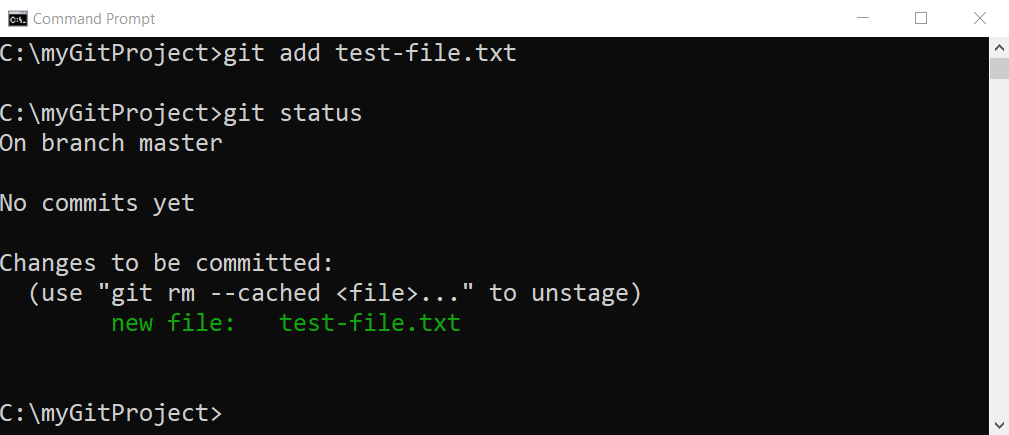
The image shows new file: test-file.txt and confirm that the staging is successful.
Step 6: Commit your staged file and check log for confirmation
The last state of git workflow is to commit the staged file and as soon as you commit , Git saves the staged changes and creates a snapshot of the project files. In future, you can return to this snapshot if something goes wrong.
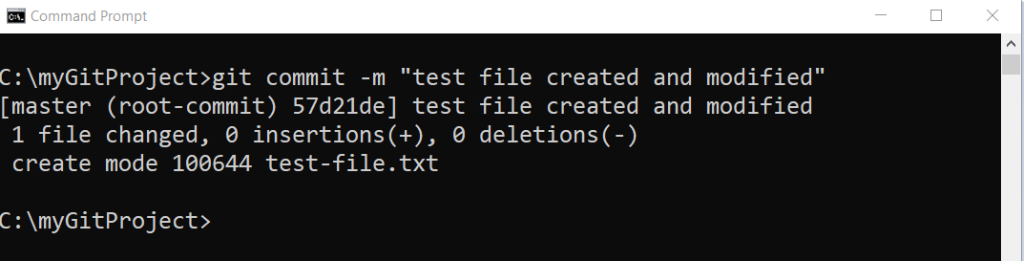
To commit your staged changes, you must run git commit command.
git commit -m "some description of changes made"The -m is commit message and it should be short description about the changes made to the project files. You can write a robust git commit message , however, we keep the discussion for future articles. The message should be written in such a way, that it is help for you or others should anyone visit the snapshot later.
To view your git commit history, run the following command.
git commit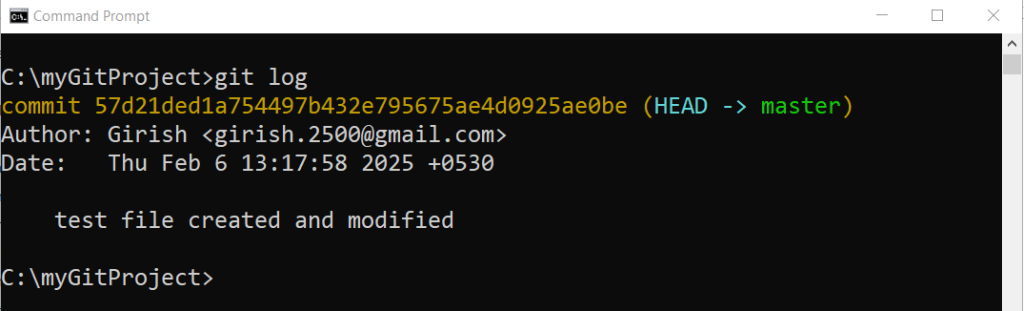
Setting up Git repository in Linux
Some of you might be using a Linux computer. Here is step by step instructions to set up a local git repository on a Linux computer. For this experiment, I am using Xubuntu release 24.04 , Noble Numbat. The process is similar to how we setup local repository on Windows.
Step 1: Open Terminal and create a new directory for git repository
All the operations to setup a Git repository should be done from a terminal. It is faster, if you this way. First open the Linux terminal using
- CTRL + ALT + T on your keyboard, you should press these three keys at the same time.
- Use the Dash bar and click Terminal, which will open the Linux terminal.
There are several other ways to open a terminal on Linux. Choose the easiest one and once the terminal is open make sure you are in the home directory by typing the command pwd, this command will show you path to your home directory. There are two types of home directory you may find in Linux;
- /home/username
- /users/username
After running pwd command your home directory should look like one of the options given above. If you are not in home directory, use command cd ~ which will reset the terminal to your home directory, no matter where your current location is in the directory system. The home directory will be your current working directory.
From the home directory, create a new folder with following command:
mkdir projectThe name “project” is your new repository name.

Once you execute the command, there is no response. Unlike windows, you can use shell to verify the existence of the new directory by running ls command. The image above shows how I created a project directory successfully. You can create the project directory with any valid name, its totally up to you.
Step 2: Make project directory your current directory
Make the project directory created in previous step your current working directory.
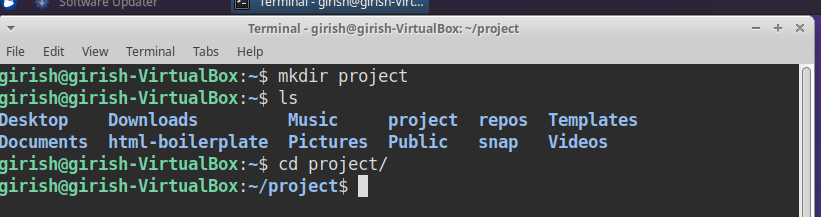
Use cd project/ command at the terminal. You will not get any response unless you are making some mistake such as incorrect command, wrong directory name etc.
Step 3: Make the current directory project as your local git repository
Its time to make your current directory ‘project’ to a git repository. Use the following command:
git initThe command will initialize the git repository by creating a ,git folder. However, running ls command in the terminal will not show anything. The new .git directory is a hidden directory and to show this folder, you must run ls -a which will display all files including hidden files and directories.

If you see a .git repository, then your local git repository is created successfully, we must now, test it.
Step 4: Make a text file and modify it
We must create some file with text, to test the git workflow – modify, staged and commit. This procedure is common for Windows and Linux, but there is still difference in how things are done both systems.
You should use terminal to create a text file in Linux using following command.
touch testfile.txt The touch command will create an empty text file instantly, while the ‘testfile.txt’ is the name of the file with extension.

You should run the ls command to verify the existence of file – testfile.txt. Open the file with following command:
nano testfile.txt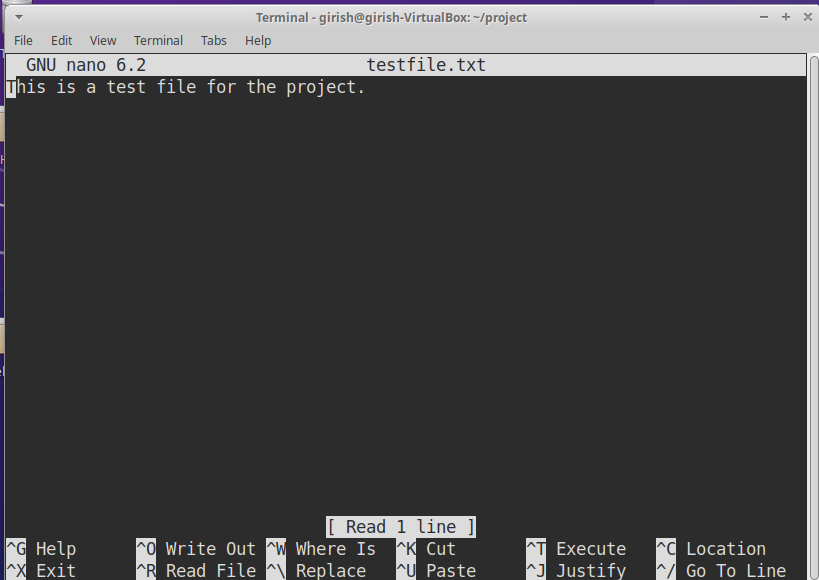
The command nano is the name of the text editor using which you wish to open the testfile.txt. Once the file is open, add some content and save the file by pressing CTRL + o on your keyboard.
Step 5: Add test file to staging area
Its time to add the file in staging area which is the second step in git workflow. Use the following command.
git add testfile.txt 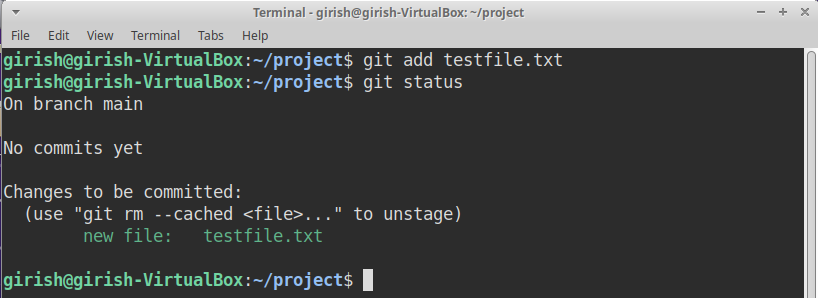
If you have added the testfile.txt to the staging area, the second step of Git workflow is completed. You can check the status of the file using git status command.
Step 6: Commit your changes to Git
The final step in the Git workflow is to commit your staged file. The command to commit in Git is given below:
git commit -m The -m is git message and it is recorded with git history.

Note that ‘Testfile modified’ is the git message that I wrote with the commit command. To check the commit history, use git log command.
Setting Git repository on Mac
The process of creating a local Git repository in Mac is similar to Linux. I have listed the steps below.
- Go to Finder, open /Applications/Utilities folder, and double-click Terminal or you can go to Launchpad icon in Dock, and then type Terminal on the top of the Launchpad screen.
- In the terminal, make a project directory using
mkdir gitproject. - Make gitproject your current directory using
cd gitproject. - Turn gitproject into Git repository using git init command.
- Test the Git workflow by creating, modifying, staging and committing to Git database.
Summary
In this article, you learned about Git as a Version Control System(VCS) and its workflow. The initial local Git repository is must to start using Git. Setting up git for different operating systems require different steps. You learned how to setup Git on Windows, Linux and Mac computer.
Follow the steps carefully to complete this experiment on your computer. You can always refer to internet if any concept or steps are not clear.