Student Attendance Management System Using MS Access and VB 6 Part 4 – In this article, we will continue to build the interface for attendance management system that will meet the user requirements.
You will build the following interfaces.
- View Attendance (frmViewAttendance)
- Today’s Attendance (frmTodayAttendance)
- Student Record Management (frmStudent)
- Teacher Record Management (frmTeacherRecord)
Let us get started.
View Attendance
The view attendance interface allows students, teachers, and admin to view attendance between specific dates, count the hours present, and display if they have the eligibility to attend the exams.
The total number of hours of class for a student is 300 hours. If the student is able to get at least 150 hour present then he or she is eligible to attend the exam. The program display how many hour to complete to qualify and number of hours present in the class.
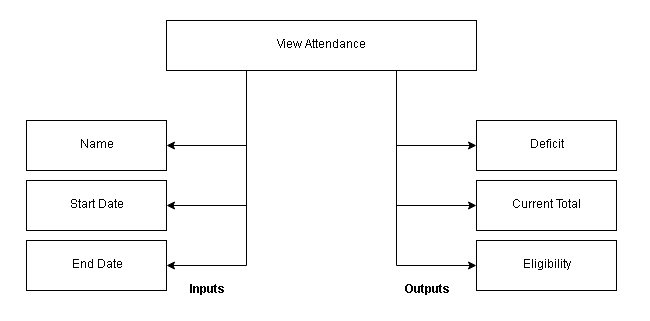
System Diagram For View Attendance
The view attendance interface requires three input values – name, start date, and end date of attendance taken. It display current total when a student was present and deficit- remaining hours to be eligible for exam. Finally, the eligibility of a student to appear in the exam as mentioned earlier.
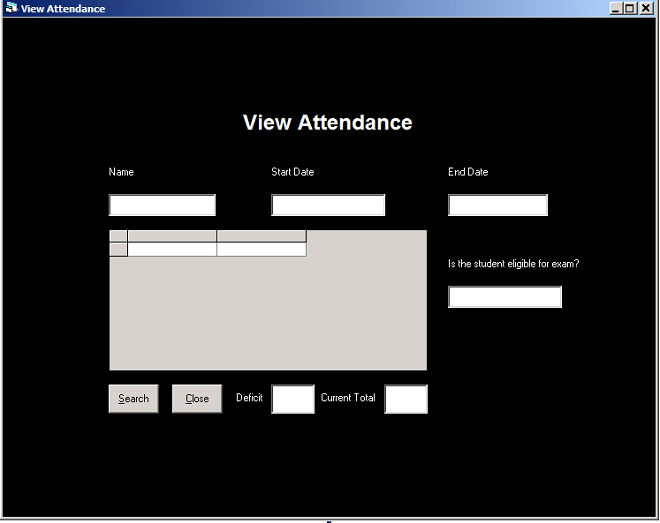
Form Design(frmViewAttendance)
The next step is to create a form called frmViewAttendance that matches with the above system diagram. You can create a form design given below. It is not necessary that your form should exactly like the following figure. You may try a different design as well.
Components for View Attendance
The components for view attendance interface are listed below.
Form Details
Name : frmViewAttendance
Caption : View Attendance
BackColor: Windows Text
Labels
Name: lblHead
Alignment : 2-Center
Caption: View Attendance
BackColor: Windows Text
ForeColor: Highlight Text
Font : Arimo 18px Bold
Name: lblName
Alignment : 0-Left Justify
Caption: Name
BackColor: Windows Text
ForeColor: Highlight Text
Name: lblStartDate
Alignment : 0-Left Justify
Caption: Start Date
BackColor: Windows Text
ForeColor: Highlight Text
Name: lblEndDate
Alignment : 0-Left Justify
Caption: End Date
BackColor: Windows Text
ForeColor: Highlight Text
Name: lblDeficit
Alignment : 0-Left Justify
Caption: Deficit
BackColor: Windows Text
ForeColor: Highlight Text
Name: lblCurrentTotal
Alignment : 0-Left Justify
Caption: Current Total
BackColor: Windows Text
ForeColor: Highlight Text
Name: lblEligible
Alignment : 0-Left Justify
Caption: Is the student eligible for exam ?
BackColor: Windows Text
ForeColor: Highlight Text
Textboxes
Name : txtSname
Text : 'none'
Name : txtSdate
Text : 'none'
Name : txtSdate
Text : 'none'
Name : txtEdate
Text: 'none'
Name : txtDeficit
Text : 'none'
Name : txtCurrent
Text : 'none'
Name : txtEligible
Text : 'none'
Buttons
Name : cmdSearch
Caption : &Search
BackColor : Button Highlight
Style : 1-Graphical
Name : cmdClose
Caption : &Close
BackColor : Button Highlight
Style : 1-Graphical
Data-grid Control
Name : DGViewAttendance
Code for View Attendance
Dim rs1 As New ADODB.Recordset
Dim total As Integer
Dim deficit As Integer
Public Sub openrecords()
rs.CursorLocation = adUseClient
rs.CursorType = adOpenStatic
rs.Open "SELECT Student.[SID],Student.[Sname],Attendance.[Adate],Attendance.[APresent] FROM Attendance,Student WHERE Student.[Sid]= Attendance.[SID] And Student.[Sname] = '" & txtSname & "' And ( Attendance.[Adate] Between  # " & Format(txtSdate.Text, "mm/dd/yyyy") & " # And  # " & Format(txtEdate.Text, "mm/dd/yyyy") & " # )", con, adOpenDynamic, adLockPessimistic
rs1.Open "SELECT Count(APresent)FROM Attendance,Student WHERE Student.[Sid]= Attendance.[SID] And Student.[Sname] = '" & txtSname & "' And ( Attendance.[Adate] Between  # " & Format(txtSdate.Text, "mm/dd/yyyy") & " # And  # " & Format(txtEdate.Text, "mm/dd/yyyy") & " # )", con, adOpenDynamic, adLockPessimistic
End Sub
Private Sub cmdCLOSE_Click()
Unload frmMenu
Unload frmViewAttendance
Unload frmTodayAttendance
rs.Close
con.Close
'closing connection
End Sub
Private Sub cmdSearch_Click()
'making connection
Call loadcon
Call openrecords
Dim Present As String
Present = "YES"
total = 300
deficit = total - rs1.Fields(0).Value
txtCurrent.Text = rs1.Fields(0).Value
txtDeficit.Text = Str(deficit)
If deficit <= 150 Then
txtEligible.Text = "ELIGIBLE FOR EXAM"
txtEligible.ForeColor = vbGreen
Else
txtEligible.Text = "NOT ELIGIBLE"
txtEligible.ForeColor = vbRed
Set DGViewAttendance.DataSource = rs
End If
End Sub
Today’s Attendance
The today’s attendance is only visible to teachers. When the teacher log into the system, his or her students are listed automatically. The teacher can browse through the student data and mark attendance.
System Diagram for Today’s Attendance
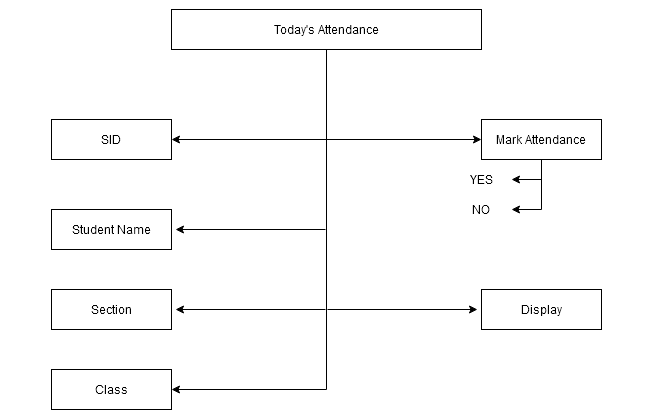
There is not input required for today’s attendance other than the teacher must log into the system with their own id. Only those who log into the system will get their student list. One teacher cannot see students of other teachers.
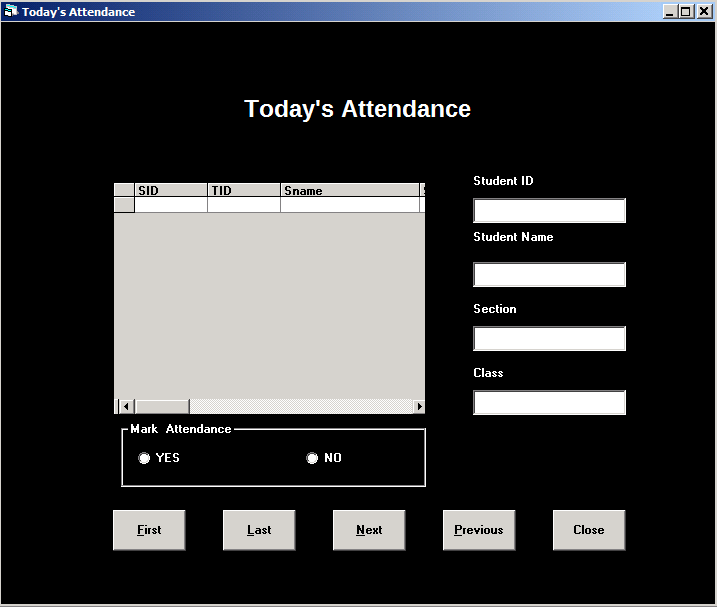
Form Design (frmTodayattendance)
The next step is to design a form based on the system diagram. You may come up with your own design.
Components for Today Attendance
Here is the list of components used to build the today’s attendance interface.
Form Details
Name : frmTodayAttendance
Caption: Today's Attendance
BackColor: Windows Text
Labels
Name : lblTodayMain
Caption: Today's Attendance
BackColor: Windows Text
ForeColor : Highlight Text
Font : Arimo 18px Bold
Name : lblTSid
Caption: Student ID
BackColor: Windows Text
ForeColor : Highlight Text
Name : lblTSname
Caption: Student Name
BackColor: Windows Text
ForeColor : Highlight Text
Name : lblTodaySection
Caption: Section
BackColor: Windows Text
ForeColor : Highlight Text
Name : lblTodayClass
Caption: Class
BackColor: Windows Text
ForeColor : Highlight Text
Textboxes
Name : txtTSid
Text : 'none'
Name : txtTodaySname
Text : 'none'
Name : txtTodaySection
Text : 'none'
Name : txtTodayClass
Text : 'none'
Data-Grid Control
Name : DGToday
Frame Control
The frame control is for marking attendance and it has two option buttons. Once we create frame, right click on the frame and click-“send to back“. After which you can create option button on top of it.
Name : frameMarkAttendance
Caption: Mark Attendance
BackColor :Window Text
ForeColor : Highlight Text
Option Buttons
Name : OptionYes
Caption : YES
BackColor :Window Text
ForeColor :Highlight Text
Font : MS Sans-serif 8px Bold
Name : OptionNo
Caption : NO
BackColor :Window Text
ForeColor :Highlight Text
Font : MS Sans-serif 8px Bold
Buttons
Name : cmdFirst
Caption : &First
BackColor: Button Highlight
Style : 1-Graphical
Name : cmdLast
Caption : &Last
BackColor: Button Highlight
Style : 1-Graphical
Name : cmdNext
Caption : &Next
BackColor: Button Highlight
Style : 1-Graphical
Name : cmdPrevious
Caption : &Previous
BackColor: Button Highlight
Style : 1-Graphical
Name : cmdClose
Caption : &Close
BackColor: Button Highlight
Style : 1-Graphical
Code for Today Attendance
Option Explicit
Public contoday As New ADODB.Connection
Public rstoday As New ADODB.Recordset
Public sqltodaystr As String
Public Sub CreateConnection()
sqltodaystr = "Provider=Microsoft.Jet.OLEDB.4.0;Data Source=C:\VBProjects\Attendance\attendance.mdb;Persist Security Info=False"
contoday.Open sqltodaystr
End Sub
Public Sub OpenRecordset()
Dim tid As Integer
tid = frmSplash.userlogin
rstoday.CursorLocation = adUseClient
rstoday.CursorType = adOpenStatic
rstoday.Open "SELECT Teaches.[SID],Teaches.[TID],Student.[Sname],Student.[Section],Student.[Class] FROM Student,Teaches WHERE Teaches.[TID] = " & tid & " And Student.[Sid] = Teaches.[SID]", contoday, adOpenDynamic, adLockPessimistic
Set DGToday.DataSource = rstoday
rstoday.ActiveConnection = Nothing
End Sub
Private Sub cmdCLOSE_Click()
Unload Me
rstoday.Close
contoday.Close
End Sub
Private Sub cmdFirst_Click()
rstoday.MoveFirst
txtTSid.Text = rstoday.Fields("Sid").Value
txtTodaySname.Text = rstoday.Fields("Sname").Value
txtTodaySection.Text = rstoday.Fields("Section").Value
txtTodayClass.Text = rstoday.Fields("Class").Value
End Sub
Private Sub cmdLast_Click()
rstoday.MoveLast
txtTSid.Text = rstoday.Fields("Sid").Value
txtTodaySname.Text = rstoday.Fields("Sname").Value
txtTodaySection.Text = rstoday.Fields("Section").Value
txtTodayClass.Text = rstoday.Fields("Class").Value
End Sub
Private Sub cmdNext_Click()
rstoday.MoveNext
If rstoday.EOF = True Then
rstoday.MoveFirst
End If
txtTSid.Text = rstoday.Fields("Sid").Value
txtTodaySname.Text = rstoday.Fields("Sname").Value
txtTodaySection.Text = rstoday.Fields("Section").Value
txtTodayClass.Text = rstoday.Fields("Class").Value
End Sub
Private Sub cmdPrevious_Click()
rstoday.MovePrevious
If rstoday.BOF = True Then
rstoday.MoveLast
End If
txtTSid.Text = rstoday.Fields("Sid").Value
txtTodaySname.Text = rstoday.Fields("Sname").Value
txtTodaySection.Text = rstoday.Fields("Section").Value
txtTodayClass.Text = rstoday.Fields("Class").Value
End Sub
Private Sub Form_Load()
CreateConnection
OpenRecordset
End Sub
Private Sub OptionNo_Click()
Call loadcon
Dim Curr_date As Date
Dim Absent As String
Dim todaytid As Integer
todaytid = frmSplash.userlogin
Absent = "NO"
Curr_date = Format(Now, "mm/dd/yyyy")
con.Execute ("INSERT INTO Attendance VALUES(" & _
"#" & Curr_date & "#," & _
"" & txtTSid & "," & _
"" & todaytid & "," & _
"'" & Absent & "')")

    MsgBox ("Record Added")

    OptionYes.Value = False
    OptionNo.Value = False
    con.Close
End Sub
Private Sub OptionYes_Click()
Call loadcon
Dim Curr_date As Date
Dim Present As String
Dim todaytid As Integer
todaytid = frmSplash.userlogin
Present = "YES"
Curr_date = Format(Now, "mm/dd/yyyy")
con.Execute ("INSERT INTO Attendance VALUES(" & _
"#" & Curr_date & "#," & _
"" & txtTSid & "," & _
"" & todaytid & "," & _
"'" & Present & "')")

    MsgBox ("Record Added")

    OptionYes.Value = False
    OptionNo.Value = False
    con.Close
End Sub
Student Record Management
The student record management is the job of admin staff. The admin can add new students, update student records, and delete the student information from the database.
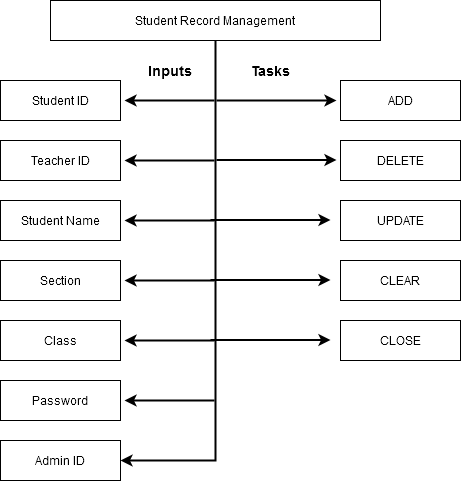
System Diagram for Student Record Management
The system diagram for student record management has two parts – inputs and tasks. The inputs for the system is student details, and once the input is received, the admin can perform one of the following tasks.
- ADD
- UPDATE
- DELETE
- CLEAR
- CLOSE
Here is the system diagram.
Form Design (frmStudent)
The next step is to use the system diagram as a guide and design the following form.
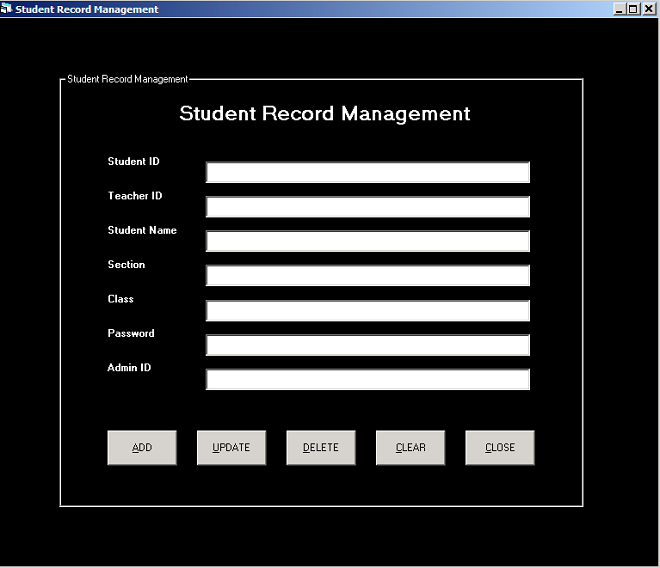
In the next section, we will discuss each component of the form in detail.
Component for Student Record Management
Here are the components for student management form.
Form Details
Name : frmStudent
Caption : Student Record Management
BackColor : Window Text
Now we need a frame control to organize our other controls. First create a frame and then right click and select “Send to Back”. Start creating other controls such as labels, textboxes and button on top of it. If you do not want a frame skip this step and continue with rest of the controls.
Frame Control
Name : frameStudentRecord
Caption : Student Record Management
BackColor : Window Text
ForeColor : Highlight Text
Labels
Name : lblStudentMain
Caption : Student Record Management
BackColor : Window Text
ForeColor : Highlight Text
Font : Arimo 18px Bold
Name : lblSSID
Caption : Student ID
BackColor : Window Text
ForeColor : Highlight Text
Font : Arimo 8px Bold
Name : lblSTID
Caption : Teacher ID
BackColor : Window Text
ForeColor : Highlight Text
Font : Arimo 8px Bold
Name : lblSSname
Caption : Student Name
BackColor : Window Text
ForeColor : Highlight Text
Font : Arimo 8px Bold
Name : lblSection
Caption : Section
BackColor : Window Text
ForeColor : Highlight Text
Font : Arimo 8px Bold
Name : lblClass
Caption : Class
BackColor : Window Text
ForeColor : Highlight Text
Font : Arimo 8px Bold
Name : lblPassword
Caption : Password
BackColor : Window Text
ForeColor : Highlight Text
Font : Arimo 8px Bold
Name : lblAID
Caption : Admin ID
BackColor : Window Text
ForeColor : Highlight Text
Font : Arimo 8px Bold
Textboxes
Name :txtSID
Text :'none'
Name :txtSTID
Text :'none'
Name :txtSname
Text :'none'
Name :txtSection
Text :'none'
Name :txtClass
Text :'none'
Name :txtSpass
Text :'none'
Name :txtAID
Text :'none'
Buttons
Name : cmdADD
Caption : &ADD
BackColor : Button Highlight
Style : 1-Graphical
Name : cmdUpdate
Caption : &UPDATE
BackColor : Button Highlight
Style : 1-Graphical
Name : cmdDelete
Caption : &DELETE
BackColor : Button Highlight
Style : 1-Graphical
Name : cmdClear
Caption : &CLEAR
BackColor : Button Highlight
Style : 1-Graphical
Name : cmdClose
Caption : &CLOSE
BackColor : Button Highlight
Style : 1-Graphical
Code for Student Management System
Option Explicit
Private Sub cmdADD_Click()
Call loadcon
con.Execute ("INSERT INTO Student VALUES(" & txtSID & ",'" & txtSname & " ','" & txtSection & " ' ,'" & txtClass & " ' ,' " & txtSpass & " ', " & txtAID & " );")
con.Execute ("INSERT INTO Teaches VALUES (" & txtSID & "," & txtSTid & ");")


    MsgBox ("Record Added")
    con.Close

End Sub
Private Sub cmdCLEAR_Click()
txtSname = " "
txtSID = " "
txtSTid = " "
txtSection = " "
txtClass = " "
txtSpass = ""
txtAID = " "
End Sub
Private Sub cmdCLOSE_Click()
Unload frmStudent
Unload frmTeacherRecord
End Sub
Private Sub cmdDelete_Click()
Call loadcon
con.Execute "DELETE * FROM Attendance WHERE SID = " & txtSID & ""
con.Execute "DELETE * FROM Teaches WHERE SID = " & txtSID & ""
con.Execute "DELETE * FROM Student WHERE Sid = " & txtSID & ""
MsgBox ("Record Deleted!")
con.Close
End Sub
Private Sub cmdUPDATE_Click()
Call loadcon
con.Execute "UPDATE Student SET Student.[Sname] = '" & txtSname & "', Student.[Section] = '" & txtSection & "',Student.[Class], Student.[Password] = '" & txtSpass & "' WHERE SID = " & txtSID & "; "
MsgBox ("Record Updated ")
End Sub
Private Sub txtSID_GotFocus()
txtSTid.Enabled = False
txtAID.Enabled = False
End Sub
Private Sub txtSname_GotFocus()
txtSTid.Enabled = False
txtAID.Enabled = False
End Sub
Teacher Record Management
The teacher record management is similar to student management. To maintain the records of old and new teaching staff is the job of administrators.
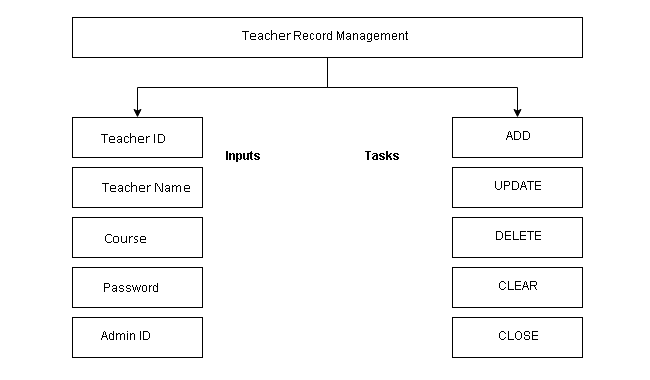
System Diagram for Teacher Record Management
Form Design (frmTeacherRecord)
The next step is to design a form similar to given below.
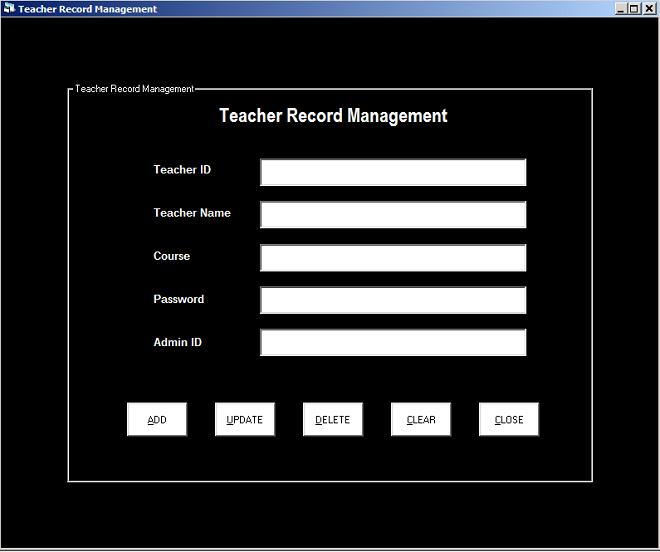
In the section below, we will discuss the components used in the interface – Teacher Record Management.
Components for Teacher Record Management
Here is the list of components for above interface.
Form Details
Name : frmTeacherRecord
Caption : Teacher Record Management
BackColor : Window Text
Frame Control
You can organize the form using the frame control. First create the control and then right click and ‘Send-to-back’. After that you can simply add other controls on top of the frame.
Name : frameTeacher
Caption : Teacher Record Management
BackColor : Window Text
ForeColor : Highlight Text
Labels
Name : lblTeacherMain
Alignment : 2-Center
Caption : Teacher Record Management
BackColor : Window Text
ForeColor : Highlight Text
Font : Arimo 18px Bold
Name : lblTID
Alignment : 0-Left Justify
Caption : Teacher ID
BackColor : Window Text
ForeColor : Highlight Text
Font : Arimo 10px Bold
Name : lblTNAME
Alignment : 0-Left Justify
Caption : Teacher Name
BackColor : Window Text
ForeColor : Highlight Text
Font : Arimo 10px Bold
Name : lblCOURSE
Alignment : 0-Left Justify
Caption : Course
BackColor : Window Text
ForeColor : Highlight Text
Font : Arimo 10px Bold
Name : lblPASS
Alignment : 0-Left Justify
Caption : Password
BackColor : Window Text
ForeColor : Highlight Text
Font : Arimo 10px Bold
Name : lblAID
Alignment : 0-Left Justify
Caption : Admin ID
BackColor : Window Text
ForeColor : Highlight Text
Font : Arimo 10px Bold
Textboxes
Name :txtTID
Text : 'none'
Name :txtTNAME
Text : 'none'
Name :txtCOURSE
Text : 'none'
Name :txtTpass
Text : 'none'
Name :txtAID
Text : 'none'
Buttons
Name : cmdADD
Caption :&ADD
BackColor : Window Text
Style : 1-Graphical
Name : cmdUpdae
Caption :&UPDATE
BackColor : Window Text
Style : 1-Graphical
Name : cmdDELETE
Caption :&DELETE
BackColor : Window Text
Style : 1-Graphical
Name : cmdCLR
Caption :&CLEAR
BackColor : Window Text
Style : 1-Graphical
Name : cmdCLOSE
Caption :&CLOSE
BackColor : Window Text
Style : 1-Graphical
Code for Teacher Record Management
Private Sub cmdADD_Click()
Call loadcon
con.Execute ("INSERT INTO Teacher VALUES(" & txtTID & ",'" & txtTNAME & " ','" & txtCOURSE & " ' ,' " & txtTpass & " ', " & txtAID & " );")
    MsgBox ("Record Added")
End Sub
Private Sub cmdCLOSE_Click()
Unload frmTeacherRecord
Unload frmStudent
End Sub
Private Sub cmdCLR_Click()
txtTID.Text = ""
txtTNAME.Text = ""
txtCOURSE.Text = ""
txtTpass.Text = ""
txtAID.Text = ""
End Sub
Private Sub cmdDelete_Click()
Call loadcon
con.Execute ("DELETE * FROM Attendance WHERE TID = " & txtTID & " ")
con.Execute ("DELETE * FROM Teaches WHERE TID = " & txtTID & " ")
con.Execute ("DELETE * FROM Teacher WHERE Tid = " & txtTID & " ")
MsgBox ("Record Deleted!")
con.Close
End Sub
Private Sub cmdUPDATE_Click()
Call loadcon
con.Execute "UPDATE Teacher SET Teacher.Tname = '" & txtTNAME & "', Teacher.Course = '" & txtCOURSE & "', Teacher.Password = '" & txtTpass & "' WHERE Tid = " & txtTID & "; "
MsgBox ("Record Updated ")
con.Close
End Sub
In the next part, you will learn to put all the above forms in one place called MDI form. The MDI form integrates your VB project forms together.