In this example, we are going to create a payroll processing system in VB 6 with Ms Access as the database. To complete this project, you need a computer with windows operating system XP or higher installed, Visual Basic 6.0 software, and Microsoft Access program anything higher than Ms Access 2003 or higher.
For the sake of this example, we are using VB 6.0 software and windows 7 64-bit system with Ms Access 2013 installed.
Payroll Processing System
The payroll processing system allow use to do following things with the employee information.
- Add Employee Record
- Modify Employee Record
- Delete the Employee Record
The main purpose of the payroll processing system is to calculate the salary of each employee.
Steps To Design And Implement This Project
To design and implement this project, we will follow a simple process listed below.
- Create a Database with tables for Employee and Salary
- Design the form for Employee records
- Write codes for the Employee form
- Design the form for Salary records
- Write codes for Salary form.
- Connect the database with the form
- Test each functionality and correct any errors.
Create The Database
The very first step is to create a database in Microsoft Access and add two tables. Open Ms Access 2013 and click ‘ Create a blank database’ and type the name of the database as ‘ EmpDB.mdb’. Save it to you drive in a folder called ‘AccessDB’.
At this moment the database is empty and it has nothing. Our task is to create two tables in the database. When you switch to Design view in Ms Access, you will asked to name your table, you can call it – Employee and click OK.

You table must have fields and corresponding data types. See the image below.
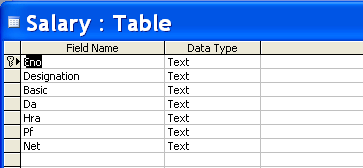
Once you have created tables, then you must create a relationship between these two tables. The employee number is the unique in both table. Each employee can have one salary account. Therefore, we must have a one-to-one relationship between employee table and the salary table.
Before you create the relationship close the tables, then go to database tools in Ms Access and click Relationships. The next step is to add both employee table and salary table in the relationship window.
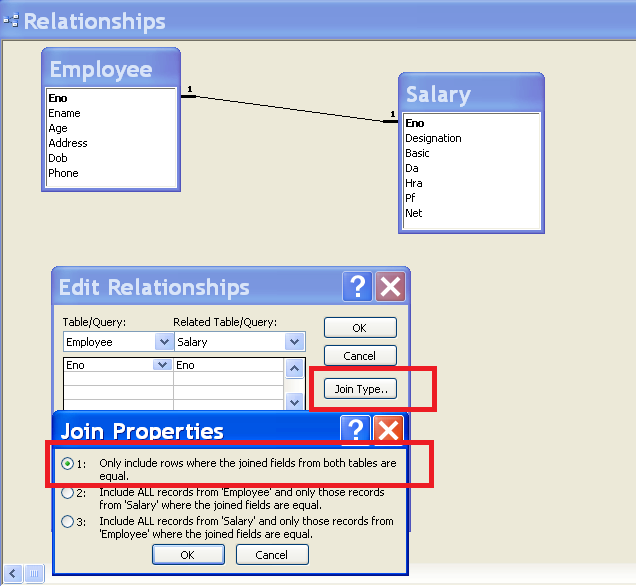
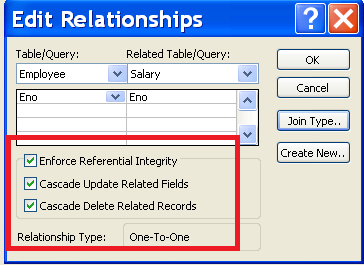
You must click on the relationship link and edit the relationship. Select ‘Enforce Referential Integrity’ and also select ‘Cascade Update Related Fields’ and ‘Cascade Delete Related Record’. These two properties will make sure that if you delete any record from one table, that will also remove it from the other.
Now you can add some records to both the table. It is good to add at least 5 records in both table. Leave the Net field empty in Salary table because we need to calculate it and update it from our VB 6 program.


Note that the net salary is not calculated yet and salary is linked to a single employee.
Form Design For Employee Relation
In this section we will design a form in VB 6 for employee relation so that we could add, update, and delete records from the database. There will also be link to main program or to exit from the employee form.
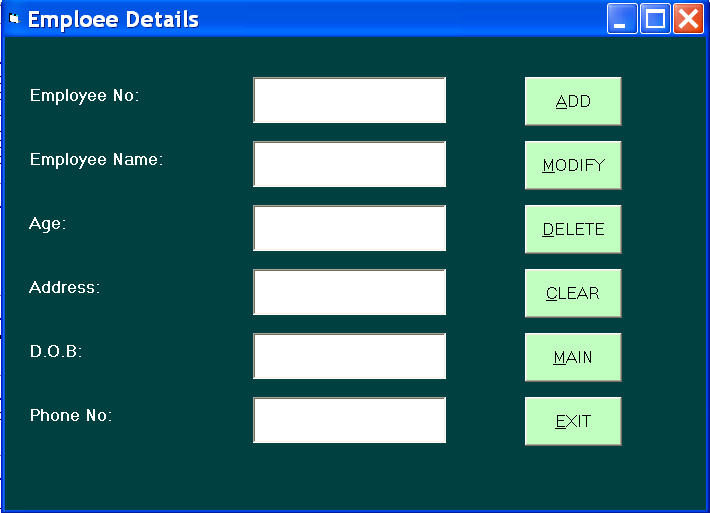
Form
Name: frmEmployee
Caption: Employee Details
BackColor: &H00404000&
ForeColor: Highlight Text
Height: 5775
Width: 10515
Labels
Name: lblEmpNo
Caption: Employee No:
BackColor: &H00404000&
ForeColor: Highlight Text
Font: Ms Sans Serif, 12, Bold
Width: 2295
Height: 495
Name: lblEmpname
Caption: Employee Name:
BackColor: &H00404000&
ForeColor: Highlight Text
Font: Ms Sans Serif, 12, Bold
Width: 2295
Height: 495
Name: lblAge
Caption: Age
BackColor: &H00404000&
ForeColor: Highlight Text
Font: Ms Sans Serif, 12, Bold
Width: 2295
Height: 495
Name: lblAddress
Caption: Address
BackColor: &H00404000&
ForeColor: Highlight Text
Font: Ms Sans Serif, 12, Bold
Width: 2295
Height: 495
Name: lblDob
Caption: D.O.B
BackColor: &H00404000&
ForeColor: Highlight Text
Font: Ms Sans Serif, 12, Bold
Width: 2295
Height: 495
Name: lblPhone
Caption: Phone No:
BackColor: &H00404000&
ForeColor: Highlight Text
Font: Ms Sans Serif, 12, Bold
Width: 2295
Height: 495
Textboxes
Name: txtEno
Height: 695
Width: 2895
Text: 'leave blank'
Name: txtEname
Height: 695
Width: 2895
Text: 'leave blank'
Name: txtAge
Height: 695
Width: 2895
Text: 'leave blank'
Name: txtAddress
Height: 695
Width: 2895
Text: 'leave blank'
Name: txtDob
Height: 695
Width: 2895
Text: 'leave blank'
Name: txtPhone
Height: 695
Width: 2895
Text: 'leave blank'
Buttons
Name: cmdAdd
Caption: &ADD
Font: Ms Sans Serif, 12, Regular
Name: cmdModify
Caption: &MODIFY
Font: Ms Sans Serif, 12, Regular
Name: cmdDelete
Caption: &DELETE
Font: Ms Sans Serif, 12, Regular
Name: cmdClear
Caption: &CLEAR
Font: Ms Sans Serif, 12, Regular
Name: cmdMain
Caption: &MAIN
Font: Ms Sans Serif, 12, Regular
Name: cmdExit
Caption: &EXIT
Font: Ms Sans Serif, 12, Regular
Code For Employee Form Of Payroll Processing System
Option Explicit
Private Sub cmdAdd_Click()
con.Execute "INSERT INTO Employee (Eno, Ename,Age,Address, Dob, Phone) VALUES ('" & txtEno & "','" & txtEname & "','" & txtAge & "','" & txtAddress & "','" & txtDob & "', '" & txtPhone & "')"
MsgBox "Record Added"
End Sub
Private Sub cmdClear_Click()
txtEno.Text = " "
txtEname.Text = " "
txtAge.Text = " "
txtAddress.Text = " "
txtDob.Text = " "
txtPhone.Text = " "
End Sub
Private Sub cmdDelete_Click()
con.Execute "DELETE * FROM Employee WHERE Eno = " & txtEno & ""
    MsgBox ("Record Deleted")
    txtEno = ""
End Sub
Private Sub cmdExit_Click()
Unload Me
con.Close
End Sub
Private Sub cmdMain_Click()
frmPayrollProcessing.Show
con.Close
End Sub
Private Sub cmdModify_Click()
con.Execute "UPDATE Employee SET Eno = '" & txtEno & "', Ename = ' " & txtEname & " ', Age = '" & txtAge & " ', Address = '" & txtAddress & "', Dob ='" & txtDob & "', Phone = '" & txtPhone & "' WHERE Eno = ' " & txtEno & " '"
MsgBox "Record Updated"
End Sub
Private Sub Form_Load()
Call loadcon
    MsgBox ("Connected")
End Sub
Form Design For Salary Relation
In this section, we will create a form to add salary account for existing employees, calculate their net salaries. The form will also print the net salary of an employee in a text file.
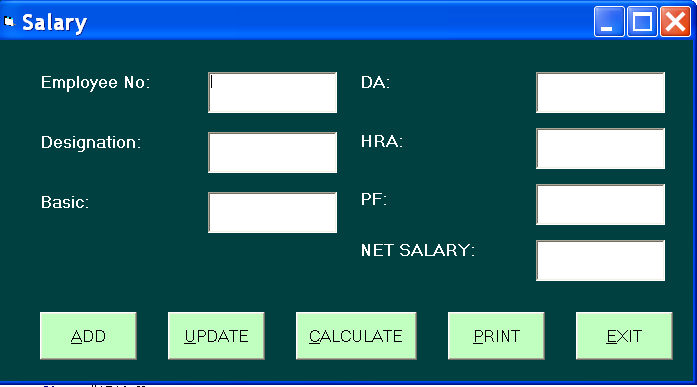
Form
Name: frmSalary
Caption: Salary
BackColor: &H00404000&
ForeColor: Highlight Text
Height: 5775
Width: 10515
Labels
Name: lblSalEno
Caption: Employee No:
BackColor: &H00404000&
ForeColor: Highlight Text
Font: Ms Sans Serif, 12, Bold
Height: 615
Width: 2175
Name: lblSalDesig
Caption: Designation:
BackColor: &H00404000&
ForeColor: Highlight Text
Font: Ms Sans Serif, 12, Bold
Height: 615
Width: 2175
Name: lblSalBasic
Caption: Basic:
BackColor: &H00404000&
ForeColor: Highlight Text
Font: Ms Sans Serif, 12, Bold
Height: 615
Width: 2175
Name: lblDa
Caption: DA:
BackColor: &H00404000&
ForeColor: Highlight Text
Font: Ms Sans Serif, 12, Bold
Height: 615
Width: 2175
Name: lblSalHra
Caption: HRA:
BackColor: &H00404000&
ForeColor: Highlight Text
Font: Ms Sans Serif, 12, Bold
Height: 615
Width: 2175
Name: lblSalPf
Caption: Pf:
BackColor: &H00404000&
ForeColor: Highlight Text
Font: Ms Sans Serif, 12, Bold
Height: 615
Width: 2175
Name: lblSalNet
Caption: NET SALARY:
BackColor: &H00404000&
ForeColor: Highlight Text
Font: Ms Sans Serif, 12, Bold
Height: 615
Width: 2175
Textboxes
Name: txtSalEno
Height: 615
Width: 1935
Text: 'leave blank'
Name: txtSalDesig
Height: 615
Width: 1935
Text: 'leave blank'
Name: txtSalBasic
Height: 615
Width: 1935
Text: 'leave blank'
Name: txtSalDa
Height: 615
Width: 1935
Text: 'leave blank'
Name: txtSalHra
Height: 615
Width: 1935
Text: 'leave blank'
Name: txtSalPf
Height: 615
Width: 1935
Text: 'leave blank'
Name: txtSalNet
Height: 615
Width: 1935
Text: 'leave blank'
Buttons
Name: cmdAdd
Caption: &ADD
Font: MS Sans Serif, 12, Regular
Height: 735
Width: 1935
Name: cmdUpdate
Caption: &UPDATE
Font: MS Sans Serif, 12, Regular
Height: 735
Width: 1935
Name: cmdCalculate
Caption: &CALCULATE
Font: MS Sans Serif, 12, Regular
Height: 735
Width: 1935
Name: cmdPrint
Caption: &PRINT
Font: MS Sans Serif, 12, Regular
Height: 735
Width: 1935
Name: cmdExit
Caption: &EXIT
Font: MS Sans Serif, 12, Regular
Height: 735
Width: 1935
Code For Salary Form Of Payroll Processing System
Private Sub cmdAdd_Click()
con.Execute "INSERT INTO Salary (Eno, Designation, Basic, Da, Hra, Pf,Net) VALUES ('" & txtSalEno & "','" & txtSalDesig & "','" & txtSalBasic & "','" & txtSalDa & "','" & txtSalHra & "', '" & txtSalPf & "','" & txtSalNet & "')"
MsgBox "Record Added"
End Sub
Private Sub cmdCalculate_Click()
Dim Basic As Double
Dim Da As Double
Dim Hra As Double
Dim Pf As Double
Dim Net As Double
Basic = Val(txtSalBasic.Text)
Hra = Basic * 0.2
Da = Basic * 0.1
Pf = Basic * 0.1
Net = Basic + Da + Hra + Pf
txtSalHra.Text = Str(Hra)
txtSalDa.Text = Str(Da)
txtSalPf.Text = Str(Pf)
txtSalNet.Text = Str(Net)
End Sub
Private Sub cmdExit_Click()
Unload Me
con.Close
End Sub
Private Sub cmdPrint_Click()
    Dim sFileText As String
    Dim iFileNo As Integer
      iFileNo = FreeFile
          'open the file for writing
      Open "C:\AccessDB\Test.txt" For Output As #iFileNo
    'please note, if this file already exists it will be overwritten!

          'write some example text to the file
      Print #iFileNo, "Employee No:"; txtSalEno.Text
      Print #iFileNo, "Employee Designation: "; txtSalDesig.Text
      Print #iFileNo, "Basic:"; txtSalBasic.Text; ""
      Print #iFileNo, "Net Salary:"; txtSalNet.Text
      MsgBox " Printing Done!!"

          'close the file (if you dont do this, you wont be able to open it again!)
      Close #iFileNo
End Sub
Private Sub cmdUpdate_Click()
con.Execute "UPDATE Salary SET Basic = '" & txtSalBasic & "' , Da = '" & txtSalDa & "', Hra = '" & txtSalHra & "', Pf = '" & txtSalPf & "', Net = '" & txtSalNet & " ' WHERE Eno = '" & txtSalEno & " ' "

    MsgBox ("Updated")
End Sub
Private Sub Form_Load()
Call loadcon
MsgBox "Connected!"
End Sub
Create A Main Form For The Payroll Processing Project
Since we have two separate forms and we want to be able to go to any form. In this section, we will create a new main form. Here is the design of the main form in VB 6.
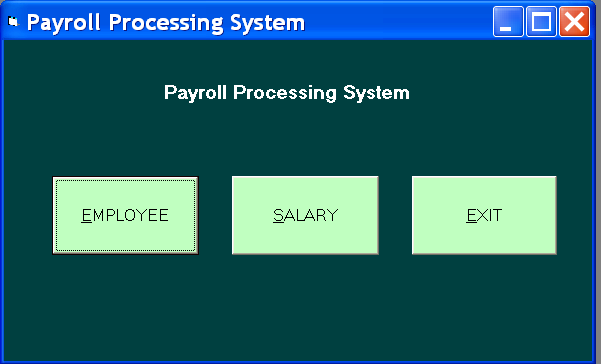
Form
Name: frmPayrollProcessing
Caption: Payroll Processing System
BackColor: &H00404000&
ForeColor: Highlight Text
Height: 5475
Width: 8940
Labels
Name: lblMainBanner
Caption: Payroll Processing System
BackColor: &H00404000&
ForeColor: Highlight Text
Buttons
Name: cmdMainEmp
Caption: &EMPLOYEE
Font: Ms Sans Serif, 12, Regular
Height: 1182
Width: 2205
Name: cmdMainSalary
Caption: &SALARY
Font: Ms Sans Serif, 12, Regular
Height: 1182
Width: 2205
Name: cmdMainExit
Caption: &EXIT
Font: Ms Sans Serif, 12, Regular
Height: 1182
Width: 2205
Make sure that you start your project with the main form. Therefore, go to Project tab on the top and click on Project1 Properties. Select ‘frmPayrollProcessing‘ under Startup Object.
Code For Main Form
Private Sub cmdMainEmp_Click()
frmEmp.Show
End Sub
Private Sub cmdMainExit_Click()
Unload Me
End Sub
Private Sub cmdMainSalary_Click()
frmSalary.Show
End Sub
Create A Module To Establish Connection With Database
The final step in this project is to create a module that help you establish a connection with the Ms Access database. This step is very important for your project success.
To create a new module, go to Project Explorer and right-click on Forms > select Add > click Module.
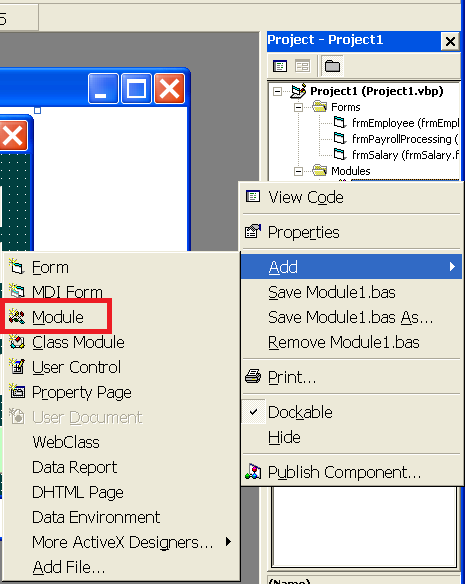
The module code window will open up immediately. Insert the following code and recheck.
Public con As New ADODB.Connection
Public rs As New ADODB.Recordset
Public constr As String
Public Sub loadcon()
 constr = "Provider=Microsoft.Jet.OLEDB.4.0;Data Source=C:\AccessDB\EmpDB.mdb;Persist Security Info=False"
    con.Open constr
End Sub
Testing The Project
There are two phase to testing the project – payroll processing.
- You always starts with Employee table and create employee records
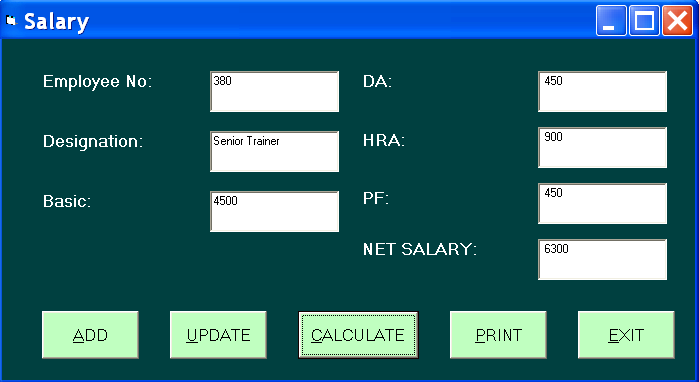
- If you want to compute the salary of an employee , Enter the employee no, designation, and basic and click on the Calculate button. The program will automatically compute the net salary.
- The third step is to print the output to a text file. Each time you click on the print button it will over write the file located in C:/Test.txt. If there is not file with that name , the program will create it when you click on the print button.
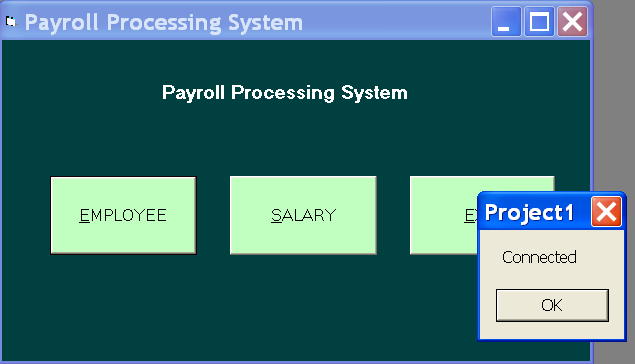
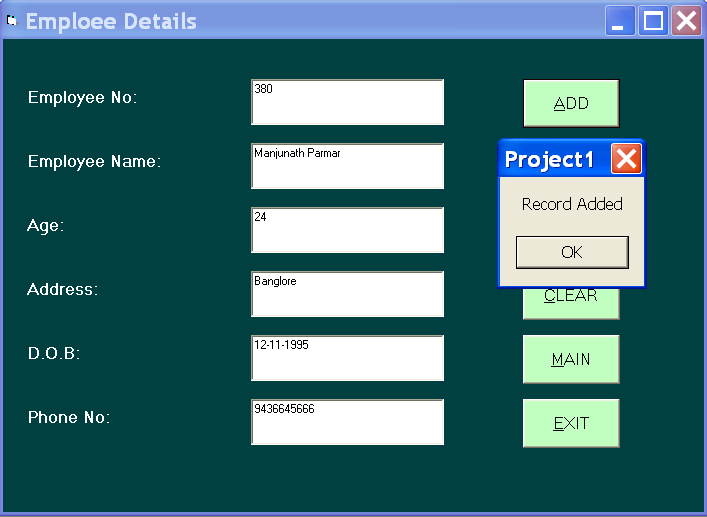
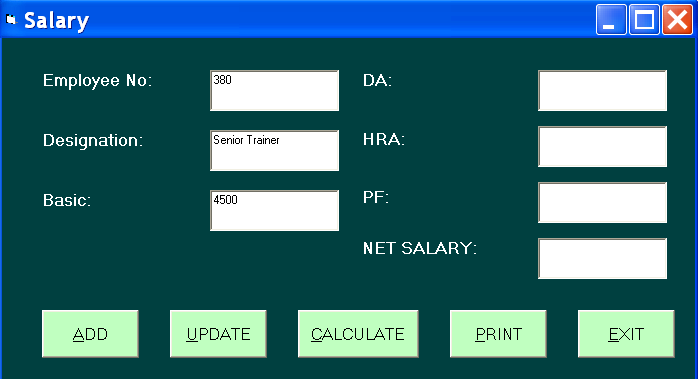
The net salary and other details are automatically processed.
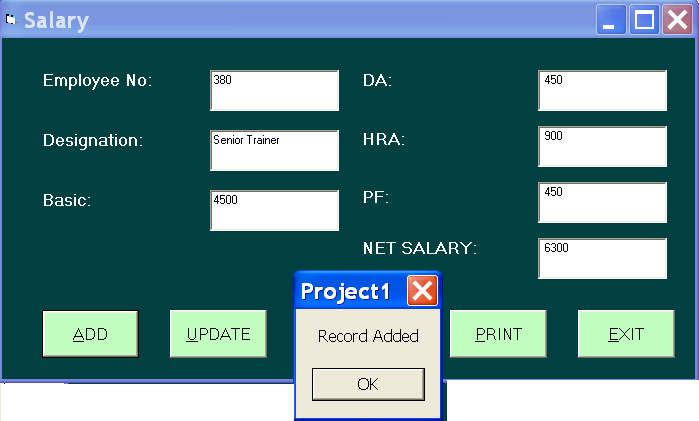
This record is new for Salary table; therefore, it is not updated but added to the salary table. You can click the Add button to add the record in Salary table.
There is a print button which will print the information in a text file. Press that PRINT button and check the output text file located in AccessDB folder where you keep your database files.

Open the text file – Test.txt and you should see an entry for your latest database entry.
There are other functionalities like Update, Modify, etc which you can test on your own.