Basic JavaScript – Exercise 06 -Conditional Statements
Conditional statements in JavaScript uses if-else or switch statement that change the direction of the program in run-time. The conditional statement check certain conditions and then based on the truth value of the condition, execute a block of code.
The if-else statements could be nested to make a if-if-else-else or if-else- else-if statements. The general structure of if-else statement is as follows
if (condition)
{
   statement 1...
}
else
{
   statement 2...
}
In the above example, if the condition is true – statement 1 is executed, else – the statement 2 is executed. In this article, you will create a JavaScript file with conditional statement called cond.js and then create an HTML page called ex06.html. Keep both in the same directory called Exercise 06.
Conditional Statements in a JavaScript File
You need to create an external JavaScript file called cond.js in a directory called Exercise 06.
The steps to create the JavaScript with conditional statements is given below.
Step 1: Open a new notepad and save it as cond.js.
Step 2: Open the cond.js file with notepad and insert the following code.
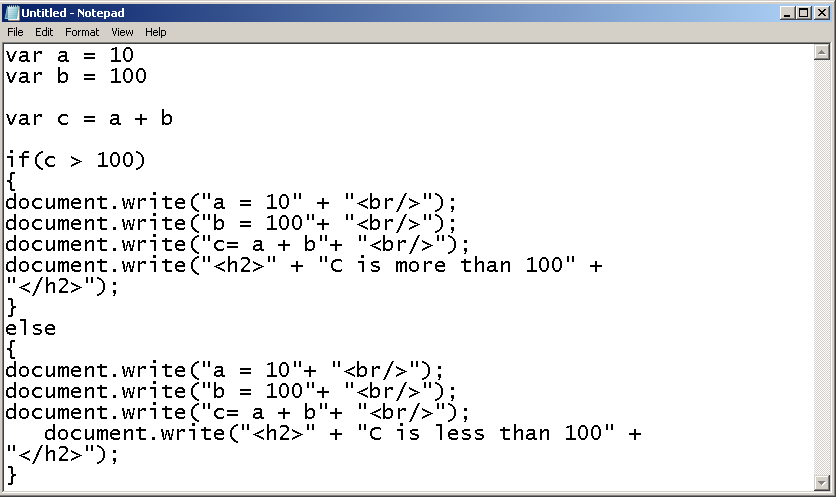
var a = 10
var b = 100
var c = a + b
if(c > 100)
{
    document.write("a = 10" + "");
    document.write("b = 100"+ "");
    document.write("c= a + b"+ "");
    document.write(" " + "C is more than 100" + " ");
}
else
{
    document.write("a = 10"+ "");
    document.write("b = 100"+ "");
    document.write("c= a + b"+ "");
    document.write( " " + "C is less than 100" + " ");
}
Step 3: Save the file cond.js and close the file.
HTML Page
Now, you will create a new HTML page called ex06.html and link the cond.js file to the HTML page. To create the HTML page follow the steps below.
Step 1: Open a note pad and save it as ex06.txt.
Step 2: Open the ex06.txt file and insert the following code.
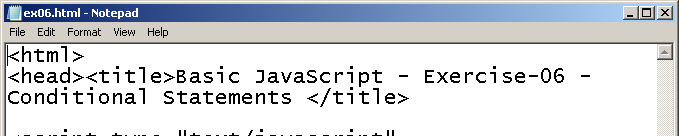
<html>
<head>
<title>
    Basic JavaScript - Exercise-06 - Conditional Statements
</title>
    <script type="text/javascript" src="cond.js"></script>
</head>
<body>
    <p>Example of Conditional Statement </p>
</body>
</html>
Step 3: Save the ex06.txt file to ex06.html and close it.
Output
The program read have two variables A = 10, B = 100. There sum is C = A + B . If C is greater then 100 , following output is displayed on the screen, else a different output will be printed. All depends on the condition whether C > 100.
Basic JavaScript- Exercise-05 – Variable Declarations
Variables are the most important element of any programming language. Variables hold values so that you can write expressions using them.You evaluate the expressions and again use a variable to store the results.
In JavaScript, variables are created using keyword “var”. There is no need to declare the type of the variable before assigning a value because as soon as you assign a value to the variable, the type is automatically decided. In this exercise, you will create an external JavaScript file called main.js and an HTML page called ex05.html and save it to a folder on your windows desktop (exercise-05). To know the difference between external and internal JavaScript files, go through exercise-03 and exercise-02.
JavaScript File
In this section, you will create a new text file, insert the example JavaScript code and save the file as main.js.
Step 1: Create a new folder on your windows desktop called “Exercise-05”.
Step 2: Create a new text file inside the “Exercise-05” folder and save it as main.txt.
Step 3: Open the main.txt file and insert the following JavaScript code.
var carname = "Hundai";
var carnumber = 2340;
var num = 10;
var n = 10;
var i = 0;

document.write("This is a car and it's Model is"
+ " " + carname + "");

document.write("The car number is " + " "
+ carnumber + "");

document.write("\n");
var txt1 = "What a very";
var txt2 = "nice day";
var txt3 = txt1 + " " + " " + txt2;document.write(txt3 + " ");
for (i = 0; i < n; i++)
{
   num = num * 4;
}
document.write("Number=" + num);
Step 4: Save the file as main.js in “Exercise-05” folder and close it.
The variable names, carname, txt1, txt2 and txt3 are decided using the keyword “var” and assigned a string value “Hyundai“. It automatically becomes a variable of type String.
Similarly, the variable carnumber, num and i are declared using keyword “var” and assigned an integer value, so they automatically become variables of type integer.
We will discuss more JavaScript data types later.
The JavaScript expressions use variables and in the example JavaScript, variables txt3 stores the result of the concatenation of two strings – txt1 and txt2. The Variable num is multiplied with 4 repeatedly until the loop exits and the final result is stored in variable num itself.
Create an HTML Page
Assuming that you have done all the steps mentioned in the previous section, in this section, you will create an HTML page called ex05.html and link JavaScript file main.js to the HTML document.
Step 1: Create a new text file called ex05.txt in the folder Exercise-05 on your windows desktop.
Step 2: Open the ex05.txt file and insert the following HTML code and save it as ex05.html.
<!DOCTYPE html>
<html>
<head>
   <title>
       Basic Javascript: Exercise-05:Variable Declarations
   </title>
</head>
<body>
    <p>Javascript Variable, String Concatenation and Loop</p>
</body>
</html>
Step 3: Add the following script to link the JavaScript file main.js to the HTML page ex05.html between <head> ... </head> section.
<script type="text/JavaScript" src="main.js"></script>Output to Browser
You will see the following output in the browser.

JavaScript – Exercise 10 : The While Loop
Just as the “for loop” repeated all the statements within the loop body, “while loop” also does the same thing. It is another type of loop that repeats everything inside the loop until the loop condition is false.
The typical structure of while loop is given below.
 n = 10;
 i = 0;

 while( i < n)
 {

      statement 1;
      statement 2;
      .
      .
      .
      statement n;
      i++;
 }
The working of the “While Loop” is easy to understand using an example program. So we are going to create a page that will make use of JavaScript and do some action with “While Loop”. We call this web page as “loop2.HTML”.
The JavaScript Code
The JavaScript code that we are going to use is as follows.
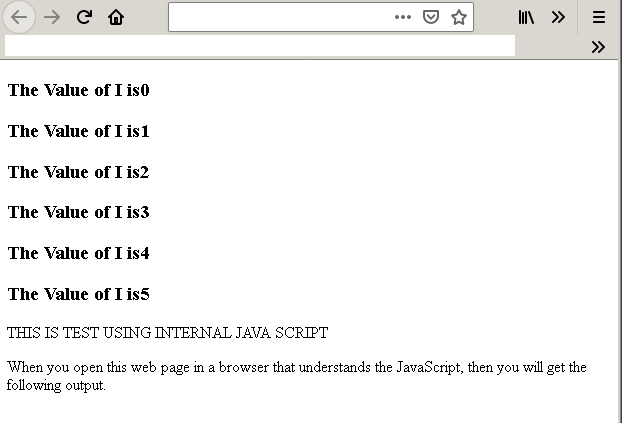
var i=0;

while(i<=5) {

    document.write("<h3>" + "The Value of I is" + i + "</h3>");
    i++;
}
The while loop has the statement ‘The Value of I is + i’ which is repeated n times when the loop executes.
The HTML file – loop2.HTML
Now we give the code for HTML file that contains the above JavaScript code.
<!DOCTYPE html>
<html>
<head>
   <title>While Loop</title>
   <meta charset = "utf-8">
 </head>
 <body>
   <script>
   var i=0;
   while(i<=5)  {
     document.write( "<h3>" + "The Value of I is" + i + "</h3>" );
     i++;
   }
   </script>
   <p>THIS IS TEST USING INTERNAL JAVA SCRIPT</p>
   <p>When you open this web page in a browser that understands the JavaScript, then you will get the following output.</p>
</body>
</html>
The page when loaded to browser will produce the following output. If you do not get the correct output then your browser does not support JavaScript or there may be something wrong with your code.
Output
Basic JavaScript – Exercise 08: Alerts, Confirm and Prompt
JavaScript programming allows 3 types of pop-up boxes or dialog boxes. Each one has a different function. Here is the list of popup boxes.
- Alert boxes
- Confirm boxes
- Prompts
Alert Boxes
Alert boxes give immediate feedback to the user. There are many reasons to provide an alert message to users.
- To give them some information
- Give warning
- Error reporting
- A message about success
When a user gets an alert, he or she can click “OK” to continue working on another part of the browser. As long as an alert is displayed, it forces users to read the messages and other browser components are hidden.
Syntax:
alert ("This is an example alert");Confirm Boxes
When you want users to accept something use a confirm box. This box is used for critical operations like deleting a file, saving a file, etc. It requires user confirmation to avoid accidental change or deletion.
Confirm boxes have two options – OK and Cancel. The OK returns “true” and Cancel returns “false”.
Syntax:
confirm ("Do you wish to proceed?");Prompts
A prompt allows users to provide input for manipulation. When users create events like clicking a button, page load, etc. A prompt will pop-up and ask for user input. Users can click OK after providing their inputs.
Syntax:
prompt ("Enter a number"," ");The value from prompt is captured in a JavaScript. You can use this value in a JavaScript function, a variable or directly use the value to do something meaningful.
Example Program – Alert, Confirm and Prompt
We will create a JavaScript file called alert.js and an HTML document called Ex08.html and verify the output for three JavaScript pop-up boxes.
Before you start the exercise, create a new folder – Exercise 08. When you create JavaScript file and HTML document, save it in this folder.
Note: If you place it in a different folder. The example code given below will not work. Both files must be in the same directory.
JavaScript File – Alert.js
Create the JavaScript file – Alert.js using following instructions.
Step 1: Open a notepad and save it as Alert.txt file.
Step 2: Insert the following code in Alert.txt and save it as Alert.js inside the Example 08 folder.
function alert_box()
{
alert("This is an alert box!");
}
function confirm_box()
{
var r = confirm("Press a button");
if(r == true)
{
alert("That was OK");
}
else
{
alert("That was cancel");
}
}
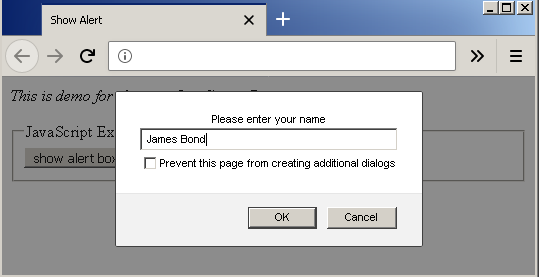
function prompt_box()
{
var name = prompt("Please enter your name","Name");
if(name!=null && name!= " ")
{
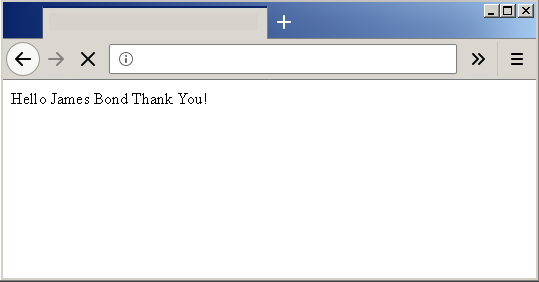
document.write("Hello" + " " + name
+ " " + "Thank You!");
}
}Step 3: Close the file.
Now, it’s time to create an HTML page and link the JavaScript file to the HTML page.
Note:- You can also create an inline script within the HTML document. If you want to do this, then put JavaScript code between <script> …</script> element inside <head>… </head> element.
The HTML file-Ex08.html
The step-by-step instructions to create an HTML file-Ex08.html is given below.
Step 1: Open a notepad and save it as Ex08.txt.
Step 2: Insert the following HTML code.
<!DOCTYPE html>
<html>
<head>
<title>Show Alert</title>
</head>
<body>
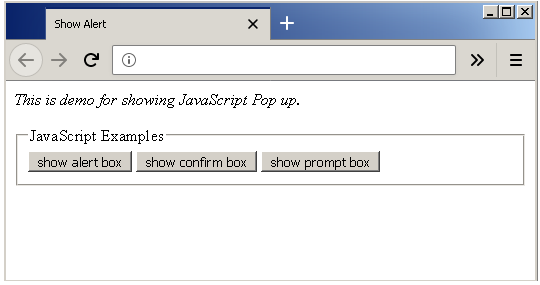
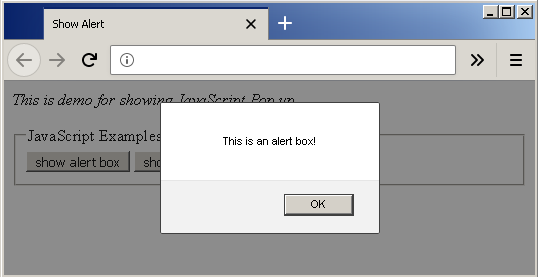
<p><em>This is demo for showing JavaScript Pop up.</p></em>
<frameset>
<legend>JavaScript Examples</legend>
<input type="button" onclick="alert_box()" value="show alert box"/>
<input type="button" onclick="confirm_box()" value="show confirm box"/>
<input type="button" onclick="prompt_box()" value="show prompt box"/>
</frameset>
</body>
</html>Step 3: Add the following line of JavaScript code to link the HTML page with JavaScript file. Remember that alert.js files and HTML page should be inside same folder.
<!DOCTYPE html>
<html>
<head>
<title>Show Alert</title>
<script type="text/javascript" src="Alert.js"></script>
</head
     <body>
          <p><em>This is demo for showing JavaScript Pop up.</em></p>
          <fieldset>
               <legend>JavaScript Examples</legend>
               <input type="button" onclick="alert_box()" value="show alert box"/>
               <input type="button" onclick="confirm_box()" value="show confirm box"/>
               <input type="button" onclick="prompt_box()" value="show prompt box"/>
           </fieldset>
     </body>
</html>
Output to the Browser
The output of the program is given below. The HTML page shows three buttons one for each type of JavaScript pop-up box. When a user clicks the button, it will create an event called onclick(). As a result, the respective pop-up code is executed and output is displayed on the browser.

When a user clicks on the alert button when they see an alert – “This is an alert box”.
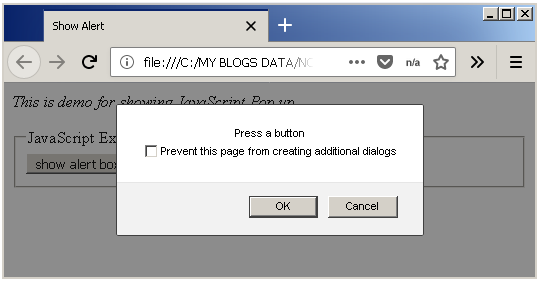
A user clicks the second button- the Confirm box button, they get a pop-up with an OK and a Cancel.
The third button when clicked will display a prompt asking username as in above diagram. You need to enter and name and then click OK.
The following output will be displayed on the browser.
JavaScript – Exercise 07: Switch – Case Statements
In the previous post, you learned that the conditional statements can change the direction or flow of the program. One type of conditional statement use if-else structure. Another type of conditional statement is called the switch-case statement.
A user input the choice from a given set of options and switch receives the input. The switch matches the input value to a number of cases and when a case matches, it executes the commands in that case.
For example.
Switch(choice)
{
    case 1: do something.....;
            break;
    case 2: do something.....;
            break; . . .
    default: do something.....;
}
The switch-case is preferred over if-else whenever you like to give a lot of choices to your users.
In this article, you will write a JavaScript using switch-case statements. Create a new HTML page called ex07.html and link the JavaScript file to the HTML page, then verify the output of the program in a browser.
JavaScript File with Switch-Case Statements
To create a new JavaScript file with switch-case statements follow the steps below.
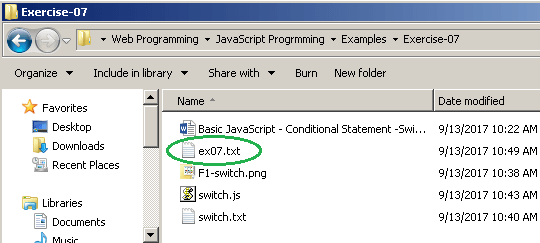
Step 1: Open Notepad and create a new file called switch.txt and save it.
Step 2: Insert the following JavaScript to the text file – switch.txt and save it as switch.js.
function s1()
{

    var fruits = document.getElementById("myInput")
    .value;

    switch(fruits)
    {
    case "1":
        document.write("" + "This is first choice!" + "");
        break;
    case "2":
        document.write("" + "This is second choice!" + "");
        break;
    case "3":
        document.write("" + "This is third choice!" + "");
        break;
    default:
        document.write("" + "Wrong choice! Try again" + "");

    }

}
Note that if you should check your code before saving it, any typos can break the JavaScript file. Also, you must save your JavaScript file inside the Exercise-07 folder.
HTML Page
Now that you have created JavaScript file, it’s time to create an HTML page and link the JavaScript file to the HTML page. Follow the steps below to create the HTML page and save it under Exercise-07 folder.
Step 1: Open Notepad document and save it as ex07.txt inside the Exercise-07 folder.
Step 2: Open the notepad and insert the following HTML code.
<!DOCTYPE html>
<html>
    <head>
        <title> Basic JavaScript - Exercise 06 - Switch Case
        </title>
    </head>
    <body> <p> This is an example of Switch Case.</p>
           <input id="myInput" type="text">
           <input type="submit" onclick="s1()">
    </body>
</html>
Step 4: Add the following script between the head section to link the JavaScript file to the HTML page.
<script type="text/javascript" src="switch.js"></script>Step 5: Save the file- ex07.txt as ex07.html and close it.
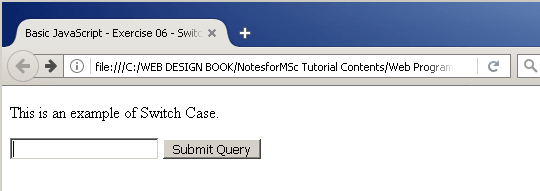
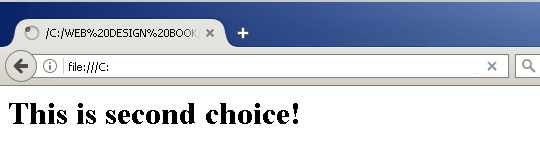
Output of the HTML Page
When you open the ex07.html in a browser, you will get an input textbox and a submit button.
Enter 1, 2, or 3 as a choice and the result will be displayed on the screen.
Basic JavaScript: Exercise 03 : Alert Boxes
When a user makes mistake, the browser does not give feedback to users unless it is a server response or browser-based error. For example, when you cannot reach a web page, you receive HTML error 404 which means “web page not found”.
There are a lot of server-side errors, a common error is 503 and it means the server cannot provide the service requested. It gives a clear feedback – “service unavailable”.
Browser-based scripting language such as JavaScript has its own way of giving feedback to users – “dialog boxes”. There are 3 types of dialog boxes in JavaScript.
- Alert Box
- Confirm Box
- Prompt
In this example, we are only going to work on alert boxes.
JavaScript For Alert Box
Example#1
An alert box is a popup box that is a result of an event. Any event like a click, double click, mouse move, etc. can result in an alert box.
So, the alert is an immediate feedback mechanism for some browser-based events.
<!DOCTYPE html>
<html>
<head>
<script type="text/JavaScript">
function message()
{
alert("This alert box was called with the onload event!");
}
</script>
<title>JavaScript - Exercise 03: Alert Box</title>
</head>
<body onload ="message()">
</body>
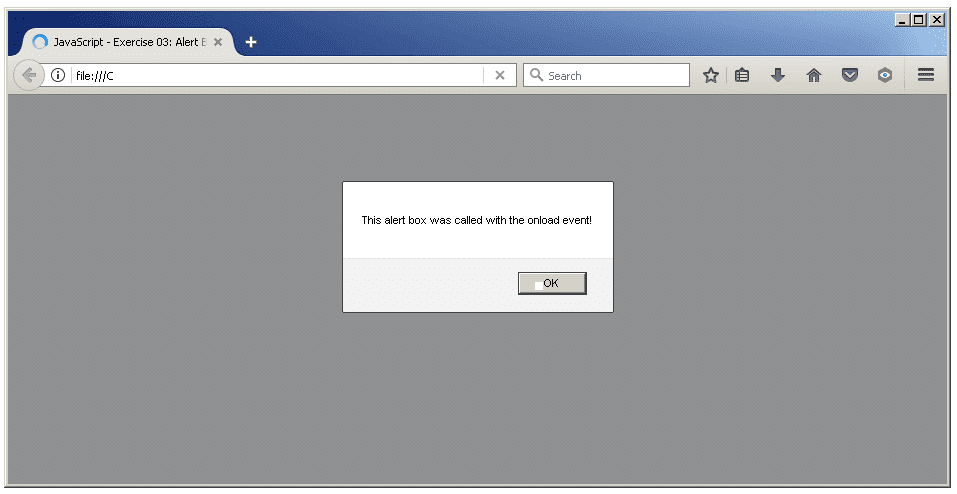
</html>As soon as the user loads the HTML page the associated JavaScript function will fired up and produce an alert box and give immediate feedback. In this program, the event is “onload” and alert is “The alert box was called with the onload event!”.
Example#2
This is an example of an alert popup for a click event. When a user clicks the button on an HTML form page, an alert will give a message immediately, just like example 1 onload event. To create a page with button use HTML form tags.
In this page, when you click the button an alert box with message will popup immediately.
<!DOCTYPE html>
<html>
<head>
<script type="text/JavaScript">
    function message()</span>
     {
        prompt("Good Job!);
     }
</script>
    <title>JavaScript - Exercise 03: Alert Box</title>
</head>
<body>
    <p>In this page, when you click the button an alert box with message will popup immediately.</p>
<form>
    <input type="submit" value="Click Me" onclick=message()>
</form>
</body>
</html>
Output Of Example#1
The output of example#1 is a popup with a message.
Output of Exercise #2
The example 2 HTML page has a form with a single button. When you click on the button an alert box will pop up.
This example shows how an alert box works for an onclick event.
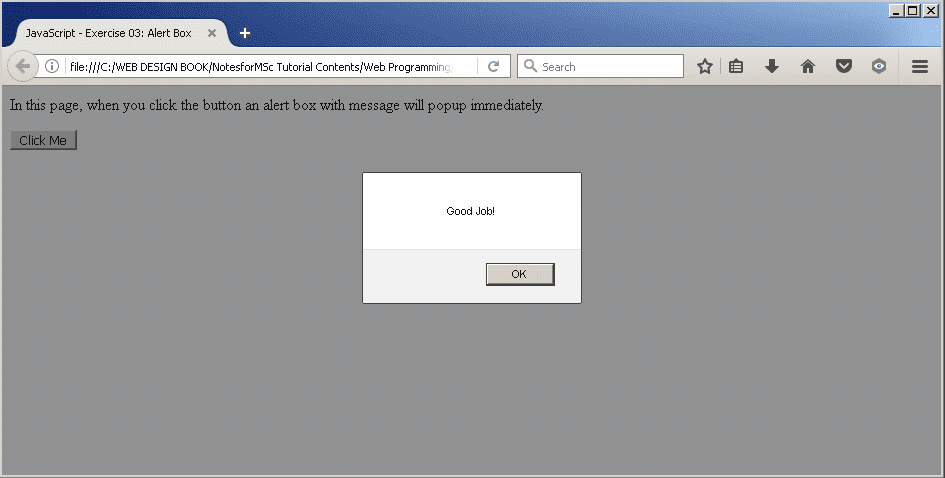
When you click the button, the JavaScript function – message() will execute. As a result, you will see the following alert box. There are many events in HTML to trigger a JavaScript program that does something like this.
Basic JavaScript: Exercise 02 : Output to HTML
In JavaScript exercise 1, you printed the output directly from the JavaScript program. There was no formatting. This is the way JavaScript program works, but HTML documents are meant to present information in a human-readable format with some style information.
Imagine reading plain notepad like web pages, there is no fun in that. A JavaScript output is then embedded within HTML tags so that output is in your desired format. In this post, the program from exercise is modified to present the output in HTML format.
JavaScript Program for HTML Output
To understand this script, you need some knowledge of HTML tags and their behavior. If you do not, then do not worry about it, just keep reading and try this program yourself.
<html>
<head>
<title>Second JavaScript</title>
</head>
<body>
<script type="text/JavaScript">
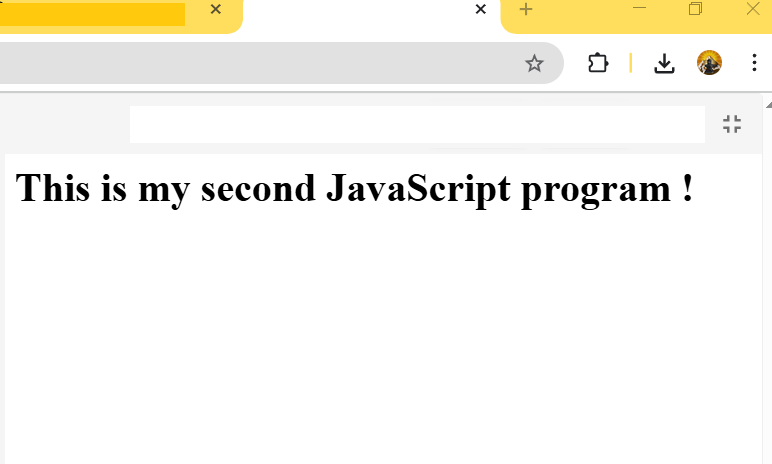
document.write ("<h1>This is my second JavaScript program !</h1>");
</script>
</body>
</html>HTML document have 6 types of header – h1, h2, h3, h4, h5 and h6 . Any text within these tags will be shown in bold. HTML and JavaScript display a high-quality web page in this way.
Output In Browser
The output is shown in bold because it is a tag h1 element now. HTML tags are used to format the text elements.
JavaScript – Write Your First Script
JavaScript is a browser-based scripting language. It means you can control certain things on a browser like validating user input, throw an alert and so on. These are some common examples, JavaScript can do much more than this.
A web developer must know how to write JavaScript programs because these are basic skills expected of him or her. The good news is anyone can learn JavaScript and it’s not difficult either. To help you get started, you will find a simple JavaScript program and its output below.
First JavaScript Program
A lot of people get confused between Java and JavaScript – both are not same. JavaScript can only be used on a web page, but the scope of Java programming is much more than a web document.
To start writing your script, all you need is a text editor. You can use the windows notepad or get a professional notepad like Notepad++, Sublime Text, etc. They all come with more features than a regular windows notepad program.
Let’s get started …
<!DOCTYPE html>
<html>
<head>
<title>First JavaScript</title>
<script type="text/JavaScript">
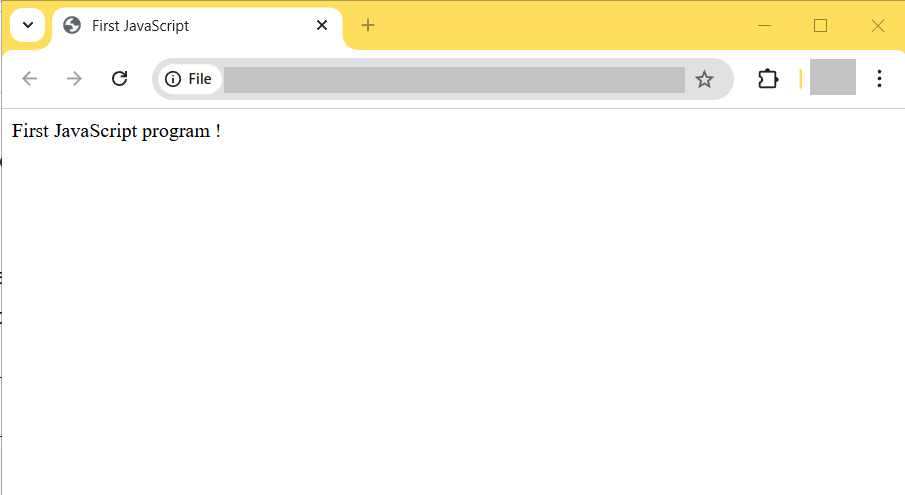
document.write("First JavaScript program !");
</script>
</head>
<body>
</body>
</html>This script prints some text on a browser window – “First JavaScript program !” and it is written in <script> … </script> tags and the document.write() is an instruction to the browser to write the text as an output.The <script> tag tells the browser about the kind of script you are using which is type="text/JavaScript" and the whole script is embedded inside HTML document or web page.
The tags <html> … </html> shows the start and end of HTML document. So, you can write complex scripts within <script> … </script> tags and the browser executes it for you.
Output to Browser
The output of the program is a single sentence only. We will see more examples of output from a JavaScript program in future articles.
Repeat A String
In JavaScript, there are several in-built functions to manipulate strings. One of them is String.prototype.repeat() function. In this tutorial, you will write a program that will repeat a string for a given number of times.
The steps that this program follows is given below:
- JavaScript function receives an input string and a number as inputs.
- If the number is greater than or equal to 0, it is repeated
number- 1times. - If the number is less than 0, it is string is set to
empty. - Output the results.
The program uses 2 textbox control for inputs, 1 h1 tag for output, 2 buttons - clear and repeat to clear the textboxes and invoke the JavaScript function respectively.
Program Code: Repeat A String
<!DOCTYPE html>
<html>
<head>
<title>Repeat A String</title>
<meta charset="utf-8">
<style>
main{
width:40%;
padding:2%;
margin:10% auto;
background:lime;
text-align:center;
}
#input,#inputTwo{
padding:10px;
width:200px;
background:whitesmoke;
margin:auto;
font-size:16px;
}
button{
padding:10px;
margin:10px;
}
</style>
</head>
<body>
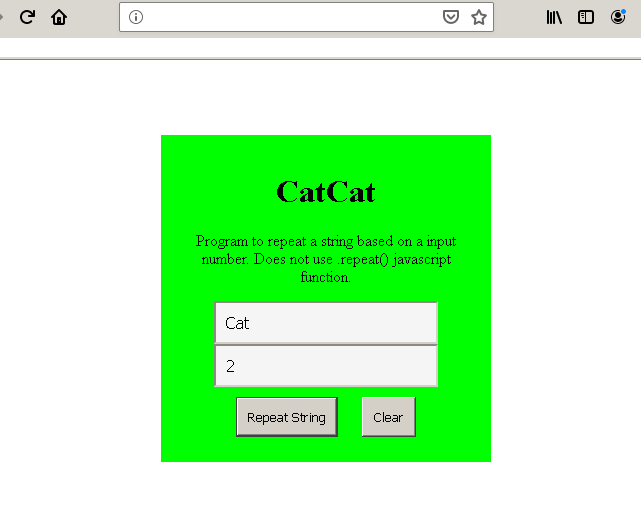
<main>
<h1 id="out">Output here</h1>
<p>Program to repeat a string based on a input number.
Does not use String.prototype.repeat() javascript function.</p>
<input type="text" id="input" value="Enter string" /><br/>
<input type="text" id="inputTwo" value="Enter Number"/><br/>
<button onclick="repeatString()">Repeat String</button>
<button onclick="MyClear()">Clear</button>
</main>
<script>
function repeatString() {
// repeat after me
var str = document.getElementById("input").value;
var num = parseInt(document.getElementById("inputTwo").value);
let tempStr = str;
let N = num - 1;
for(let i = 0;i < N;i++){
if(N >= 0)
{
str = str + tempStr;
}
}
if(N < 0)
{
str = "";
}
document.getElementById("out").innerHTML = str;
}
function MyClear() {
document.getElementById("input").value = "";
document.getElementById("inputTwo").value = "";
document.getElementById("out").innerHTML = "Output here";
}
</script>
</body>
</html>Note that the HTML elements are accessed using getElementById object. It will be used to access the string input and display the output string.
Also, to clear the textboxes.
Output In Browser: Repeat The String
Find The Largest Number
In this example, we will receive a two-dimensional array of numbers as input and the JavaScript function will find the largest in each sub-array and return the result in a new array.
The program takes following steps to compute the results:
- Receive an array with many sub-arrays.
- Set a maximum number variable.
- Loop through each sub-array,compare it with maximum and if the array number greater than maximum then get that array number as new maximum.
- Push the new maximum from the sub-array into a new result array.
- Repeat the above two steps for all sub-arrays.
- Display the resultant new array which contains maximum from all sub-arrays.
For example,
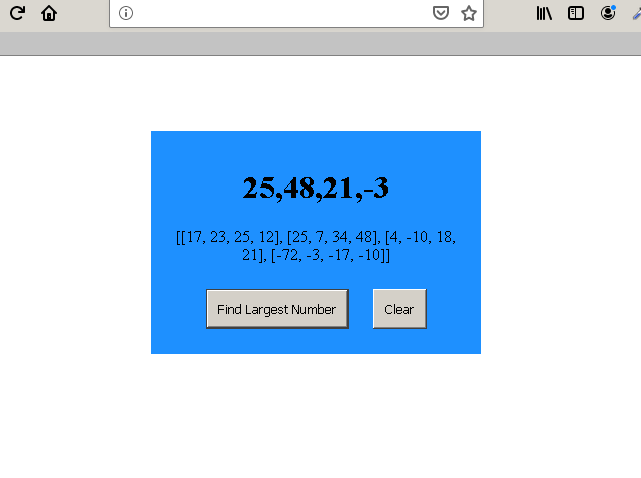
Suppose our array is following
[[17, 23, 25, 12], [25, 7, 34, 48], [4, -10, 18, 21], [-72, -3, -17, -10]]Each of the sub-array has maximum and we will collect them in a new array. The result is as follows.
[25, 48, 21, -3]Program Code: Find the Largest Number
<!DOCTYPE html>
<html>
<head>
   <title>Find Largest number from Array</title>
   <meta charset="utf-8">
   <style>
   main{
    width:40%;
	padding:2%;
	margin:10% auto;
	background:DodgerBlue;
	text-align:center;
   }
     #in{

	  padding:10px;
	  width:150px;
	  background:whitesmoke;
	  margin:auto;
	 }

	 button{
	 padding:10px;
	 margin:10px;

	 }
   </style>
</head>
<body>
  <main>
     <h1 id="out">Output here</h1>
     <p>[[17, 23, 25, 12], [25, 7, 34, 48], [4, -10, 18, 21],
     [-72, -3, -17, -10]]</p>
     <button onclick="largestNumber()">Find Largest Number</button>
     <button onclick="MyClear()">Clear</button>
  </main>
  <script>
     function largestNumber() {
       // You can do this!
       var arr = [[17, 23, 25, 12], [25, 7, 34, 48],
       [4, -10, 18, 21], [-72, -3, -17, -10]];
       var maxNumber = -20;
       var result = [];
       for(let i = 0;i< arr.length;i++){
         for(let j = 0; j < arr[i].length;j++){

            if (arr[i][j] > maxNumber){
                maxNumber = arr[i][j];
              }
          }
        result.push(maxNumber);
        maxNumber = -20;
        }
        document.getElementById("out").innerHTML = result;
      }
  </script>
</body>
</html>
Note that we did not receive input from a HTML control, but directly assigned it to a variable. The output is display in the browser though.
Output To Browser: Find the Largest Number