The swirl R package
The swirl R package will teach you R programming and data science interactively. In this article, you will learn to install swirl package in your R installation.
Step 1:
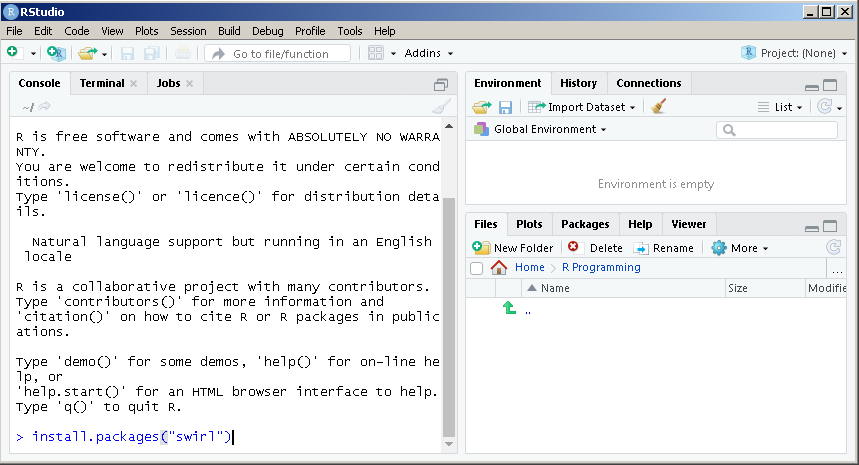
This step assume that you have R and R Studio installed as per the previous article. Open the R Studio console and type the following line next to > symbol.
> install.packages("swirl")See the figure below.
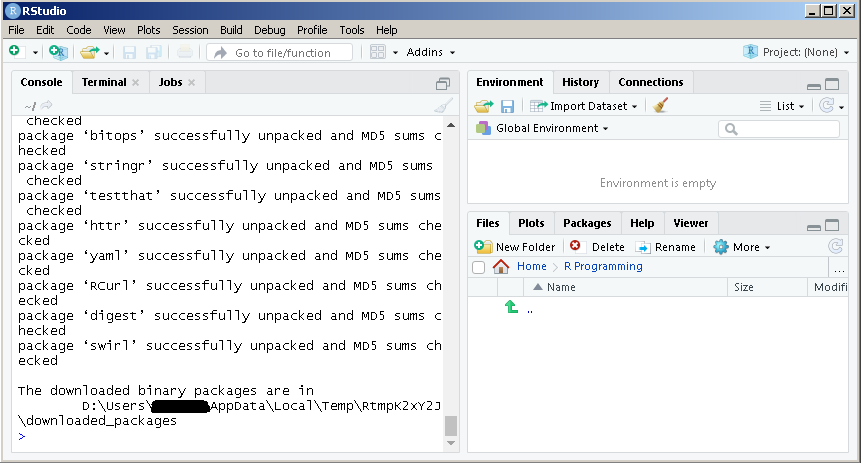
Make sure that your internet connection is working before running the command. The swirl packages will be downloaded and extracted successfully. After installation your screen should look like the following.
Step 2:
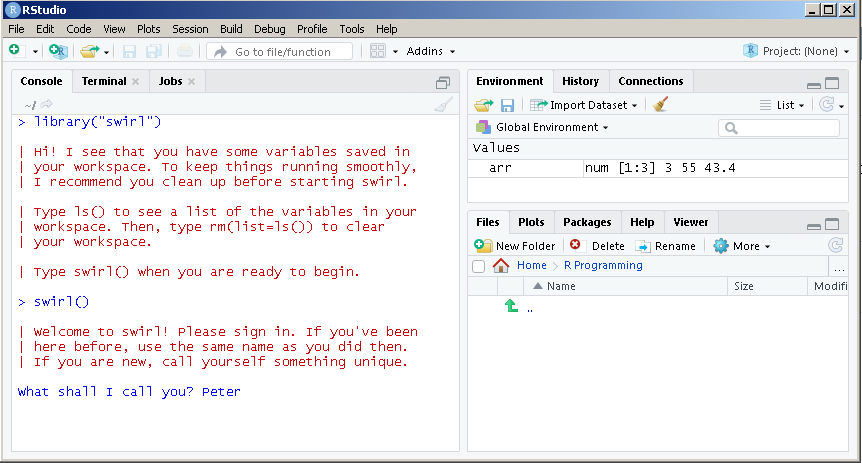
To start using the swirl packages use the library() function and this step must be repeated every time you want to use swirl.
Type the following command in the R Studio console and press enter after each line.
> library("swirl")
> swirl()
The above code will install swirl courses for you and get you started with R programming.
Here is the list courses displayed for you by swirl. Note that you can install other courses also. To get started with swirl make your selection and start learning.
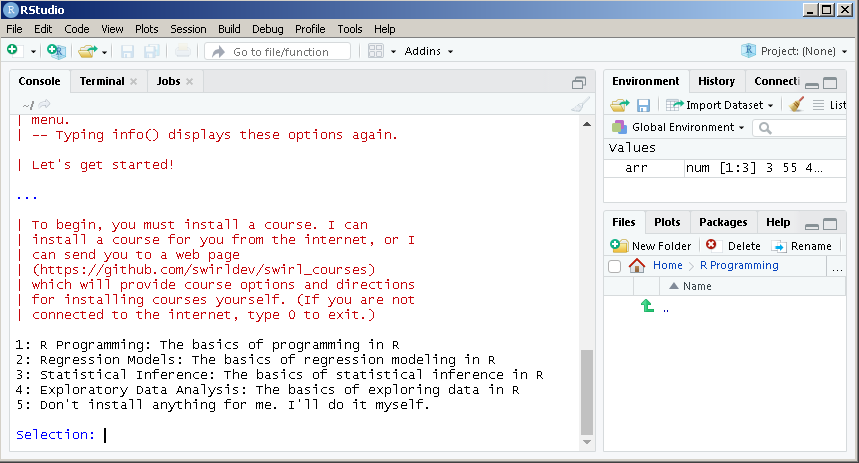
Type ?installCourses to get the list of functions that could help you install new courses.
In this tutorial, you have two option to learn R programming. Either use swirl to guide you through the learning process or use this tutorial to learn R.
With swirl to guide you through the learning process, you need to load swirl each time.
This tutorial gives you freedom to learn and practice R directly on the R studio console.
R and R-Studio Setup
In this article, you will learn to install R software and R Studio to get started with R programming.
The R software is a free software which you can install to write your programs and R-Studio is an IDE that helps to manage your workspace (you will learn about workspace later) and debugging, syntax highlighting, etc.
To learn R you don’t need R-Studio, however, we recommend installing it because it will make things little easier. Also, throughout this tutorial, we have used R-Studio for R programming examples.
In the next few sections, you will learn how to install R and R-Studio. If you already familiar with the step, simply skip this part and move to next article.
Download R and R-Studio
The first step to install R is download the required software from the following links.
Before downloading the software check the system requirements such as disk space, Windows operating system 10/8/7/XP and 32/64 bit system. The best way to know this in advance is to read the product documentation for R and R-studio.
Installing R
Once you have downloaded the R and R-studio in a separate folder and click R-3.x.x to start installing it. See the figure below.
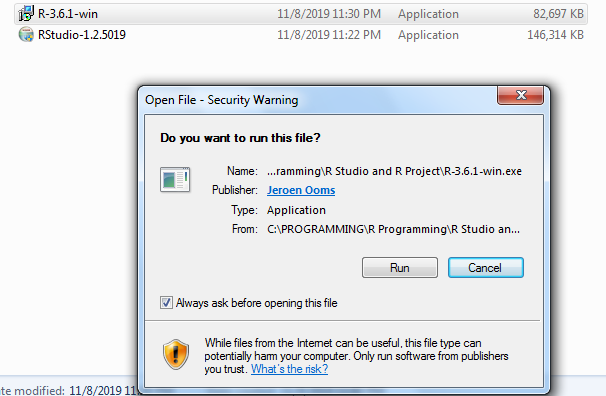
Click run to continue the installation.
The R setup will ask you to select the language. If you want a different language other than English, click the drop down and select your language.

Click OK to continue with he installation.
In the next screen, you will be asked to accept the license agreement. R software is free with GNU license means you do not need to pay for anything.
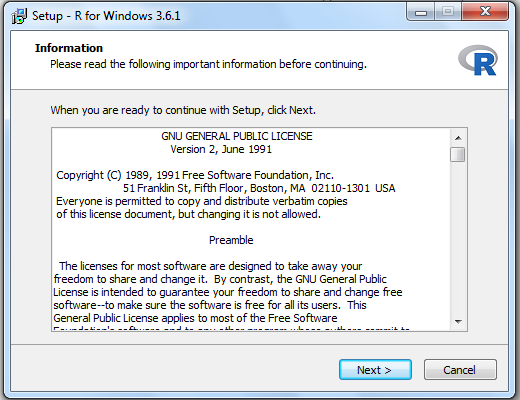
Click Next to continue with the installation of R.
Next step is to choose a installation directory for R. By default, R tries to install in C:/Program Files/R/R-3.x.x, however, you can click on the Browse button and navigate to a location of your choice.
Make sure that the destination drive has enough disk space.
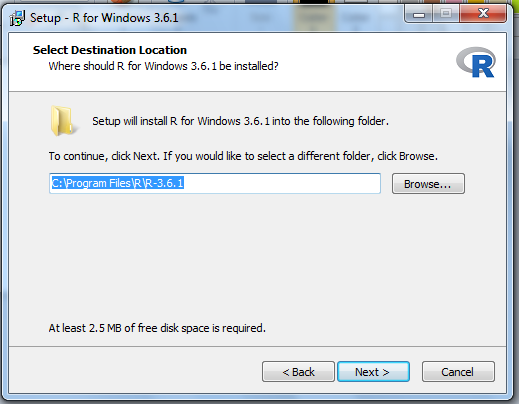
Choose a different directory using Browse or click Next to continue with the installation.
Now, in the next screen, you have to select the required components that you want to install for R. If you have a 64 bit system you can select 32 bit files or 64 bit files. Otherwise, for 32 bit system only select 32 bit files.
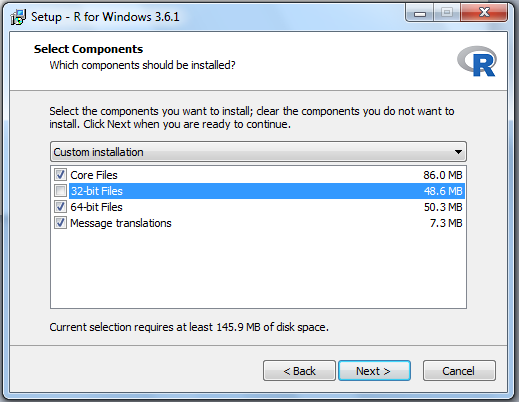
Since, we are using a 64-bit Windows 8.1 system, 32-bit files are not selected for this installation. You can select rest of the components to install. Click Next to continue the installation.
The next screen is about startup options. R provides with two startup options.
- customized startup environment
- default startup
In a fresh installation, a site-wide environment or user specific environment configuration file does not exist.
If available, this file will be located in the installation directory (C:/program files/R/..).
The file is called Rprofile.site, if not than R will try to start the environment from current working directory. A working directory is directory where R command line works. It means whatever R command you give to console is executed here.
If nothing is found site-wide , then R tries to load the environment from user-home directory. It look for a file called .rprofile.
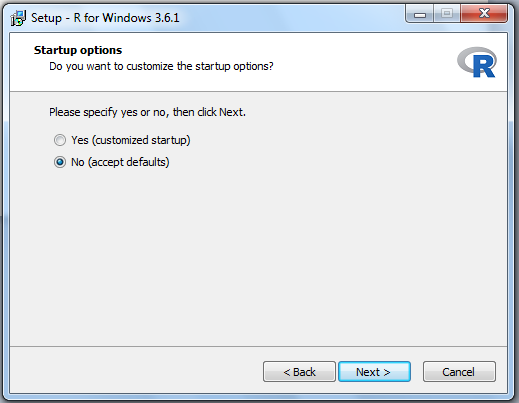
Select No, if you are not using RProfile.site or any .rprofile configuration. Click Next to continue with the installation.
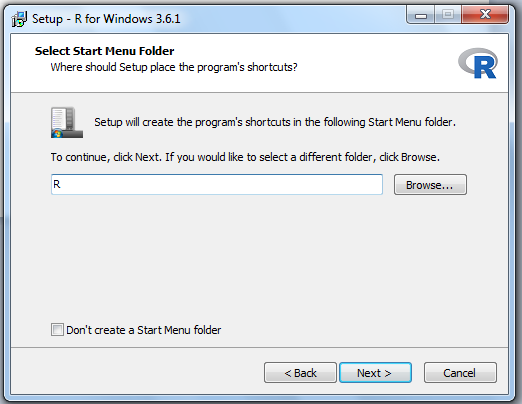
In the next screen, select if you want R to be in the Start Menu folder. if not, then select ”Don’t create a Start Menu folder” and click Next.Otherwise, simply click Next to continue.
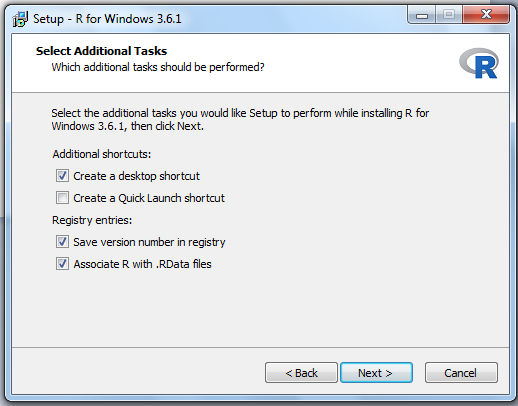
You can select to create shortcuts for R on desktop here or a quick launch shortcut in windows taskbar. Since, we are going to use R-Studio, no need to select quick launch shortcuts.
Data from R workspace is stored in .RData files. You choose the registry options. Click Next to continue.
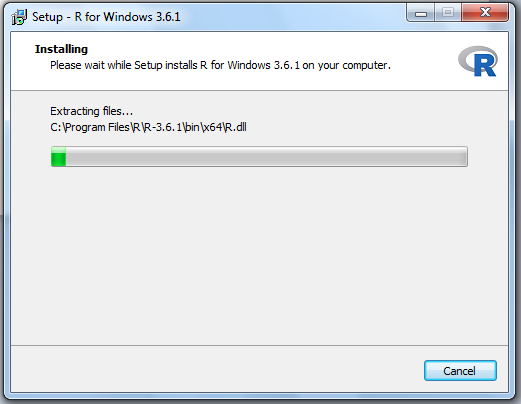
You have to wait for few minutes while setup installs R on your computer.

Once the setup completes the installation of R, you can click Finish.
Installing R-Studio
R-Studio is an Integrated Development Environment (IDE). It highlights the R syntax, help in debugging R codes, and so on.
You have already downloaded the R studio and saved it in the same directory as R.
Click the setup for R-studio and start the installation.
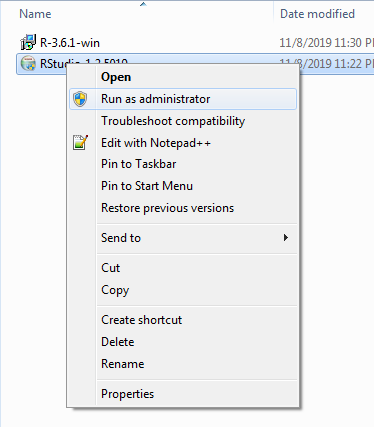
First right-click the RStudio setup and select Run As Administrator.
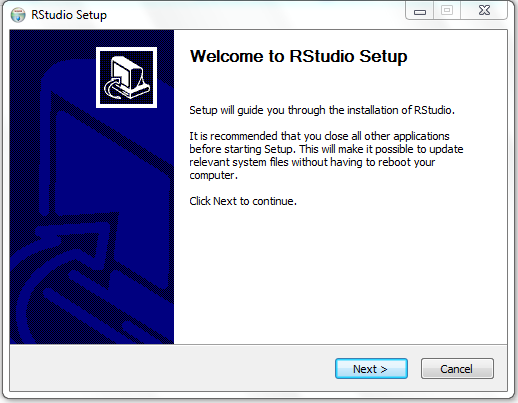
Click on the RStudio setup and click Next.
Choose the installation directory, by default, it will install it in the C:/Program files/RStudio. However, you can change the installation directory by clicking the Browse button.
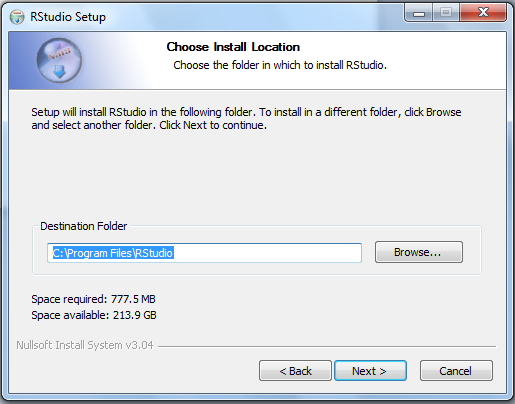
Click Next to continue with the installation.
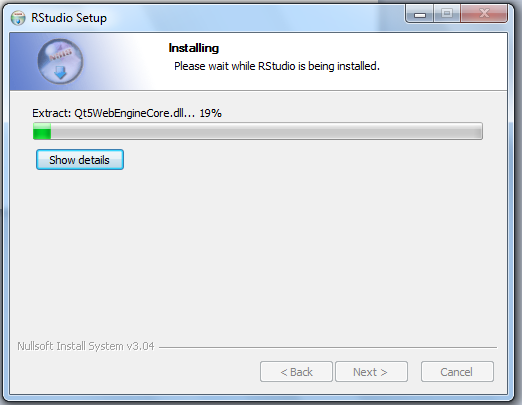
The setup will continue to install the files which will take few minutes.

Once the setup is complete the installation click on Finish.
Congratulations ! you have installed R and RStudio successfully. Try to open the RStudio and verify your installation.
Programming Paradigms
Programming paradigms attempt to classify programming languages according to their features and capabilities. In this article, you will learn what are the programming paradigms available for python language. The python programming language supports following programming paradigms.
- Imperative programming paradigm
- Structural Programming Paradigm
- Procedural Programming
- Functional Programming
- Object-Oriented Programming Paradigm
- Event-Driven Programming paradigm
Imperative Programming Paradigm
The word “imperative” means urgent or give command. In this programming paradigm the commands are executed in step-by-step manner. It just change the state within the program. Therefore, cannot run complex codes in imperative programming. The languages like C, FORTRAN, BASIC, PL/I supports this paradigm.
Example:
x = 10
y = 20
x + y
30
//each of the above code is executed line by line
Structured Programming Paradigm
We can use structured programming when the programming language supports it. In this paradigm, the program is written clearly by dividing the program into blocks, procedures, functions, using if-else and loop constructs. That is the reason, structured programming is divided into – procedural programming paradigm and function programming paradigm.
Procedural Programming Paradigm
The procedural programming paradigm is supported by those languages that can call procedures. A procedure is a routine, subroutine, or function that execute commands in step-by-step manner.
A procedural programming is also imperative in nature and change the state of the program itself. Imperative programming give commands to computer describing “how” a program operates. It uses algorithms which is step-by-step method of solving problems.
Functional Programming Paradigm
The functional programming uses procedures called functions and the program is structured using many functions whose nature is similar to a mathematical function.
It takes the declarative approach and does not change the state of the program. Output of the functional programming is dependent on the arguments it takes. Similar to a mathematical function, from one set to another set. The declarative nature of functional programming focus more on “what to do” than “how to do” approach of imperative programming paradigm.
Remember that a subroutine is not a mathematical function. Therefore, functional programming is popular in academics. Java, C, FORTRAN, BASIC are few examples of structural languages.
Object-Oriented Programming Paradigm
The object-oriented approach translates the real world object into abstract objects with properties and methods. The object is created out of a template called class. The properties are the description or attributes of an object and the behavior of the object is modeled by its methods.
For example,
//Here is the JavaScript code to create a class
class Car{
     constructor(name, model){
          this.carName = name;
          this.carModel = model;
          }
//method of the class
     start(){
          console.log("The this.carName is started!");
          }
     }
//Now we create an object using Class
const myCar = new Car("Volvo","XCS00");
Event-Driven Programming Paradigm
In the event driven programming paradigm, the control of the program is with the user-events such as mouse-clicks, key-press, etc.It is very popular paradigm in web programming using JavaScript, Python, NodeJS, etc.
In this programming paradigm, the program waits and listens for an event to happen. The moment an event take place, the event handler will respond to the event with appropriate message.
JavaScript Object Notation(JSON) Basics
JavaScript object notation or JSON is a way to store and exchange data in string format for applications in JavaScript object notation.
When the data is exchanged,it is converted into <span style="color:#a30000" class="tadv-color">strings </span>and when the application needs to manipulate the string values. It can <span style="color:#a32200" class="tadv-color">parse </span>it back to JavaScript objects.
- stringify() – convert the JS objects into strings.
- parse() – converts the strings into JS objects.
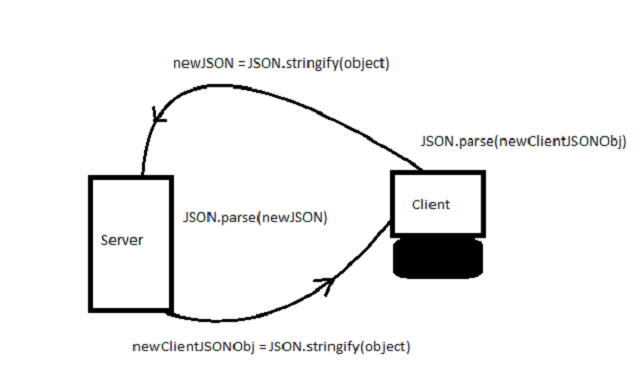
Stringify Method
JSON is an independent format that can send text information or receive it. Therefore, any programming language can use it efficiently.
To convert a JavaScript object over the network is possible if we use JSON. It means we need to convert JavaScript object into text without loosing its format.
The stringify() function can convert any JavaScript object into string.
For example
//Create a JavaScript object
var person = {
   firstName :'Peter',
   lastName: 'Pan'
};

//Use JSON to convert the object into string
var jsonObj = JSON.stringify(person);
console.log(person);
//Output = {"firstName":"Peter","lastName":"Pan"}
The output of the program is following:
{"firstName":"Peter","lastName":"Pan"}The output is a string and it cannot be manipulated.
For example
console.log(json.firstName);
//will return undefined
Parse Method
The parse() method does exactly opposite of stringify(). It converts the JSON string into a valid JavaScript object.
Let us continue our previous example and convert <span style="color:#a30500" class="tadv-color">jsonObj</span> into a valid JavaScript object.
var jsObj = JSON.parse(jsonObj);
console.log(jsObj.firstName);
//output = "Peter"
Once benefit of using JSON is that it communicate faster than technologies like XML to exchange data.
JSON Example Program
In this example, we will be using PHP code that the server executes and send JSON information to the
//Server side PHP code that convert object into a JSON //format
<?php
$obj->name = "Peter";
$obj->age = 34;
$obj->salary = 1200;
echo json_encode($obj);
?>
//Use AJAX to get the data
<script>
var xhttp = new XMLHttpRequest();
xhttp.open("GET", "ajax_info.txt", true);
xhttp.onload = function(e){
var jsonData = this.response;
}
//Parse the data into JavaScript objects
var jsObj = JSON.parse(jsonData);

//Print the name of the object
console.log(jsObj.name);
//output = 'Peter'JS Getters and Setters
In JavaScript ES5(2009), there are getter and setter defined using keyword get and set. The getter will get the value and the setter will set the value of the property.
These are computed properties for the object and might be useful when you want to convert object property into something before using it.
Getters
The getter is defined using keyword get. Consider the following code.
//Our object
var car = {
carName: "volvo",
carModel: "xc60",
get carmodel(){
  return this.carModel.toUpperCase();
}
};
console.log(car.carmodel);
//output = XC60
In the code, above we created an object called car. The object has carModel property. You can access the object getter just like any other property.
Here is an example
console.log(car.carmodel)This will result in XC60 which is uppercase version of xc60.The getter converts the original object property called carModel.
Setters
The setters are compute-able property that update the original object property.
Consider the following example
//Our object
var car = {
carName: "volvo",
carModel: "xc60",
//my Getter
get carmodel(){
  return this.carModel.toUpperCase();
},
//my Setter
set newcarmodel(model){
this.carModel = model;
};
//set a new car model
car.newcarmodel = "sc60";
console.log(car.carmodel);
//output = SC60 (in uppercase)
In the above code, we have called the setter and assigned a new car model to the original model property of the car.
car.newcarmodel = "sc60";Note that the output is through getter <span style="color:#a30f00" class="tadv-color">car.carmodel</span> which change the output to uppercase.
JavaScript Built-in Classes and Their Useful Methods
In this article, we intent to give you a list of built-in classes from JavaScript and their useful methods.
You can click on each one of them to understand how those methods work.
Array Class
You can create an array using following constructor.
var myArray = new Array(23,44,5.5,'tomato');
console.log(myArray);
//Output = [23,44, 5.5,'tomato']
Popular Methods
Number Class
This class converts string to numbers, and some other conversions. It uses the constructor called Number();
The Number constructor takes a number of type string and then convert into a number of type number.
var num = Number('34.5');
//typeof '34.5' is string.
console.log(num);
//output = 34.5 and typeof 34.5 is Number.
Popular Methods: Number Class
- parseInt()
- parseFloat()
- num.toFixed()
- num.toPrecision()
- num.toString()
- num.toExponential()
String Class
The string class has the constructor called String that used to create string objects.
Remember that it is different from the regular declaration of a string. For example
var name = "Spiderman";
var myFriend = new String('Ganesh');
console.log(typeof name); //output = String
console.log(typeof myFriend); //output = Object
Popular Methods: String Class
Math Class
The math class has no constructors to create math object. However, it has many useful constants and functions that can be used in mathematical expressions.
Math Constants
Math.PI;
3.141592653589793
Math.SQRT2;
1.4142135623730951
Math.E; // Euler constant
2.718281828459045
Math.LN2; // Neperian log of 2
0.6931471805599453
Math.LN10; // Neperian log of 10
2.302585092994046
Popular Math Functions
- Math.random()
- Math.min(a, b) or Math.max(a,b)
- Math.round()
- Math.ceil()
- Math.floor()
- Math.pow()
- Math.sqrt()
Trigonometric Functions
- sin()
- cos()
- tan()
- atan()
- atan2(dy,dx)
Date Class
The date class has a constructor that returns current date. You can change the format of the dates using this parameters.
var date = new Date();
console.log(date.toString());
//output= "Tue Nov 05 2019 23:10:35 GMT+0530 (India //Standard Time)"
Useful Method of Date Class
- Date() // constructor returns current date and time
- date.getDay()
- date.getMonth()
- date.getHours()
- date.getFullYear()
- date.getMinutes()
- date.getSeconds()
- date.getTime()
- date.getMilliseconds()
All of the above methods have an equivalent set method.
JavaScript Class Methods and Class Properties
In this section, you will learn about class methods and class properties of JavaScript. Usually, the properties and methods are for objects, however, JavaScript has properties and methods for class also.
There are some properties and methods that only belong to class.For example: counting the number of objects created by the class
   constructor(name, subject) {
       this.name = name;
      this.subject = subject;
      Student.count++;  // class property
}
static add(a, b){         //class method uses static keyword
     const answer = a  + b;     //using const keyword to declare a const variable that never changes.
}
}
Student.count = 0; //declaring class property outside of class
//create some objects
let  peter = new Student(“Peter Parker”, “Mathematics”);
let  John = new Student(“John Rambo”, “Computers”);
console.log(Student.count);     //prints 2
console.log(Student.add(30,44)); //prints 74
Rules for Class Properties and Class Methods
- Static keyword for static methods like class methods.
Static methodcan be called with creating a single instance of object.- Do not use the instance properties in class methods.
- Static methods are usually created for utility functions for an application – source
Mozilla Developer Network
Example Program for Class Method and Class Properties
<!DOCTYPE html>
<html>
<body>
<script>
class Person {
    constructor(firstName, lastName) {
        this.firstName = firstName; // "normal name"
        this._lastName = lastName; // starts with "_"
    }

    get lastName() {
        return this._lastName.toUpperCase();
    }
    set lastName(newName) {
        // validation could be checked here such as
        // only allowing non numerical values
        this._lastName = newName;
    }
    walk() {
        return (this.firstName + ' ' + this._lastName + ' is walking.');
    }
}
let p1 = new Person('Peter', 'Parker');
document.body.innerHTML += p1.lastName;
</script>
</body>
</html>JavaScript Classes
In this article, you will learn about ECMAScript which is a standard for JavaScript. We will only learn about the current ES5 and ES6 features such as JavaScript classes.
When objects are of same type then we want class. But , ES5 only has constructors. For example
function Employee(name, department){
     this.name = name;
     this.department = department;
     this.say = function (){
     alert(“I am “ + this.name);
     }
}
Now, if we want to create objects using the constructor.
let manager = new Employee(‘peter’,’finance’);Some rules about ES5 Constructor
Rule 1: constructor name has first letter capitalized.
Rule 2: There can only be one constructor.
Rule 3: property has no colon but a “=” sign.
Rule 4: this is used because constructor for same object as Hero.
Rule 5: Function uses function keyword.
In the above example, we have used ‘this’ operator, even through the constructor is not an object and each property has “=” assignment operator rather than the usual (:) colon for properties.
ES 6 Classes
The ES6 have something called class like other programming languages.
The class contains a single constructor which will create multiple objects of same type.
class Employee{
constructor (name, dept){
     this.name = name;
     this.dept = dept;
}
//function in class
say_something(){
     alert(“I am “ + this.name);
     }
}
let manager = new Employee(“peter”,”finance”);
JavaScript Special function (factories)
There is one more method of creating multiple objects. You can create objects using functions that return a value, therefore, we call them factories or factory function.
let supervisor = function(name,dept){
return {
     empName : name,
     empDept: dept
     }
}JavaScript Object In-Depth
In this article, you will learn about JavaScript object in more details. All the previous examples have one or two objects created. Now we will look at more complex construct.
JavaScript objects are like arrays . You can access them like arrays using index. However, the index is its property.
For example:
let arr = [‘john’, ‘lee’]; //an array
console.log(arr[0]); // prints the first element of array
Now consider an object.
let person = {
firstName : ‘John’,
lastName: ‘Miro’
};
//to access the property like array use the bracket notation
console.log(person[‘firstName’]);
How many ways to define the property?
How many ways to define the property?
Method 1: use double quotes
let person = {
“firstName”: ‘John’
};
Method 2: use single quotes
let person = {
‘firstName’: ‘John’
};
Method 3: use no quotes
let person = {
firstName: ‘John’
};
Nested Objects
Objects can contain other objects.
For example:
let person = {
firstName: ‘Sherlock’,
lastName: ‘Holmes’,
address: {
    street: ‘221 Baker Street’,
    city: ‘London’,
    country: ‘UK’
}
};
How do you access the nested Object ?
The dot notation and the bracket notation still works for the nested objects.
console.log(person.address.street);
console.log(person.address[‘city’]);
How to add or delete object property?
person.age = 34; /* simply type the object and its        property name and it will add it.*/

delete person.address.city; /*will delete the city property in the nested object.*/
Objects Have Methods
Objects have methods that define the behavior of the object.
For example.
let person = {
firstName : ‘Ted’,
lastName: ‘codd’,
say: function (){
alert(‘I am a data scientist!”);
}
};
How to call the object function?
person.say();The ‘this’ keyword
You can refer to a property or method inside a function with ‘this’ keyword.
let person = {
firstName : ‘Ted’,
lastName: ‘codd’,
talk: function (){
document.body.innerHTML = ‘My name is” + this.firstName;
}
};
In the next article, we will talk about strings.
HTML 5 GeoLocation API
HTML 5 geolocation API is very popular method to get access to location of user if the user browser supports geolocation feature.
It uses various techniques to get the location information
- GPS,
- GSM/3G triangulation,
- Wifi,
- IP address, etc.
Consider the following code that find location of user in terms of latitude and longitude.
<p id="msg">Click the Button to Get Your Position:</p>
<button onclick="getLocation()">Find Me</button>
JavaScript Code
JavaScript Code
<script>
     var displayCoords=document.getElementById("msg");
     function getLocation() {
          if (navigator.geolocation) {
          navigator.geolocation.getCurrentPosition(showPosition);
          } else {
          displayCoords.innerHTML="Geolocation API not supported by your browser.";
          }
         }
     function showPosition(position) {
          displayCoords.innerHTML="Latitude: " + position.coords.latitude +
          "<br />Longitude: " + position.coords.longitude;
     }
</script>
Important features:
- Navigator
- Geolocation
- Function getCurrentPosition()
- Position object
- Coords.latitude
- Coords.longitude
You can also use the above coordinates to display the location using Google Maps.
Geolocation with Maps-Leaflet.js
You can get location on google maps using the latitude and longitude values returned by the geolocation.getCurrentPosition function.
<html>
<head>
<meta charset="utf-8">
<title>Geolocation with Leaflet.js</title>
<link rel="stylesheet" href="https://unpkg.com/[email protected]/dist/leaflet.css">
<script src="https://unpkg.com/[email protected]/dist/leaflet.js"></script>
<style>
html, body {
  height: 100%
}

.map {
  height: 300px;
}

.btn {
  background-color: darkred;
  border: 0;
  color: #000;
  padding: 20px;
  text-shadow: 0 0 1px rgba(0, 0, 0, .4);
  text-decoration: none;
  margin:20px auto;
  display: inline-block;
}
</style>
</head>
<body>
  <a href="#" id="show" class="btn">Show Map</a>
  <div id="map" class="map"></div>
  <script>
  // Get current position successfully
function success(position) {
  var map, marker,
      latitude = position.coords.latitude,
      longitude = position.coords.longitude;

  // Instance map using leaflet
  map = L.map('map').setView([latitude, longitude], 13);

  // Tile layer using key api at cloudmade.com
  L.tileLayer('https://{s}.tile.openstreetmap.org/{z}/{x}/{y}.png', {
    key: '760506895e284217a7442ce2efe97797',
    styleId: 103288,
    maxZoom: 16
  }).addTo(map);

  // Marker using leaflet
  marker = L.marker([latitude, longitude]).addTo(map);

  // Popup in leaflet
  marker.bindPopup('<p>Your location</p>').openPopup();
}

// Get current position fail
function error() {
  alert('Get current position fail. Please access codepen to get geolocation.');
}

// Init load document
var show = document.getElementById('show');

show.addEventListener('click', function(e) {
  e.preventDefault();
  if (!navigator.geolocation) {
    console.log("Browser doesn't support geolocation");
  } else {
    navigator.geolocation.getCurrentPosition(success, error);
  }
}, false);
  </script>
</body>
</html>