Rolling Dice Program
In this post, I will teach you to create a rolling dice program in visual basic 6. The program will consist of a single dice with six dots representing numbers between 1 to 6 and button to roll the dice. After you have clicked the rolling button, the dice will give you a random number between 1 to 6.
Prerequisites
To create this program, you need to have a computer that runs at least Windows XP Sp3 or above and Visual basic 6.0. I am running a virtual machine with Windows XP Sp3 which will also work, in case, you have a higher version of windows system.
Design Form for Rolling Dice program
The first step is to open the Visual basic 6 program and create a new standard.exe form. In this form we will create shapes and buttons. Assuming that you know about toolbar, click on the Shape object from the toolbar and create a rectangle shape.
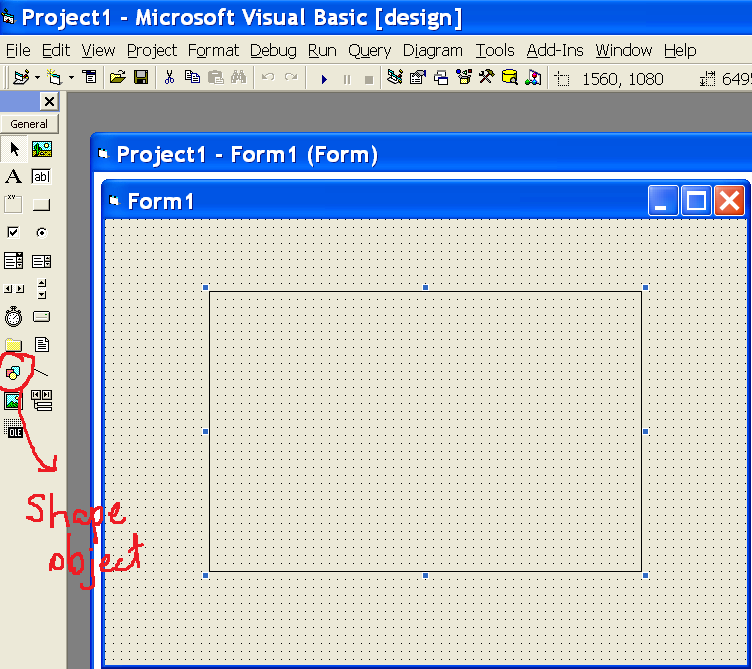
Form Properties
Name: frmRollDIce
Caption: Rolling Dice
Height: 7350
Width:9750
Now, you can set the properties of the above shape as given below.
Name: Dice
Fillcolor: &H00FFFFFF&
Fillstyle: 0-Solid
Shape: 4-Rounded Rectangle
Height: 4215
Width: 4215
Now, you can create black round shapes to simulate an actual dice. Since, we cannot show all the face of the dice, show only one face with 6 dots, that is, the maximum number that the dice can get when you roll it.
Click on the shape object again and create a single small rectangle inside dice shape you created earlier. Set the properties of this object as follows.
Name: Shape1
Fillcolor: &H00000000&
Fillstyle: 0-Solid
Shape: 3-Circle
Height:735
Width:735
Copy the black round shape and paste in the dice shape 5 more times. When you try to paste the shape object, you should receive a warning shown below.
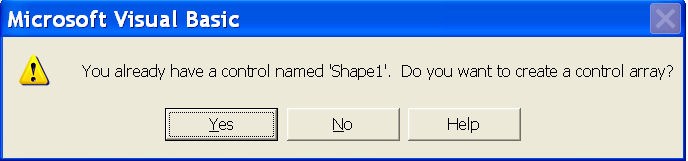
Click on Yes and continue to copy the black round shape 5 more times and arrange them in the following order. You should end up with following form design.

The arrangement of dice is up to you, and you may use the Format tab on Visual basic 6 for align the back circles.
Button to Roll Dice
Now it is time to add button for rolling the dice and getting a random number. Add a button object to the form and set the following properties.
Name: cmdRoll
Caption: Roll Dice
Backcolor: &H0000FFFF&
Style: 1-Graphical
Font: MS Sans Serief 14 Bold
Your final form should look like the following.
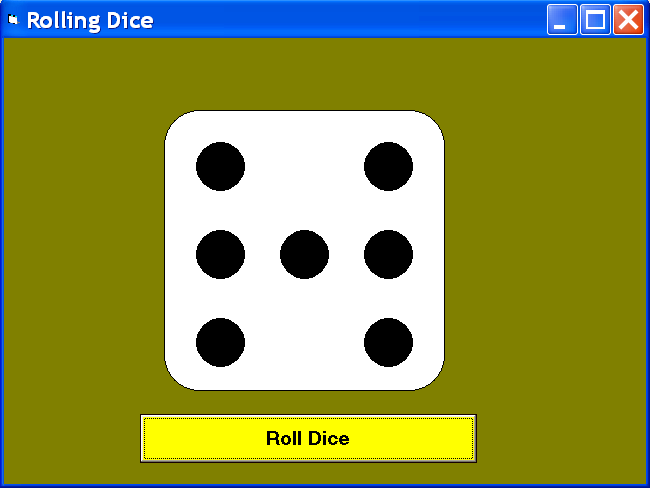
I have added a background color to the main form, you can also change the look and feel of your form design or leave it as it is.
Code for Rolling Dice Program
The only code required here is for the button – Roll Dice because all action is going to happen when you click on the button only.
Add the following code to the button control.
Private Sub cmdRoll_Click()
n = Int(1 + Rnd * 6)
For i = 0 To 6
Shape1(i).Visible = False
Next

If n = 1 Then
Shape1(6).Visible = True
End If

If n = 2 Then
Shape1(1).Visible = True
Shape1(4).Visible = True
End If

If n = 3 Then
Shape1(0).Visible = True
Shape1(6).Visible = True
Shape1(5).Visible = True
End If

If n = 4 Then
Shape1(0).Visible = True
Shape1(2).Visible = True
Shape1(3).Visible = True
Shape1(5).Visible = True
End If

If n = 5 Then
Shape1(0).Visible = True
Shape1(2).Visible = True
Shape1(3).Visible = True
Shape1(5).Visible = True
Shape1(6).Visible = True
End If

If n = 6 Then
Shape1(0).Visible = True
Shape1(1).Visible = True
Shape1(2).Visible = True
Shape1(4).Visible = True
Shape1(5).Visible = True
Shape1(3).Visible = True
End If
End Sub
You program is completed and now you can try to roll the dice and see how it works. If there is a problem, recheck the code.
VB 6 Projects
Visual Basic 6 is a GUI based object-oriented programming language.
You can develop software with visual basic much faster than other programming languages. Visual basic follow the rapid application model also known as RAD model.
Doing projects is a great way to learn visual basic programming. A visual basic project not only gives you an idea about software development, but also teaches you project planning and process involved in finishing the project successfully.
Prerequisites
To take maximize your learning, you must complete these prerequisites because visual basic seems to be an easy programming language, but it is not.
- VB 6 Tutorial – you must be familiar with VB IDE and coding practices before creating your first project. You can do this in two ways – one, visit our VB tutorial page or read a visual programming book.
- VB 6 IDE – install visual basic 6 software to create your project. Read the Visual basic 6.0 installation guide.
- Microsoft Access – this is necessary for connecting your project to a data source, only if its a project requirement. For some projects you can use Microsoft Excel or SQL as the data sources.
VB 6 Examples
VB6 Database Projects
- Library Management
- Bank Management
- Employee Record Management
- Student Record Management
- Time Management
- Payroll Processing
VB6 Attendance Management
- Attendance Management Part 1
- Attendance Management Part 2
- Attendance Management Part 3
- Attendance Management Part 4
- Attendance Management Part 5
VB6 Programs
Recommended Books
Whether you are a student or self-learner, it is hard to learn programming without a good book. I recommend few good books here which has detailed information about Visual Basic 6.0 programming. It is also necessary because Microsoft has stopped supporting Visual basic 6; now they have more advanced version of visual basic in the form of VB.Net and other versions. However, the language of modern visual basic is more or less the same.
Student Records Management System in VB 6.0 with Access Database
In this post, we will create an application for Student Record Management System in Visual Basic 6 with Microsoft Access Database.
The list of Modules and Forms used in the program as follows.
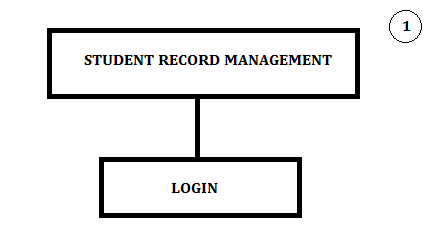
(A) frmStudentManagement System
Caption: STUDENT RECORD MANAGEMENT SYSTEM
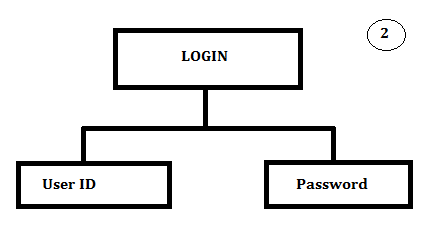
(B) frmLogin
Caption: LOGIN
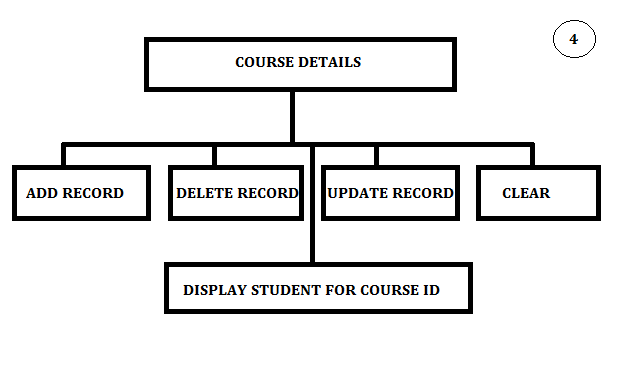
(C) frmCourse
Caption: COURSE DETAILS
(D) frmStudentDetails
Caption: STUDENT DETAILS
(E) Module1.BasSystem Design
First, we will design the System Model and simple high-level diagram of each module will be enough. There are many kind of the diagram to model a system especially when you are using Object-Oriented design. These models are specified in Unified Modelling Language (UML) which not scope of this post.
The Administrator has to log in to the system with username and password provided during registration process. No one is allowed to log in without a proper User ID and Password.
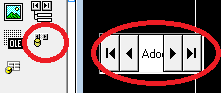
Once the Administrators logged in they can see form for Student Details where they can Insert, Delete, Update and Clear the Student Records. They also have the option to go to First Record, Last Record, Next Record and Previous Record.
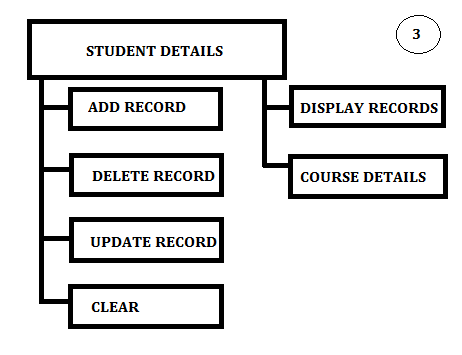
Next, there is an option to maintain the Course Details, when you click a Specific button. We will discuss that later.
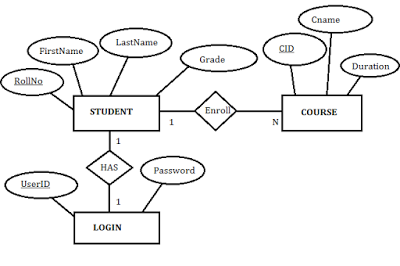
Data Model
ER Model
Tables
First steps after creating the data model are to make sure that you create an MS Access Database called StudentDB.mdb. If you have MS Access 2007 or higher version, save your database with the file extension (.mdb).
Create the following table with correct data types as shown in the following figures.
Components of frmStudentManagent System
Labels
Name :lblStudentManagement
Caption : Student Management System
Font: MS Sans Serif
Font-Size: 24 PX
Font-Weight : Bold
Buttons
Name : btnLogin
Caption: Log in
Font: MS-Sans-Serif
Font-weight:Bold
Font-Size: 10px
Code for frmStudentManagement System
Private Sub Login_Click()
    frmLogin.Show
End Sub
Components of frmLogin
Labels
Name: lblUserID
Caption : User Name:
Name : lblPassword
Caption: PasswordText-Boxes
Name : txtUserID
Text : 'leave blank'
Name : txtPassword
Text : 'leave blank'Buttons
Name : cmdOK
Caption : Log in
Name : cmdCancel
Caption : CancelCode for frmLogin
Option Explicit
Dim rs As New ADODB.Recordset
Dim con As New ADODB.Connection
Dim constr As String
Public LoginSucceeded As Boolean
Private Sub cmdCancel_Click()
'set the global var to false '
'to denote a failed login '
LoginSucceeded = False
Me.Hide
End Sub
Private Sub cmdOK_Click()
Dim userfound As Boolean
With rs .Open "SELECT * FROM LOGIN",
con, adOpenDynamic, adLockOptimistic
'check the username '
.MoveFirst While Not .EOF
If txtUserName = !RollNo And
txtPassword = !Password Then
frmSTUDREC.Show
LoginSucceeded = True
Exit Sub
Me.Hide
ElseIf
txtUserName <> !RollNo Then
.MoveNext
Else
MsgBox "Invalid Password, try again!", ,
"Login" txtPassword.SetFocus
SendKeys "{Home}+{End}"
Exit Sub
End If
Wend
.Close
End With
End Sub
Private Sub Form_Load()
Call loadcon
MsgBox ("connected")
End SubComponents of frmCourse
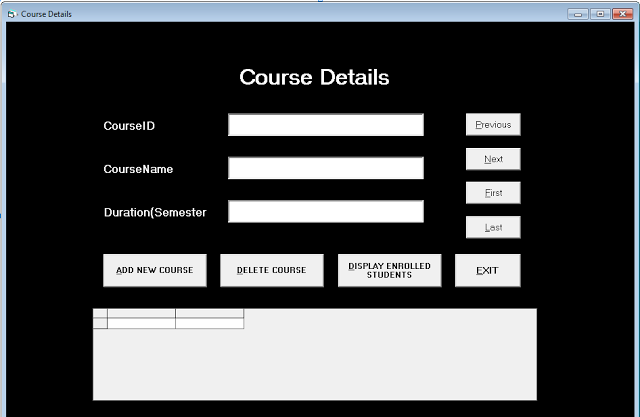
Labels
Name : lblCID
Caption: Course IDName : lblCname
Caption : Course NameName : lblDuration
Caption : Duration(Semester):Text-Boxes
Name : txtCID
Text : 'leave blank'Name : txtCname
Text : 'leave blank'Name : txtDuration
Text : 'leave blank'Buttons
Name : cmdAdd
Caption : &ADD NEW COURSEName : cmdDel
Caption : &DELETE COURSEName : cmdDisplay
Caption : &DISPLAY ENROLLED STUDENTSName : cmdExit
Caption : &EXITName : cmdFirst
Caption : First RecordName : cmdLast
Caption : :Last RecordName : cmdNext
Caption : Next RecordName ; cmdPrev
Caption : Previous RecordCode for frmCourse
Dim con As New ADODB.Connection
Dim rs As New ADODB.Recordset
Dim constr As String
Private Sub cmdAddCourse_Click()
con.Execute "INSERT INTO
Course(CourseID, CourseName, Duration)
VALUES ('" + txtCID.Text + "','" +
txtCNAME.Text + "','" + txtDURATION.Text + "')"
txtCID.Text = "" txtCNAME.Text = "" txtDURATION.Text = ""
con.Close
End Sub
Private Sub cmdDelCourse_Click()
con.Execute "DELETE * FROM COURSE
WHERE CourseID = " &
txtCID & ""
End Sub
Private Sub cmdDisplay_Click()
Dim rsGrid As New ADODB.Recordset
con.CursorLocation = adUseClient rsGrid.CursorLocation
= adUseClient rsGrid.CursorType = adOpenStatic
rsGrid.Open "SELECT * FROM Student_Records
WHERE CourseID = " &
txtCID & "",
con, adOpenForwardOnly, adLockPessimistic
Set DataGrid1.DataSource = rsGrid
End Sub
Private Sub cmdFirst_Click()
With rs .Open "SELECT * FROM Course",
con, adOpenDynamic, adLockOptimistic
While Not .EOF
txtCID.Text = rs!CourseID
txtCNAME.Text = rs!CourseName
txtDURATION.Text = rs!Duration
.MoveFirst
Wend
End With
End Sub
Private Sub cmdLast_Click()
With rs .Open "SELECT * FROM Course",
con, adOpenDynamic, adLockOptimistic
While Not .EOF
txtCID.Text = rs!CourseID
txtCNAME.Text = rs!CourseName
txtDURATION.Text = rs!Duration
.MoveLast
Wend
End With
End Sub
Private Sub cmdNext_Click()
With rs .Open "SELECT * FROM Course",
con, adOpenDynamic, adLockOptimistic
While Not .EOF
txtCID.Text = rs!CourseID
txtCNAME.Text = rs!CourseName
txtDURATION.Text = rs!Duration
.MoveNext
Wend
End With
End Sub
Private Sub cmdPrev_Click()
With rs .Open "SELECT * FROM Course",
con, adOpenDynamic, adLockOptimistic
While Not .EOF
txtCID.Text = rs!CourseID
txtCNAME.Text = rs!CourseName
txtDURATION.Text = rs!Duration
.MovePrevious
Wend
End With
End Sub
Private Sub Form_Load()
Call loadcon
MsgBox ("Connected")
End SubComponents of frmStudentDetails

Labels
Name : lblStudentID
Caption : STUDENT IDName : lblFirstName
Caption : FIRST NAME:Name : lblLastName
Caption : LAST NAME:Name : lblCourseID
Caption : COURSE IDName : lblGrade
Caption : GRADEText-Boxes
Name : txtStudentID
Text : 'leave blank'Name : txtFirstName
Text : 'leave blank'Name : txtLastName
Text : 'leave blank'Name : txtCourseID
Text : 'leave blank'Name : txtGrade
Text : 'leave blank'Buttons
Name : cmdAdd
Caption : &ADDName : cmdDel
Caption: &DELETEName : cmdUpdatev
Caption : &UPDATEName : cmdClear
Caption : &CLEARName : cmdExit
Caption : &EXITName : cmdDisplay
Caption : &DISPLAYName : cmdStudentCourses
Caption : Student CoursesName: cmdNext
Caption : &Next RecordName : cmdPrev
Caption : &Previous RecordName : cmdFirst
Caption : &First RecordName : cmdLast
Caption : &Last RecordData Grid Control
Name : DataGrid1Code for frmStudentDetails
Dim con As New ADODB.Connection
Dim rs As New ADODB.Recordset
Dim constr As String
Private Sub btnCourse_Click()
Unload Me
frmCourse.Show
End Sub
Private Sub cmdData_Click()
Dim rsGrid As New ADODB.Recordset
con.CursorLocation = adUseClient
rsGrid.CursorLocation = adUseClient
rsGrid.CursorType = adOpenStatic
rsGrid.Open "SELECT * FROM Student_Records",
con, adOpenForwardOnly, adLockPessimistic
Set DataGrid1.DataSource = rsGrid
End Sub
Private Sub cmdDel_Click()
con.Execute "DELETE * FROM
STUDENT_RECORDS WHERE RollNo = " &
(Text1.Text) & ""
MsgBox ("Record Deleted Successfully")
End Sub
Private Sub cmdExit_Click()
Unload Me
End Sub
Private Sub cmdFirst_Click()
With rs
.Open "SELECT * FROM STUDENT_RECORDS",
con, adOpenDynamic, adLockOptimistic
Text1.Text = rs!RollNo
Text2.Text = rs!FirstName
Text3.Text = rs!LastName
Text4.Text = rs!CourseID
Text5.Text = rs!Grade
.MoveFirst
.Close
End With
End Sub
Private Sub cmdLast_Click()
With rs
.Open "SELECT * FROM STUDENT_RECORDS",
con, adOpenDynamic, adLockOptimistic
Text1.Text = rs!RollNo
Text2.Text = rs!FirstName
Text3.Text = rs!LastName
Text4.Text = rs!CourseID
Text5.Text = rs!Grade
.MoveLast
End With
End Sub
Private Sub cmdNext_Click()
With rs
.Open "SELECT * FROM STUDENT_RECORDS",
con, adOpenDynamic, adLockOptimistic
While Not .EOF
Text1.Text = rs!RollNo
Text2.Text = rs!FirstName
Text3.Text = rs!LastName
Text4.Text = rs!CourseID
Text5.Text = rs!Grade
.MoveNext
Wend
.Close
End With
End Sub
Private Sub cmdPrev_Click()
With rs
.Open "SELECT * FROM STUDENT_RECORDS",
con, adOpenDynamic, adLockOptimistic
While Not .EOF
Text1.Text = rs!RollNo
Text2.Text = rs!FirstName
Text3.Text = rs!LastName
Text4.Text = rs!CourseID
Text5.Text = rs!Grade
.MovePrevious
Wend
End With
End Sub
Private Sub cmdSave_Click()
con.Execute "UPDATE STUDENT_RECORDS
SET FirstName = '" & Text2 & "',
LastName = '" & Text3 & "',
CourseID =" & Text4 & ",
Grade = '" & Text5 & "'
WHERE RollNo = " & Text1 & ""
MsgBox ("Record Updated")
End Sub
Private Sub Form_Load()
constr = "Provider=Microsoft.Jet.OLEDB.4.0;Data
Source=C:UsersGirishDocumentsStudentDB.mdb;
Persist Security Info=False"
con.Open constr
End Sub
Private Sub cmdAdd_Click()
con.Execute "INSERT INTO
STUDENT_RECORDS(RollNo,FirstName,LastName,CourseID,Grade)
VALUES ('" + Text1.Text + "','" +
Text2.Text + "','" +
Text3.Text + "','" +
Text4.Text + "','" +
Text5.Text + "')"
Text1.Text = ""
Text2.Text = ""
Text3.Text = ""
Text4.Text = ""
Text5.Text = ""
con.Close
End SubCode for Module1.Bas
The Module1.Bas is the code for connection to Microsoft Access Database. Since you may not want to define this connection on each form that is used in the application.
Public Sub loadcon()
constr = "Provider=Microsoft.Jet.OLEDB.4.0;
Data Source=C:UsersGirishDocumentsStudentDB.mdb;
Persist Security Info=False"
con.Open constr
End SubNote : The C:\Users\Peter\Documents\StudentDB.mdb; is path to the Access database , you need to change is according to path of your Student Database.
Simple Calculator Application in Visual Basic 6.0
In this post we will learn to create a simple calculator in Visual basic 6.0. It is a simple application project to help you learn Visual basic programming.
Background Information
The calculator application does simple arithmetic operations. You can construct an advanced calculator which need same kind of coding that we are going to use in this program, however, the computational logic may differ. The overall steps required to create the Calculator application is as follows.
- Design the interface of the calculator application.
- Name the buttons and textbox controls used in the application.
- Write VB6 codes for each controls without making any mistakes.
- Test the calculator application and make sure it works and there is no error of any kind.
- Add style to calculator by changing the background and color of buttons.
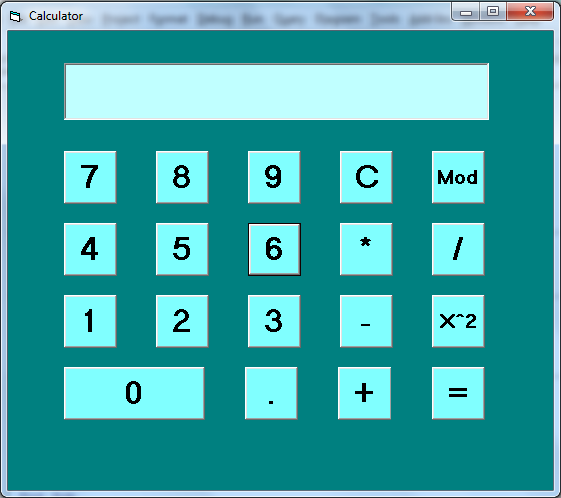
Names of Controls
Open your Microsoft Visual basic 6.0 software and under New Project, select Standard EXE and click Open.
Resize the Form for Calculator application appropriately and this can be done changing the width and the height property. Now add buttons and a single text box from Toolbox on the left sidebar of Visual basic editor window.
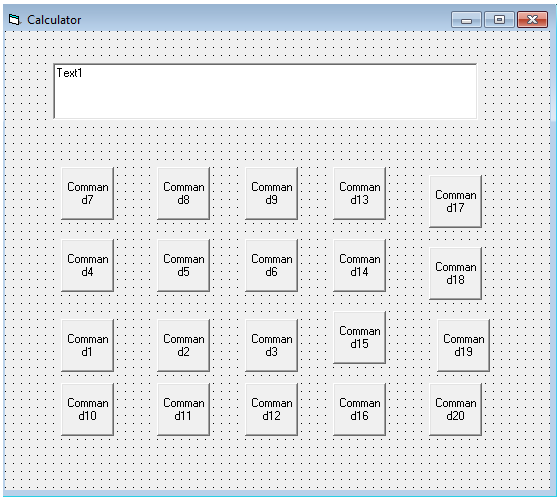
Change the width and the height property of Textbox control, so that it is aligned with the buttons. The original fonts are very small, change the font-size of the buttons to 16px and font-weight to bold.
Only one button in the above figure is of different size which is Command10 because it is for the number 0. Set the width of this button to 1630px.
The buttons are not aligned properly – both horizontally and vertically. You can align the controls using Format tab of Visual basic editor menu bar.
Select top row of buttons and select Format tab > go to Align > select Tops. The buttons get aligned to top. Repeat the step for all rows of buttons.
Now we align the buttons column-wise.
Select the first column of buttons and click Format tab > go to Align > select Lefts. The column gets left aligned. Repeat the same step for each column.
Select top row of buttons and select Format tab > got to Horizontal Spacing > select Make Equal. The button space becomes equal between the first and the last button of the row. Repeat the step for all rows of buttons.
Select top row of buttons and select Format tab > go to Vertical Spacing > select Make Equal. The button space vertically becomes equal between the first and the last button of the column. Repeat the step for all column of buttons.
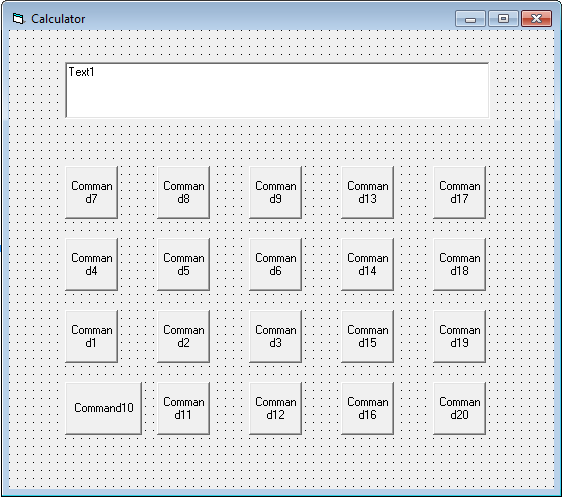
The naming convention of the buttons should be consistent.
For example, if it is label control and text for label is number 9, then the name of the label control should be “lblNine“. We follow this convention throughout the post.
Form Name
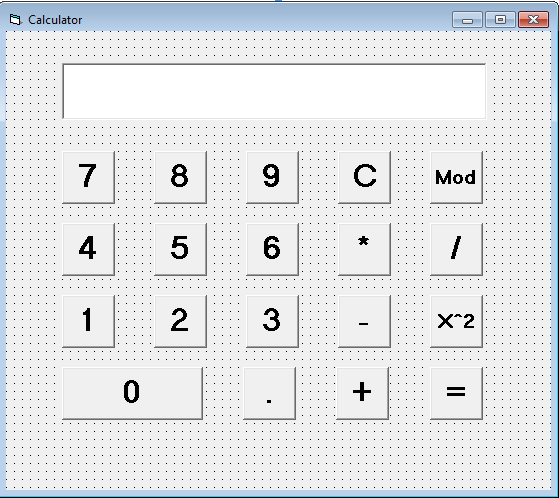
Next we start naming form controls by putting caption for our button and textbox controls, but before that name the form to frmCALC and set form caption to Calculator. Similarly, change the names and caption of all the other buttons and textbox.
For your convenience here is the list of controls and their names, caption values and other properties.
Buttons
Command1: btnOne
Caption: 1
Height: 800
Width: 800
Font: MS Sans Serif
Font-weight: Bold
Font-size: 24 pxCommand2: cmdTwo
Caption: 2
Height: 800
Width: 800
Font: MS Sans Serif
Font-weight: Bold
Font-size: 24 pxCommand3: cmdThree
Caption: 3
Height: 800
Width: 800
Font: MS Sans Serif
Font-weight: Bold
Font-size: 24pxCommand4 : btnFour
Caption: 4
Height: 800
Width: 800
Font: MS Sans Serif
Font-weight: Bold
Font-size: 24pxCommand5: cmdFive
Caption: 5
Height: 800
Width: 800
Font: MS Sans Serif
Font-weight: Bold
Font-size: 24pxCommand6: cmdSix
Caption: 6
Height: 800
Width: 800
Font: MS Sans Serif
Font-weight: Bold
Font-size: 24pxCommand7: cmdSeven
Caption: 7
Height: 800
Width: 800
Font: MS Sans Serif
Font-weight: Bold
Font-zise: 24pxCommand8: cmdEight
Caption: 8
Height: 800
Width: 800
Font: MS Sans Serif
Font-weight: Bold
Font-size: 24pxCommand9: cmdNine
Caption: 9
Height: 800
Width: 800
Font: MS Sans Serif
Font-weight: Bold
Font-size: 24pxCommand0: cmdZero
Caption: 0
Height: 800
Width: 800
Font: MS Sans Serif
Font-weight: Bold
Font-size: 24pxCommand0: cmdPlus
Caption: 0
Height: 800
Width: 800
Font: MS Sans Serif
Font-weight: Bold
Font-size: 24pxCommand0: cmdMinus
Caption: 0
Height: 800
Width: 800
Font: MS Sans Serif
Font-weight: Bold
Font-size: 24pxCommand0: cmdMul
Caption: 0
Height: 800
Width: 800
Font: MS Sans Serif
Font-weight: Bold
Font-size: 24pxCommand0: cmdDivide
Caption: 0
Height: 800
Width: 800
Font: MS Sans Serif
Font-weight: Bold
Font-size: 24pxCommand0: cmdMod
Caption: 0
Height: 800
Width: 800
Font: MS Sans Serif
Font-weight: Bold
Font-size: 24pxCommand0: cmdSquare
Caption: 0
Height: 800
Width: 800
Font: MS Sans Serif
Font-weight: Bold
Font-size: 24pxCommand0: cmdEquals
Caption: 0
Height: 800
Width: 800
Font: MS Sans Serif
Font-weight: Bold
Font-size: 24pxTextbox
TextBox1: txtOutput
Height: 855
Width: 6375
Font: MS Sans Serif
Font-weight: Bold
Font-size: 18px
Alignment: 1-Right-JustifyNote: Remove the default text from the TextBox1.
Now the Calculator should appear as in the following figure. Make correction if you did not get it right.
Coding for Calculator Application
Declare global variable at the top of the coding windows in VB and type the following code.
Dim sd As Integer
Dim operator As Integer
Dim result As IntegercmdOne
Private Sub cmdOne_Click()
txtOutput = txtOutput & 1
End SubcmdTwo
Private Sub cmdTwo_Click()
txtOutput = txtOutput & 2
End SubcmdThree
Private Sub cmdThree_Click()
txtOutput = txtOutput & 3
End SubcmdFour
Private Sub cmdFour_Click()
txtOutput = txtOutput & 4
End SubcmdFive
Private Sub cmdFive_Click()
txtOutput = txtOutput & 5
End SubcmdSix
Private Sub cmdSix_Click()
txtOutput = txtOutput & 6
End SubcmdSeven
Private Sub cmdSeven_Click()
txtOutput = txtOutput & 7
End SubcmdEight
Private Sub cmdEight_Click()
txtOutput = txtOutput & 8
End SubcmdNine
Private Sub cmdNine_Click()
txtOutput = txtOutput & 9
End SubcmdZero
Private Sub cmdZero_Click()
txtOutput = txtOutput & 0
End SubCode for Operators
cmdPlus
Private Sub cmdPlus_Click()
operator = 1
sd = txtOutput.Text
txtOutput.Text = " "
End SubcmdMinus
Private Sub cmdMinus_Click()
operator = 2
sd = txtOutput.Text
txtOutput.Text = " "
End SubcmdMul
Private Sub cmdMul_Click()
operator = 3
sd = txtOutput.Text
txtOutput.Text = " "
End SubcmdDivide
Private Sub cmdDivide_Click()
operator = 4
sd = txtOutput.Text
txtOutput.Text = ""
End SubcmdMod
Private Sub cmdMod_Click()
operator = 5
sd = txtOutput.Text
txtOutput.Text = " "
End SubcmdSquare
Private Sub cmdSquare_Click()
operator = 6
sd = txtOutput.Text
txtOutput.Text = " "
End SubcmdEquals
Private Sub cmdEquals_Click()
If operator = 1 Then
result = Val(sd) + Val(txtOutput.Text)
txtOutput.Text = result
ElseIf operator = 2 Then
result = Val(sd) - Val(txtOutput.Text)
txtOutput.Text = result
ElseIf operator = 3 Then
result = Val(sd) * Val(txtOutput.Text)
txtOutput.Text = result
ElseIf operator = 4 Then
result = Val(sd) / Val(txtOutput.Text)
txtOutput.Text = result
ElseIf operator = 5 Then
result = Val(sd) Mod Val(txtOutput.Text)
txtOutput.Text = result
ElseIf operator = 6 Then
result = Val(sd) * Val(sd)
txtOutput.Text = result
End If
End SubAdding Style information to Calculator Application
To add style and change the appearance of Calculator application, you can do a lot of things in Visual basic 6.0. We will change the appearance of Calculator by doing following
- Change the Background color of the Form.
- Change the Background color of the button and Textbox.
- Change the Fore-color of the Form and Form elements.
VB 6.0 Persistent Recordset
When you establish connection with a database such as Microsoft Access or SQL through Visual basic 6 form. You must extract a set of records from one or more tables. These records are stored in a VB 6 object called a recordset. There are two ways to get recordset.
- ADODC ( ActiveX Object Data Control )
- ADODB ( ActiveX Object Data Base)
The next section I will discuss more about it.
ADODC vs ADODB
The ADODC provides a control that that creates a “connection string” and interface with the database. It skips the programming and helps to connect controls like textbox to connect to database directly.
Whereas ADODB is a class library with lot of methods and objects to connect to external databases. In other words, using methods and objects you can connect to any database and retrieve recordset.
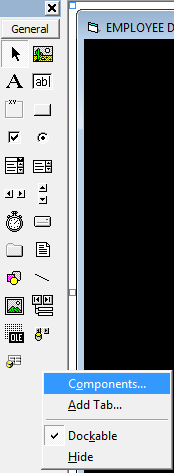
To use the ADODC and ADODB, you must install following components under Project > Components > Controls Tab.
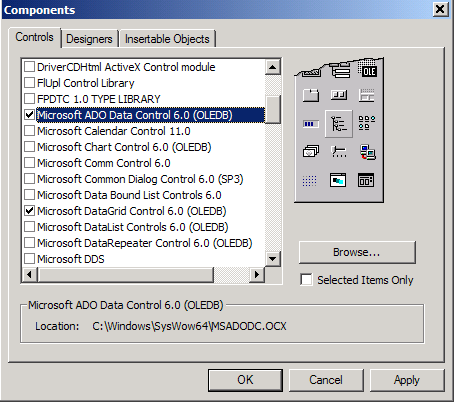
Select two items – Microsoft ADO Data Control 6.0 and Microsoft Data Grid Control 6.0.
Click Apply and then click OK.
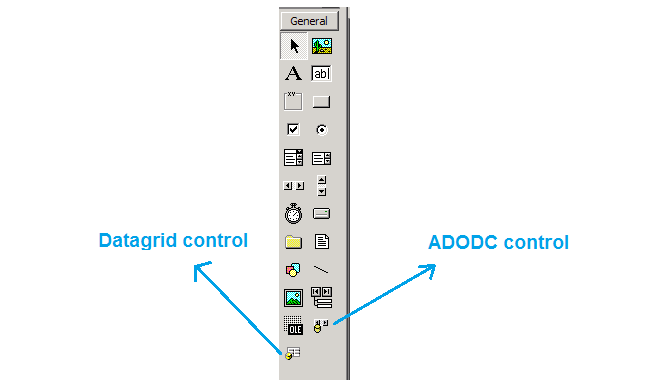
You will find that the VB Tool box has new sets of controls in the left hand side of VB 6.0 IDE. See image below.
Recordset Connection Problem
Once you establish connection with the database and retrieve recordset , you can insert, delete, update or display data anyway you like. However, this will not work if your connection is broken or you want to work offline. As long as the database connection state is open, you can continue without problem.
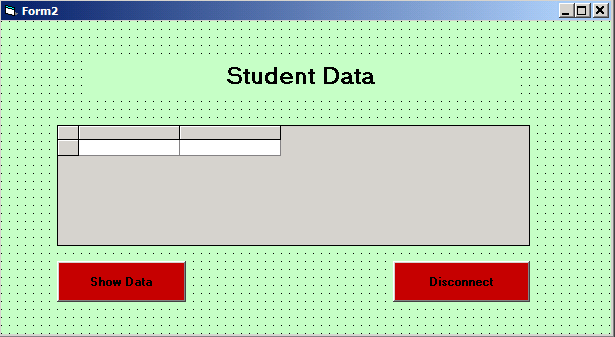
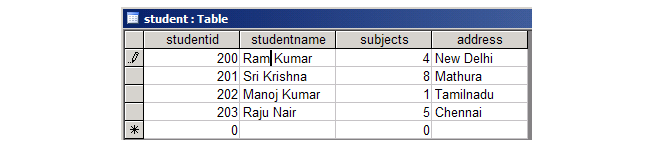
Suppose you established connection with MS Access database and display your data in a data-grid control as shown in the following example.
Form Design
This form has two buttons and a data-grid control to display data. The show data button will retrieve data from the database table ‘student‘ and display in the data-grid control.The second button, disconnect will close the recordset and the connection to the database.
Create MS Access 2003 Database with table ‘student’
The first step is to create a MS access database and create a simple table – students. Fill some random data for testing.
Code for Controls
Now you need to write appropriate codes for both the controls.
Show Data
Private Sub cmdShowData_Click() Call myconnect rs.CursorLocation = adUseClient 'open student table rs.Open "student", con, adOpenKeyset, adLockBatchOptimistic, adCmdTable Set DataGrid1.DataSource = rs End Sub
Disconnected
Private Sub cmdDisconnect_Click() rs.Close con.Close End Sub
Code under ‘General’ to establish database connection
Option Explicit Public con As New ADODB.Connection Public rs As New ADODB.Recordset Public constr As String Public Sub myconnect() constr = "Provider=Microsoft.Jet.OLEDB.4.0;Data Source=C:\VBProjects\Temp\temp.mdb;Persist Security Info=False" con.Open constr MsgBox "Connected" End Sub
Testing Our Program
When you run the program, you will find that clicking show data will populate the data-grid control successfully.
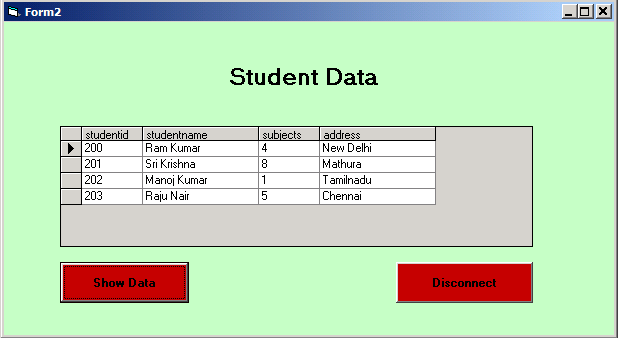
However, as discussed earlier the recordset is available as long as the connection to the database is open. If you click the Disconnect button the data will disappear.

Therefore, the access to data set depends on the connection. We need data available even after the connection is closed or recordset is closed.
Persistent Recordset
The persistent recordset follow a very simple principle of saving your recordset data in a file, so that even if you break the connection with database it does not matter.
Now we rewrite the same program with persistent recordset.
Form Design
This form has two buttons and a data-grid control. The first button is Show Data and the second button is Save Data.
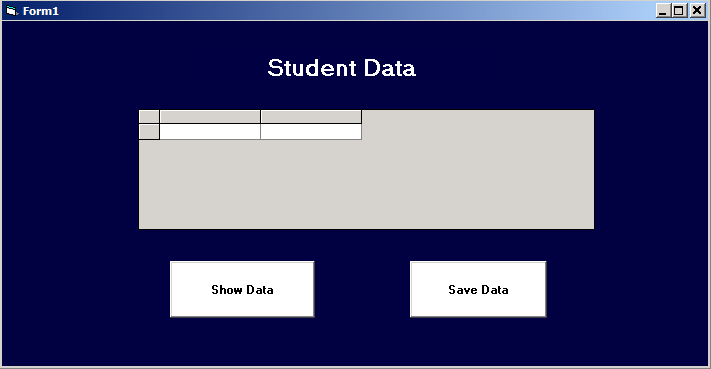
The save data button will run a query to the database and get the recordset. It will open a file and save the data immediately. The connection is closed.
The show data will not query the data but open the file and get the recordset. In this way, it does not matter whether the connection to the database is available or not, we can continue to work offline.
Database
There is not change in the database. You may use the same database and table which was used for the program earlier.
Code for controls
Save Data
Private Sub cmdSave_Click()
Call loadcon
rs.CursorLocation = adUseClient
rs.Open "student", con, adOpenKeyset, adLockBatchOptimistic, adCmdTable
If Dir$("C:/VBProjects/Temp/mydata.xml") <> "" Then
Kill "C:/VBProjects/Temp/mydata.xml"
End If
rs.Save "C:/VBProjects/Temp/mydata.xml", adPersistXML
rs.Close
con.Close
End SubLet us discuss the code in detail.
Call loadcon rs.CursorLocation = adUseClient rs.Open "student", con, adOpenKeyset, adLockBatchOptimistic, adCmdTable
The above code will establish the connection to database which is MS Access 2003. It will store the entire table ‘student’ from the database to a recordset called rs.
adUseClient– it is the cursor location that change, navigate or update data. This cursor works on the client side.
con – name of the connection object.
adOpenKeyset -This is the cursor type when you access the recordset. This specify which records are visible or accessible, how efficient it is.
adLockBatchOptimistic– It is lock type required to edit the record. Optimistic batch update lock is not supported when cursor is adUseClient.
adCmdTable – It is a commandType that will internally generate a query that will fetch a table with all columns.
If Dir$("C:/VBProjects/Temp/mydata.xml") <> "" Then
Kill "C:/VBProjects/Temp/mydata.xml"
End IfThe persistent recordset uses rs.save command to create a file and save the results. Each time it attempts to create a new file. It there is an exiting file, you get an error. The above command will check for existing file and delete it.
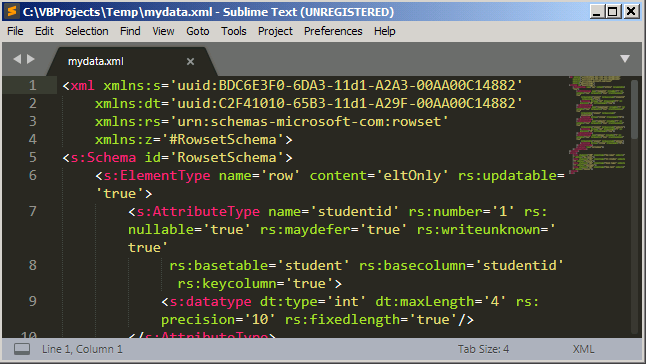
rs.Save "C:/VBProjects/Temp/mydata.xml", adPersistXML
The above code will create a new file and save the recordset data. Now, the file is an XML file because we specified adPersistXML parameter which save the query into an XML file.
There is a default method to save the recordset in a DAT file using parameter – adPersistADTG
rs.Save "C:/VBProjects/Temp/mydata.dat", adPersistADTG
This file can be retrieved in the same manner as an XML file.
rs.close con.close
The last part of code is very important as it closes all the connection. However, it does not concern us because the recordset is stored in the file.
Show Data
The show data button will open the recordset from previously saved file and display it to the data-grid.
Private Sub cmdShow_Click() Set rs = New ADODB.Recordset rs.CursorLocation = adUseClient rs.Open "C:/VBProjects/Temp/mydata.xml", , adOpenKeyset, adLockBatchOptimistic, adCmdFile Set DataGrid1.DataSource = rs End Sub
The most important code above is
rs.Open "C:/VBProjects/Temp/mydata.xml", , adOpenKeyset, adLockBatchOptimistic, adCmdFile
The recordset is opened from a file and the command type specified is adCmdFile.

The above result is persistent because the database connection is already closed. Note that the code to establish a database connection will remain same as the previous program.
Library Management System using VB 6 with MS Access Database
This article will help you to develop a library management system in Visual basic 6.0 with MS Access as database. To help you understand the project, we have included system diagram , er diagram, table design in MS Access and VB 6 form designs.
User Activities
Since, this is a medium size project we don’t need use- case diagrams. However, you are free to use them and modify the project. The main activities of the library management system are:
- Managing members information that includes adding, deleting, updating, and displaying member records.
- Each library member including admin must login to perform any transaction. Therefore, a user ID and password is given to every member.
- Managing book details in the library such as adding , deleting, updating, and displaying book information. Each book has member ID of the person who borrowed the book recently. Therefore, looking at book details we know who has the book from the library.
- Every member can check the availability of the book before borrowing it.
The library management system you develop must contain the following modules.
- frmLibraryManagement (Main Form)
- frmLogin (Login Form)
- frmBook (Book Form)
- frmMember (Member Form)
- frmBorrow (Book Borrow Form)
- frmMenu (MDI Form)
- Module1.bas (Module)
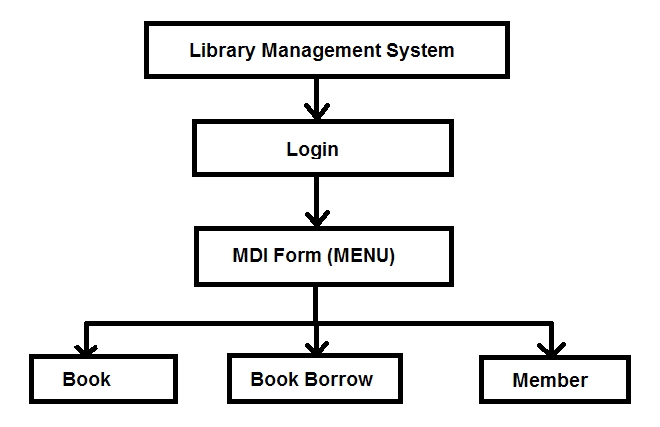
System Design
The library management main form with login button is displayed to the users. The users login to access the menu (MDI Form). The users can manage books or members at anytime within menu form . Also,members can check availability of books and borrow it if available.
The system diagram shows how the overall system works.
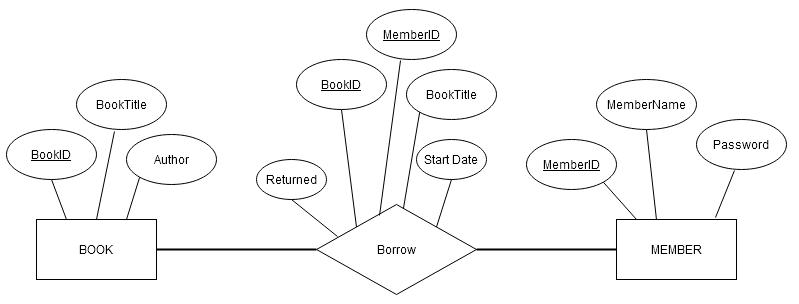
Data Model – ER Diagram
The ER diagram or entity-relationship diagram begins with identifying all entities of the project. You can write activities or use an activity diagram to identify entities.
- Member has user ID and password.
- Member can borrow books and return after use.
- A single book is allocated to only one member.
- Member can check availability of a book.
- Book details and Catalog of all books in library.
From above description we identified three entities and their relationships.
- Borrow and Return
- Library member
- Book Details
The ER diagram is below shows relationship between all entities.
Location of the Database
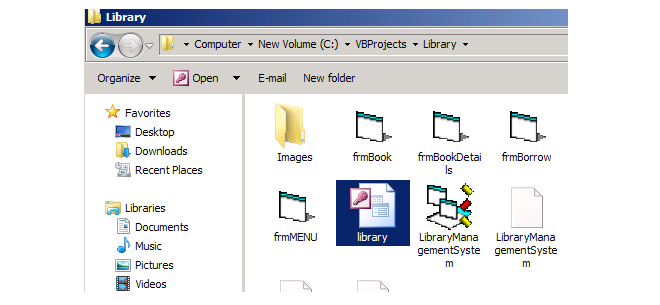
In the next section, you will be creating a database in MS Access 2003; therefore, you must create the database in following location – C:/VBProjects/Library/library.mdb for this project to work. If the path is incorrect, the program will not run successfully.
Relational Model – Tables
Now we need to convert the ER Model to a Relational Model which means creating a table for each entity in the ER Model.
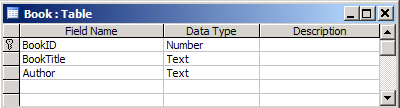
Book Table
The book table in Access Design View is given below. One of the Field Name is “Primary Key”, in this case, BookID.
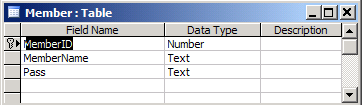
Member Table
The screenshot for the Member table in Microsoft Access Design View is given below. The Field Name “MemberID” is the “Primary Key” for this table”.
Borrow Table
The third table in MS Access Design View is Borrow. This table has multiple fields that serve as the “Primary Key”. The primary key are BookID, MemberID, and Return.
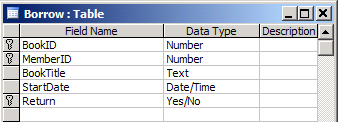
Note: Primary Key is a field that uniquely identifies each row in the table.
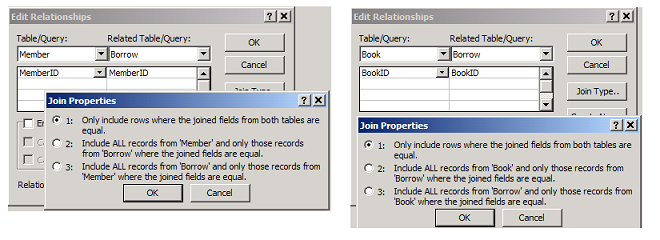
Relationship
A relationship is MS Access is similar to the e-r diagram we created previously. We can use the e-r diagram to create relationships between tables.
To view or create relationships among tables, go to Database Tool from the Toolbar > [Click] Relationship under Show/Hide.

The relationship between Member and Borrow is called One-to-Many and the relationship between Book and Borrow is One-to-Many.
Connect to MS Access Database Using Module1.bas
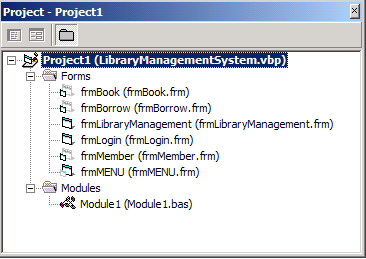
All form need to connect to Microsoft Access Database but you may have to write the code for connection in each form. It there is a large number of forms in the project, say 10, then these extra line of codes become redundant. To save us from this trouble, create Module1.bas file from Project1.vbp windows.The code for Module is given below.
Public con As New ADODB.Connection
Public rs As New ADODB.Recordset
Public constr As String
Public Sub loadcon()
constr = "Provider=Microsoft.Jet.OLEDB.4.0;Data Source=C:\VBProjects\Library\library.mdb;Persist Security Info=False"
con.Open constr
End SubComponents for frmLibraryManagement
You can design the interface for each of the forms in Visual Basic now. However, you must rename them properly for sake of coding. Let’s create components for frmLibraryManagement as follows and rename them.
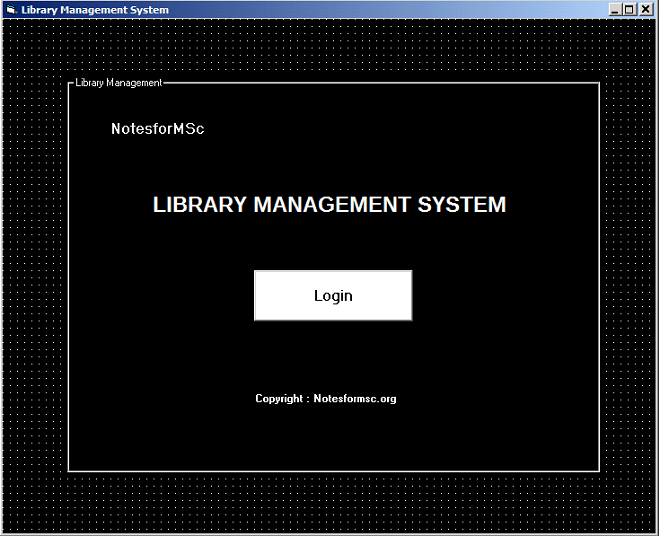
Form Details
Name: frmLibraryManagement
Caption: LIBRARY MANAGEMENT SYSTEM
BackColor: Window Text
ForeColor: Highlight TextNow add a frame control and add all other controls on top of it.
Frame
Name: frameLibraryManagement
Caption: Library Management
BackColor: Window Text
ForeColor: Highlight TextLabels
Name : lblLibraryManagement
Caption : LIBRARY MANAGEMENT SYSTEM
BackColor :Window Text
ForeColor : Highlight Text
Font : Arimo 18px BoldName : lblCompany
Caption : NotesforMSc
BackColor :Window Text
ForeColor : Highlight Text
Font : MS Sans-serif 12px BoldName : lblCopyright
Caption : Copyright : https://notesformsc.org
BackColor :Window Text
ForeColor : Highlight Text
Font : MS Sans-serif px BoldButtons
Name : cmdLogin
Caption : Login
BackColor : Button Highlight
Font : MS Sans-serif 12px Bold
Style :1-GraphicalCode for frmLibraryManagement
Private Sub cmdLogin_Click()
frmLogin.Show
Unload Me
End SubComponents for frmLogin
The login screen is different because you want password to be hidden when you type them. To create Login dialog, {Right-Click] Project.vbp > Select Add > [Click] Form. The new form dialog box will appear, select Log in Dialog.
Now we must rename and change the code for frmLogin.

Form Details
Name : frmLogin
Caption :Login
BackColor: WindowText
ForeColor : Highlight TextLabels
Name : lblUserID
Caption : UserID
BackColor : Window Text
ForeColor : Highlight TextName : lblPassword
Caption : Password
BackColor : Window text
ForeColor : Highlight TextText-Boxes
Name: txtUserID
Text : 'leave blank'Name : txtPassword
Text : 'leave blank'Buttons
Name : cmdOk
Caption : OKName: cmdCancel
Caption : CancelCode for frmLogin
Option Explicit
Public LoginSucceeded As Boolean
Private Sub cmdCancel_Click()
'set the global var to false
'to denote a failed login
LoginSucceeded = False
Me.Hide
End Sub
Private Sub cmdOK_Click()
rs.Open "SELECT * FROM Member ", con, adOpenDynamic, adLockReadOnly
While Not rs.EOF
If rs!MemberID = Val(txtUserID) Then
'check for correct password'
If rs!Pass = txtPassword Then
'place code to here to pass the '
'success to the calling sub'
'setting a global var is the easiest'
LoginSucceeded = True
frmMENU.Show
Me.Hide
con.Close
Exit Sub
Else
MsgBox "Invalid Password, try again!", , "Login"
txtPassword.SetFocus
SendKeys "{Home}+{End}"
End If
End If
rs.MoveNext
Wend
End Sub
Private Sub Form_Load()
Call loadcon
End SubComponents for frmBook
All details of books are available from this form.You can add new books, delete a book, update book information, and view the entire books in the library from this form.
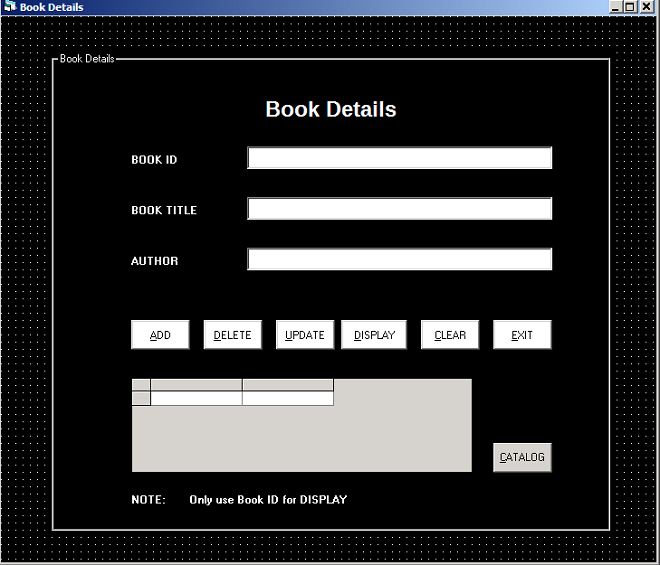
Form Details
Name : frmBook
Caption : Book Details
BackColor : Window Text
ForeColor : Highlight TextFirst create a single frame control and add all other controls on top of it.
Name : frameBook
Caption : Book Details
BackColor : Window Text
ForeColor : Highlight TextLabels
Name : lblBookMain
Alignment : Center
Caption : Book Details
BackColor : Window Text
ForeColor : Highlight Text
Font : Arimo 18px BoldName : lblBookID
Alignment : Center
Caption : BOOK ID
BackColor : Window Text
ForeColor : Highlight Text
Font : MS Sans-serif 8px BoldName : lblBookTitle
Alignment : Center
Caption : BOOK TITLE
BackColor : Window Text
ForeColor : Highlight Text
Font : MS Sans-serif 8px BoldName : lblAuthor
Alignment : Center
Caption : AUTHOR
BackColor : Window Text
ForeColor : Highlight Text
Font : MS Sans-serif 8px BoldName : lblBNote
Alignment : Center
Caption : NOTE:
BackColor : Window Text
ForeColor : Highlight Text
Font : MS Sans-serif 8px BoldName : lblBInstruction
Alignment : Center
Caption : Only use BOOK ID for DISPLAY
BackColor : Window Text
ForeColor : Highlight Text
Font : MS Sans-serif 8px BoldTextboxes
Name : txtBookID
Text :'leave empty'Name : txtBookTitle
Text :'leave empty'Name :txtAuthor
Text: 'leave empty'Buttons
Name : cmdBAdd
Caption : &ADD
BackColor : Button Highlight
Style : 1-GraphicalName : cmdBDelete
Caption : &DELETE
BackColor : Button Highlight
Style : 1-GraphicalName : cmdBUpdate
Caption : &UPDATE
BackColor : Button Highlight
Style : 1-GraphicalName : cmdBDisplay
Caption : &DISPLAY
BackColor : Button Highlight
Style : 1-GraphicalName : cmdClear
Caption : &CLEAR
BackColor : Button Highlight
Style : 1-GraphicalName : cmdBExit
Caption : &EXIT
BackColor : Button Highlight
Style : 1-GraphicalName : cmdBCatalog
Caption : &CATALOG
BackColor : Button Highlight
Style : 1-GraphicalDataGrid Control
Name : BookFinderCode for frmBook
Option Explicit
Private Sub cmdBAdd_Click()
Call loadcon
con.Execute "INSERT INTO Book (BookID, BookTitle, Author) VALUES (" & txtBookID & ",'" & txtBookTitle & "','" & txtAuthor & "')"
MsgBox ("Record Inserted Successfully")
con.Close
End Sub
Private Sub cmdBCatalog_Click()
Call loadcon
rs.CursorLocation = adUseClient
rs.Open "Book", con, adOpenKeyset, adLockBatchOptimistic, adCmdTable
If Dir$("C:/VBProjects/Library/savebookquery.xml") <> "" Then
Kill "C:/VBProjects/Library/savebookquery.xml"
End If
rs.Save "C:/VBProjects/Library/savebookquery.xml", adPersistXML
rs.Close
con.Close
Set rs = Nothing
rs.Open "C:/VBProjects/Library/savebookquery.xml", , adOpenKeyset, adLockBatchOptimistic, adCmdFile
Set BookFinder.DataSource = rs
Set rs = Nothing
End Sub
Private Sub cmdBDelete_Click()
Call loadcon
con.Execute "DELETE * FROM Book WHERE BookID = " & txtBookID & ""
MsgBox ("Record Deleted Successfully")
con.Close
End Sub
Private Sub cmdBDisplay_Click()
Call loadcon
rs.CursorLocation = adUseClient
rs.Open "SELECT Book.[BookID], Book.[BookTitle],Borrow.[MemberID],Member.[MemberName],Borrow.[StartDate] FROM Book,Borrow,Member WHERE Book.[BookID] = " & txtBookID & " And Book.[BookID]= Borrow.[BookID]And Borrow.[MemberID]=Member.[MemberID] And Borrow.[Return] = 0", con, adOpenDynamic, adLockOptimistic
If Dir$("C:/VBProjects/Library/savebookdisplay.xml") <> "" Then
Kill "C:/VBProjects/Library/savebookdisplay.xml"
End If
rs.Save "C:/VBProjects/Library/savebookdisplay.xml", adPersistXML
rs.Close
con.Close
Set rs = Nothing
rs.Open "C:/VBProjects/Library/savebookdisplay.xml", , adOpenKeyset, adLockBatchOptimistic, adCmdFile
Set BookFinder.DataSource = rs
Set rs = Nothing
End Sub
Private Sub cmdBExit_Click()
Unload Me
End Sub
Private Sub cmdBUpdate_Click()
Call loadcon
con.Execute "UPDATE Book SET BookTitle = '" & txtBookTitle & "', Author = '" & txtAuthor & "' WHERE BookID = " & txtBookID & ""
MsgBox ("Record Updated Successfully")
con.Close
End Sub
Private Sub cmdClear_Click()
txtBookID.Text = " "
txtBookTitle.Text = " "
txtAuthor.Text = " "
End SubComponents for frmMember
This form will provide information about library members including the book they currently borrowed. You can create new members, delete members, and update their information except except MemberID.
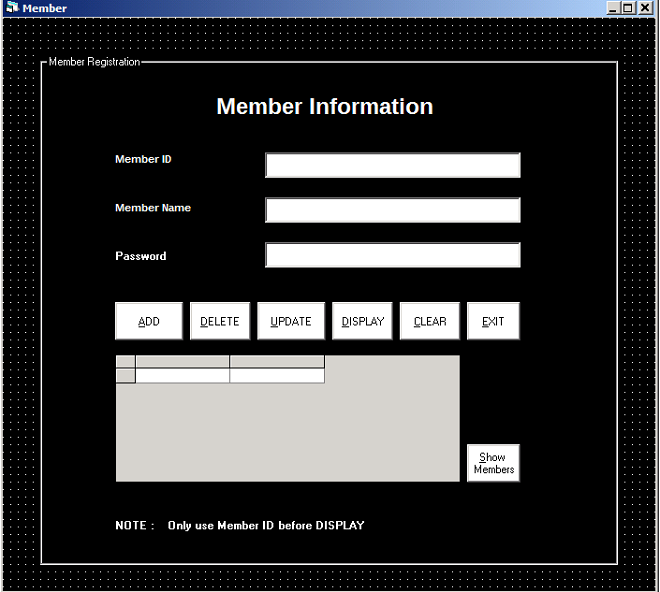
Form Details
Name : frmMember
Caption : Member
BackColor : Window Text
ForeColor : Highlight TextFrame Control
Name : frameMember
Caption : Member Registration
BackColor : Window Text
ForeColor : Highlight TextNow you can start adding all the other control on top of frame. You want to make controls visible on frame,then right click frame and click send to back.
Labels
Name :lblMemberMain
Alignment :Center
Caption : Member Information
BackColor : Window Text
ForeColor : Highlight Text
Font : Arimo 18px BoldName :lblMID
Caption : Member ID
BackColor : Window Text
ForeColor : Highlight Text
Font :MS Sans-serif 8px BoldName :lblMName
Caption : Member Name
BackColor : Window Text
ForeColor : Highlight Text
Font :MS Sans-serif 8px BoldName :lblMNote
Caption : NOTE:
BackColor : Window Text
ForeColor : Highlight Text
Font :MS Sans-serif 8px BoldName :lblMInstruction
Caption : Only use Member ID before DISPLAY
BackColor : Window Text
ForeColor : Highlight Text
Font :MS Sans-serif 8px BoldTextboxes
Name: txtMID
Text :'leave blank'Name: txtMName
Text :'leave blank'Name: txtMPass
Text :'leave blank'Buttons
Name :cmdMAdd
Caption : &ADD
BackColor : Window Text
Style : 1-GraphicalName :cmdMDel
Caption : &DELETE
BackColor : Window Text
Style : 1-GraphicalName :cmdMUpdate
Caption : &UPDATE
BackColor : Window Text
Style : 1-GraphicalName :cmdMDisplay
Caption : &DISPLAY
BackColor : Window Text
Style : 1-GraphicalName :cmdMClear
Caption : &CLEAR
BackColor : Window Text
Style : 1-GraphicalName :cmdMExit
Caption : &EXIT
BackColor : Window Text
Style : 1-GraphicalName :cmdMAllMember
Caption : &Show Members
BackColor : Window Text
Style : 1-GraphicalDataGrid Control
Name :MemberFinderCode for frmMember
Private Sub cmdAllMember_Click()
Call loadcon
rs.CursorLocation = adUseClient
rs.Open "Member", con, adOpenKeyset, adLockBatchOptimistic, adCmdTable
If Dir$("C:/VBProjects/Library/saveshowmembers.xml") <> "" Then
Kill "C:/VBProjects/Library/saveshowmembers.xml"
End If
rs.Save "C:/VBProjects/Library/saveshowmembers.xml", adPersistXML
rs.Close
con.Close
Set rs = Nothing
rs.Open "C:/VBProjects/Library/saveshowmembers.xml", , adOpenKeyset, adLockBatchOptimistic, adCmdFile
Set MemberFinder.DataSource = rs
Set rs = Nothing
End Sub
Private Sub cmdMAdd_Click()
Call loadcon
con.Execute "INSERT INTO Member (MemberID,MemberName,Pass) VALUES (" & txtMID & ",'" & txtMName & "','" & txtMPass & "')"
MsgBox ("Record Inserted Successfully")
con.Close
End Sub
Private Sub cmdMClear_Click()
txtMID.Text = " "
txtMName.Text = " "
txtMPass.Text = " "
End Sub
Private Sub cmdMDel_Click()
Call loadcon
con.Execute "DELETE * FROM Member WHERE MemberID = " & txtMID & ""
MsgBox ("Record Deleted Successully")
con.Close
End Sub
Private Sub cmdMDisplay_Click()
Call loadcon
rs.CursorLocation = adUseClient
rs.Open "SELECT Member.[MemberID],Member.[MemberName],Borrow.[Bookid],Borrow.[bookTitle]FROM Member, Borrow WHERE Member.[MemberID]= " & txtMID & " And Member.[MemberID] = Borrow.[MemberID] And Borrow.[Return]= 0", con, adOpenDynamic, adLockOptimistic
If Dir$("C:/VBProjects/Library/savememberdisplay.xml") <> "" Then
Kill "C:/VBProjects/Library/savememberdisplay.xml"
End If
rs.Save "C:/VBProjects/Library/savememberdisplay.xml", adPersistXML
rs.Close
con.Close
Set rs = Nothing
rs.Open "C:/VBProjects/Library/savememberdisplay.xml", , adOpenKeyset, adLockBatchOptimistic, adCmdFile
Set MemberFinder.DataSource = rs
Set rs = Nothing
End Sub
Private Sub cmdMExit_Click()
Unload Me
End Sub
Private Sub cmdMUpdate_Click()
Call loadcon
con.Execute "UPDATE Member SET MemberName = '" & txtMName & "',Pass = '" & txtMPass & "' WHERE MemberID = " & txtMID & ""
MsgBox ("Record Updated Successfully")
con.Close
End SubComponents for frmBorrow
The form Borrow allows you to check the availability of books, and if the book is available you can borrow it. If member wants to return the book they can enter details of the book and return it immediately.
Form Borrow Details
Name : frmBorrow
Caption : Book Borrow
BackColor : Window Text
ForeColor : Highlight TextFrame Controls
Name : frameBookBorrow
Caption : Book Borrow
BackColor : Window Text
ForeColor : Highlight TextName : frameAvailibility
Caption : Availibility
BackColor : Window Text
ForeColor : Highlight TextOnce you have created a frame control, add other controls on top of it. Also right click frame and send to back the frame.
Under the frame book borrow add following controls.
Labels
Name : lblBorrowMain
Caption : Book Borrow Details
BackColor : Window Text
ForeColor :Highlight Text
Font : Arimo 18px BoldName : lblBBookID
Caption : Book ID
BackColor : Window Text
ForeColor :Highlight Text
Font : MS Sans-serif 8px BoldName : lblBTitle
Caption : Book Title
BackColor : Window Text
ForeColor :Highlight Text
Font : MS Sans-serif 8px BoldName : lblBMemberID
Caption : Member ID
BackColor : Window Text
ForeColor :Highlight Text
Font : MS Sans-serif 8px BoldName : lblBorrowNote
Caption : NOTE:
BackColor : Window Text
ForeColor :Highlight Text
Font : MS Sans-serif 8px BoldName : lblBInstructions
Caption : Always CLEAR before any Query or Update
BackColor : Window Text
ForeColor :Highlight Text
Font : MS Sans-serif 8px BoldTextboxes
Name : txtBBookID
Text : 'leave blank'Name : txtBTitle
Text : 'leave blank'Name : txtBMemberID
Text : 'leave blank'Buttons
Name : cmdBorrow
Caption :&Borrow
BackColor : Window Text
ForeColor : Highlight Text
Style :1-GraphicalName : cmdReturn
Caption :&Return
BackColor : Window Text
ForeColor : Highlight Text
Style :1-GraphicalName : cmdBClear
Caption :&Clear
BackColor : Window Text
ForeColor : Highlight Text
Style :1-GraphicalName : cmdExit
Caption :&Exit
BackColor : Window Text
ForeColor : Highlight Text
Style :1-GraphicalNow you can add controls under Check Availability frame.
Labels under Check Availability
Name : lblBBookTitle
Caption : Book Title
BackColor : Window Text
ForeColor : Highlight Text
Font : MS Sans-serif 8px BoldName : lblBResult
Caption : Result
BackColor : Window Text
ForeColor : Highlight Text
Font : MS Sans-serif 8px BoldTextboxes
Name :txtBBookTitle
Text : 'leave blank'Name :txtBResult
Text : 'leave blank'Buttons
Name : cmdAvailibility
Caption :&Check Availibility
BackColor : Window Text
ForeColor : Highlight Text
Style :1-GraphicalCode for frmBorrow
Private Sub cmdAvailibility_Click()
Call loadcon
rs.CursorLocation = adUseClient
rs.CursorType = adOpenStatic
rs.Open "SELECT * FROM Borrow WHERE BookTitle = '" & txtBBookTitle & "' And Return = 0", con, adOpenDynamic, adLockOptimistic
If rs.RecordCount > 0 Then
txtBResult.Text = "Not Available"
Else
txtBResult.Text = "Available"
End If
rs.Close
con.Close
End Sub
Private Sub cmdBClear_Click()
txtBBookID.Text = ""
txtBMemberID.Text = " "
txtBBookTitle.Text = " "
txtBResult.Text = ""
txtBTitle.Text = " "
End Sub
Private Sub cmdBorrow_Click()
Call loadcon
rs.Open "INSERT INTO Borrow (BookID, MemberID, BookTitle,StartDate) VALUES (" & txtBBookID & "," & txtBMemberID & ",'" & txtBTitle & "',#" & Format(Now, "mm/dd/yyyy") & "#)", con, adOpenDynamic, adLockOptimistic
MsgBox ("Book Borrowed Successully")
con.Close
End Sub
Private Sub cmdExit_Click()
Unload Me
If con.State = adStateOpen Then
con.Close
End If
End Sub
Private Sub cmdReturn_Click()
Call loadcon
rs.CursorLocation = adUseClient
rs.CursorType = adOpenDynamic
rs.Open "UPDATE Borrow SET Return = 1 WHERE MemberID = " & txtBMemberID & " And BookID = " & txtBBookID & "", con, adOpenStatic, adLockReadOnly
MsgBox "Book Returned Successfully"
con.Close
End SubComponents for frmMENU – MDI form
The frmMENU is a form with menu items and we can create a menu using the Menu Editor.
To create a MDI form, [Right-Click] Project1.vbp > Select Add > [Click] MDI Form. Create following menu items using Menu Editor.
You have to create four menu items with following values. Do not change any other settings. However, you can use arrow buttons to move item up and down.
Borrow Book
Name : borrow
Caption : Borrow Book
Index: 3Member Details
Name : members
Caption : Member Details
Index : 1Book Details
Name : books
Caption : Book Details
Index : 2Exit
Name : exit
Caption : Exit
Index : 0Code for frmMenu
Before adding code for frmMENU, make sure you have created all other forms of the Library Management Project,
When you click on any menu item it will open another form within the parent MDI form. The other form that must open within MDI form should have their MDI child property set to True.
Add following code to frmMENU in from the code editor.
Private Sub books_Click(Index As Integer)
frmBook.Show
End Sub
Private Sub borrow_Click(Index As Integer)
frmBorrow.Show
End Sub
Private Sub exit_Click(Index As Integer)
Unload Me
End Sub
Private Sub members_Click(Index As Integer)
frmMember.Show
End SubThe menu item allows multiple forms at the same time. If you want to allow only single form to load then hide other forms. See an example below.
Private Sub members_Click(Index As Integer)
frmMember.Show
frmBorrow.hide
frmBook.hide
End SubNote: You cannot add the code for Module 1 because first you have to add the components for Microsoft ADO Data Control 6.0 (OLEDB) and Microsoft Data grid Control 6.0 (OLEDB).
Bank Management System in VB 6.0 using MS Access Database
In this article, you will create an application in visual basic 6.0 with Microsoft access database as a back-end to manage customer transactions and bank employee details. This project is called bank management system in vb 6.0 using ms access.
The bank management system in vb 6.0 using ms access. must do the following tasks.
- INSERT, DELETE, UPDATE records of Employees and Customers.
- Keep track of customer transactions. A customer is allowed to withdraw and deposit money, not exceeding the balance in the account.
- Bank employees only work for the branch with unique code.
- Customer and Bank employee can log into there account with user id and password.
The system will be developed in following ways.
- Develop System Design
- Data Model [ E-R Diagram]
- User Interface in VB 6.0
- Code the different Modules
- Verify the Output
SYSTEM MODEL
DATA MODEL
E-R Diagram
Tables
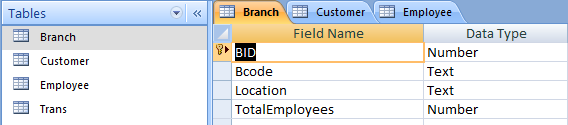
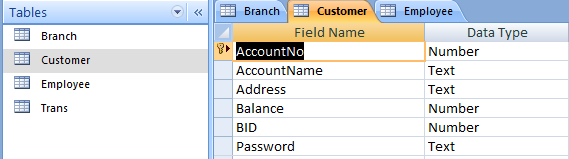
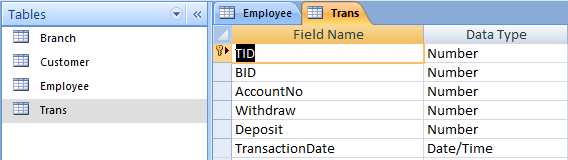
Using the E-R Diagram we can create a relational model of the database. It means we can create tables with the database. To create a new database go to the Microsoft Access Database and create a new blank database. If you have MS Access 2007 or Higher save the database with (.mdb) extension. Otherwise, Visual Basic 6 may not recognize the database file.
Create three four tables within the database with appropriate data-types given in the following figures.
MODULES AND FORMS
The modules used in this application are given below
- frmBankManagement
- frmLogin
- frmMENU(MDI Form)
- frmBranch
- frmCustomer
- frmEmployee
- frmTransaction
- Module1.bas
Components of frmBankManagement

Labels:
Name : lblBankManagement
Caption : Bank Management SystemButtons:
Name : cmdLogin
Caption : LOGINCode for frmBankMangement
Private Sub cmdLogin_Click()
Unload Me
frmLogin.Show
End Sub
Components of frmLogin
Labels
Name : lblUserID
Caption : UserID
Name : lblPassword
Caption : PasswordText-boxes
Name : txtUserID
Text : 'leave blank'
Name : txtPassword
Text : PasswordButtons
Name : cmdLogin
Caption : Login
Name : cmdCancel
Caption : Cancel
Code for frmLogin
Option Explicit
Public LoginSucceeded As Boolean
Private Sub cmdCancel_Click()
'set the global var to false 'to denote a failed login
LoginSucceeded = False
Me.Hide
End Sub
Private Sub cmdLogin_Click()
rs.CursorLocation = adUseClient rec.CursorLocation
= adUseClient rec.Open "SELECT * FROM Employee", con,
adOpenDynamic, adLockPessimistic rs.Open
"SELECT * FROM Customer", con, adOpenDynamic, adLockOptimistic
'check the username
While Not rs.EOF
If txtUserID = rs!AccountNo And txtPassword = rs!Password Then
frmMENU.Show
LoginSucceeded = True
con.Close MsgBox ("Connection Closed")
Exit Sub
Unload Me
ElseIf
Val(txtUserID) = rec!EID And txtPassword
= rec!Password Then
frmMENU.Show LoginSucceeded = True
con.Close
MsgBox ("Connection Closed")
Exit Sub
Unload Me
ElseIf
Val(txtUserID) <> rs!AccountNo Then
rs.MoveNext ElseIf Val(txtUserID) <>
rec!EID Then rec.MoveNext
Else
MsgBox "Invalid Password, try again!", ,
"Login" txtPassword.SetFocus
SendKeys "{Home}+{End}"
Exit Sub
End If
Wend
rs.Close
rec.Close
End Sub
Private Sub Form_Load()
Call loadcon
MsgBox ("Connected")
End SubComponents for frmBranch
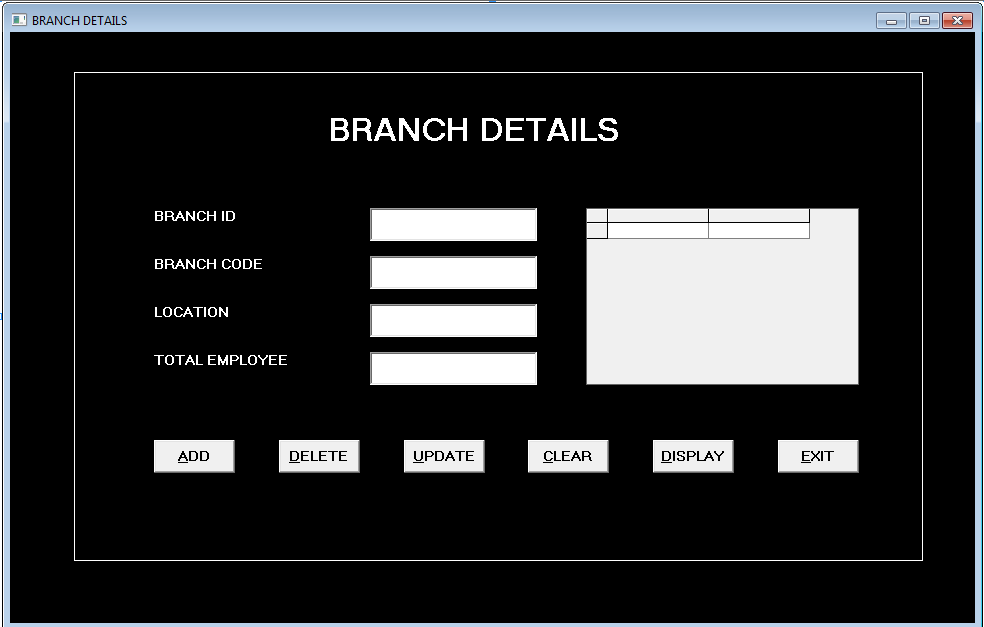
Labels
Name : lblBID
Caption : BRANCH IDName : lblBcode
Caption :BRANCH CODEName : lblLocation
Caption : LOCATIONName : lblTotEmp
Caption : TOTAL EMPLOYEEText-boxes
Name: txtBID
Text : 'leave blank'Name : txtBcode
Text : 'leave blank'Name : txtLocation
Text : 'leave blank'Name : txtTotEmp
Text : 'leave blank'Buttons
Name : cmdAdd
Caption : &ADD
Name : cmdDel
Caption : &DELETEName : cmdUpdate
Caption: &UPDATEName : cmdDisplay
Caption : &DISPLAYName : cmdClr
Caption : &CLEARName : cmdExit
Caption : &EXITDataGrids
Name : DataGrid1Code for frmBranch
Private Sub cmdAdd_Click()
Dim total As Double
rs.Open "SELECT Count(EID) FROM Employee",
con, adOpenDynamic, adLockPessimistic
total = rs.Fields(0).Value
con.Execute "INSERT INTO
Branch(BID, Bcode, Location , TotalEmployees )
VALUES (" & txtBID & ",'" & txtBcode &
"','" & txtLocation & "', " & total & ")"
MsgBox ("Record Added")
End Sub
Private Sub cmdClr_Click()
txtBID = " "
txtBcode = " "
txtLocation = " "
txtTotEmp = " "
End Sub
Private Sub cmdDel_Click()
con.Execute "DELETE * FROM Branch
WHERE BID = " & txtBID & ""
MsgBox ("Record Deleted")
End Sub
Private Sub cmdDisplay_Click()
rs.CursorLocation = adUseClient
rs.Open "SELECT * FROM Branch",
con, adOpenDynamic, adLockPessimistic
Set DataGrid1.DataSource = rs
End Sub
Private Sub cmdExit_Click()
Unload Me
con.Close
End Sub
Private Sub cmdUpdate_Click()
Dim total As Double
rs.Open "SELECT Count(EID) FROM
Employee WHERE BID = " &
txtBID & " ", con,
adOpenDynamic, adLockPessimistic
total = rs.Fields(0).Value
con.Execute "UPDATE Branch SET Bcode
= '" & txtBcode & "',Location
= '" & txtLocation & " ',
TotalEmployees = " & total & "
WHERE BID = " & txtBID & " "
MsgBox ("Record Updated ")
End Sub
Private Sub Form_Load()
Call loadcon
End SubComponents of frmCustomer
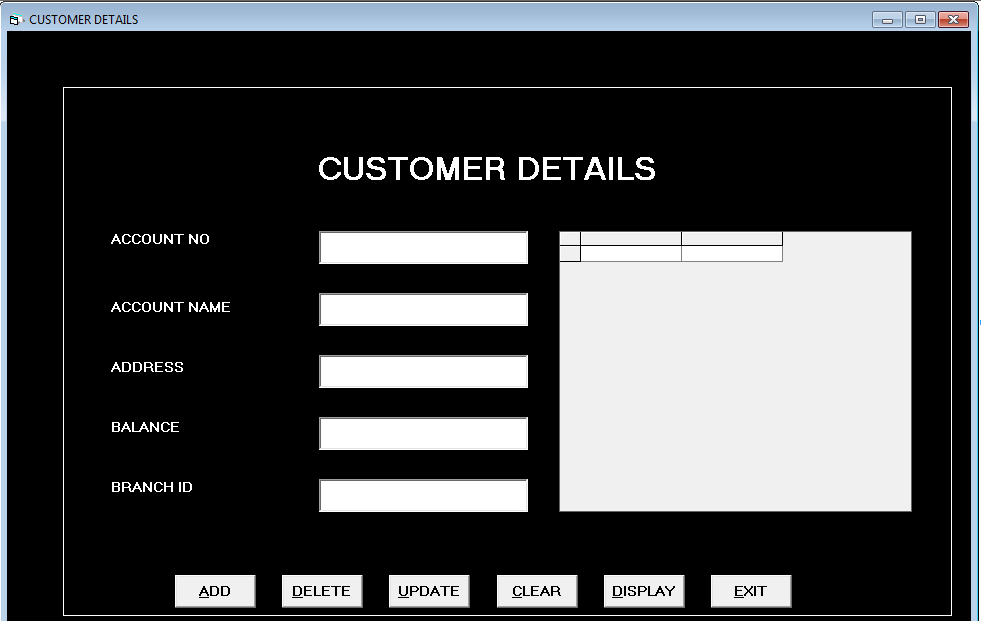
Labels
Name :lblAno
Caption : ACCOUNT NOName :lblAno
Caption : ACCOUNT NOName :lblAname
Caption : ACCOUNT NAMEName : lblAddress
Caption : BALANCEName : lblBrankID
Caption : BRANCH IDText-Boxes
Name : txtAno
Text : 'leave blank'Name : txtAname
Text ; 'leave blank'Name : txtAddress
Text : 'leave blank'Name : txtBalance
Text : 'leave blank'Name : txtBID
Text : 'leave blank'Name : cmdAdd
Caption : &ADDName : cmdDel
Caption : &DELETEName : cmdClr
Caption : &CLEARName : cmdExit
Caption : &EXITName : cmdUPDATE
Caption : &UPDATEName : cmdDisplay
Caption : &DISPLAYCode for frmCustomer
Private Sub cmdAdd_Click()
con.Execute "INSERT INTO Customer (
AccountNo, AccountName, Address, Balance, BID )
VALUES(" & txtAno & ",' " & txtAname &
" ',' " & txtAddress & " '," &
txtBalance & ", " & txtBID & ")"
txtAno = "" txtAname = "" txtAddress = ""
txtBalance = "" txtBID = ""
MsgBox ("Record Added")
End Sub
Private Sub cmdClr_Click()
txtAno = ""
txtAname = ""
txtAddress = ""
txtBalance = ""
txtBID = ""
End Sub
Private Sub cmdDel_Click()
con.Execute "DELETE * FROM Customer
WHERE AccountNo = " & txtAno & ""
MsgBox ("Record Deleted")
End Sub
Private Sub cmdDisplay_Click()
rs.Open "SELECT * FROM Customer",
con, adOpenDynamic, adLockPessimistic
Set DataGrid1.DataSource = rs
End Sub
Private Sub cmdExit_Click()
Unload Me
con.Close
End Sub
Private Sub cmdUpdate_Click()
con.Execute "UPDATE Customer
SET AccountName = '" & txtAname & " ',
Address = ' " & txtAddress & " ',
Balance = " & txtBalance & "
WHERE AccountNo = " & txtAno & "" txtAno = ""
MsgBox ("Record Updated!")
End Sub
Private Sub Form_Load()
Call loadcon
MsgBox ("connected")
End SubComponents of frmEmployees
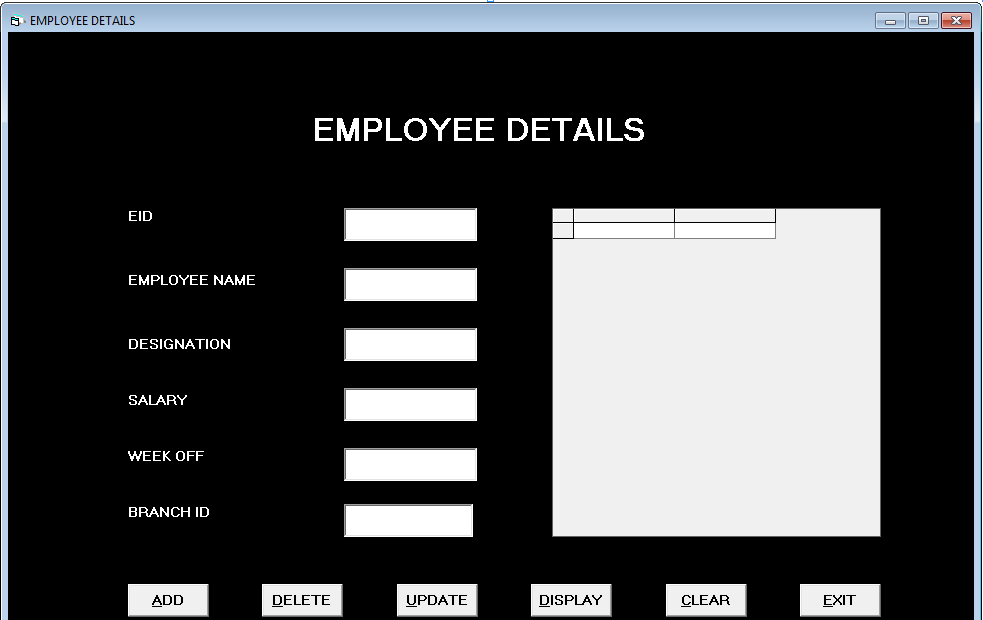
Labels
Name : lblEID
Caption : EIDName : lblEname
Caption : EMPLOYEE NAMEName : lblEname
Caption : EMPLOYEE NAMEName : lblDesig
Caption : DESIGNATIONName : lblSalary
Caption : SALARYName : lblWeekoff
Caption :WEEKOFFName : lblBranchID
Caption : BRANCH IDText-boxes
Name : txtEID
Text : 'leave blank'Name : txtEname
Text : 'leave blank'Name : txtDesig
Text ; 'leave blank'Name ; txtSalary
Text : 'leave blank'Name : txtWeekoff
Text : 'leave blank'Name : txtBID
Text : 'leave blank'Buttons
Name : cmdAdd
Caption : &ADDName : cmdDel
Caption : &DELETEName : cmdUpdate
Caption : &UPDATEName : cmdDisplay
Caption : &DISPLAYName : cmdClr
Caption : &CLEARName : cmdExit
Caption : &EXITDataGrid
Name : DataGrid 1Code for frmEmployee
Private Sub cmdAdd_Click()
con.Execute "INSERT INTO
Employee (EID, Ename, Designation, Salary, Weekoff, BID)
VALUES (" & txtEID & ",'" &
txtEname & "','" &
txtDesig & "', " &
txtSalary & ", '" &
txtWeekoff & "', " &
txtBID & ")"
MsgBox ("Record Added")
txtEID = "" txtEname = "" txtDesig
= "" txtSalary = "" txtWeekoff = "" txtBID = ""
End Sub
Private Sub cmdClr_Click()
txtEID = ""
txtEname = ""
txtDesig = ""
txtSalary = ""
txtWeekoff = ""
txtBID = ""
End Sub
Private Sub cmdDel_Click()
con.Execute "DELETE * FROM
Employee WHERE EID = " &
txtEID & ""
MsgBox ("Record Deleted ")
txtEID = ""
End Sub
Private Sub cmdDisplay_Click()
rs.Open "SELECT * FROM Employee",
con, adOpenDynamic, adLockPessimistic
Set DataGrid1.DataSource = rs
End Sub
Private Sub cmdExit_Click()
Unload Me
con.Close
End Sub
Private Sub cmdUpdate_Click()
con.Execute "UPDATE Employee
SET Ename = '" &
txtEname & "',Designation = '" &
txtDesig & "',Salary = " &
txtSalary & ",Weekoff = ' " &
txtWeekoff & " ', BID = " &
txtBID & " WHERE EID = " &
txtBID & " "
MsgBox ("Record Updated")
End Sub
Private Sub Form_Load()
loadcon
End SubComponents of frmTransaction
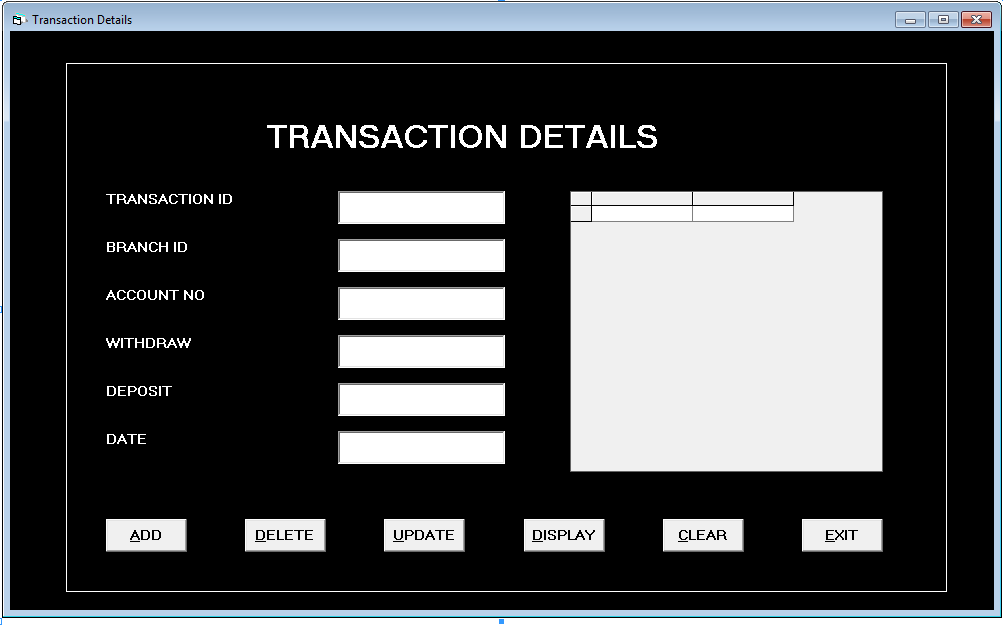
Labels
Name : lblTID
Caption : TRANSACTION IDName : lblBID
Caption : BRANCH IDName :lblAno
Caption : ACCOUNT NOName : lblWDraw
Caption : WITHDRAWName : lblDEPOSIT
Caption : lblDepositName : lblDate
Caption : DATEText-boxes
Name : txtTID
Text : 'leave blank'Name : txtBID
Text : 'leave blank'Name : txtAno
Text : 'leave blank'Name : txtWDraw
Text : 'leave blank'Name : txtDeposit
Text : 'leave blank'Name : txtDate
Text : 'leave blank'Buttons
Name : cmdAdd
Caption : &ADDName : cmdDel
Caption : &DELETEName : cmdUpdate
Caption : &UPDATEName : cmdDisplay
Caption : &DISPLAYName : cmdClr
Caption : &CLEARName : cmdExit
Caption : &EXITData Grids
Name : Data Grid 1Code for frmTransaction
Private Sub cmdAdd_Click()
con.Execute "INSERT INTO
Trans(TID, BID, AccountNo, Withdraw, Deposit, TransactionDate )
VALUES (" & txtTID & "," &
txtBID & ", " &
txtAno & "," &
txtWDraw & ", " &
txtDeposit & ", ' " &
txtDate & "' )"
txtTID = "" txtBID = "" txtAno
= "" txtWDraw = "" txtDeposit
= "" txtDate = ""
MsgBox ("Record Added")
End Sub
Private Sub cmdClr_Click()
txtTID = ""
txtBID = ""
txtAno = ""
txtWDraw = ""
txtDeposit = ""
txtDate = ""
End Sub
Private Sub cmdDel_Click()
con.Execute "DELETE * FROM
Trans WHERE TID = " &
txtTID & ""
MsgBox ("Record Deleted")
End Sub
Private Sub cmdDisplay_Click()
rs.Open "SELECT * FROM Trans ", con,
adOpenDynamic, adLockPessimistic
Set DataGrid1.DataSource = rs
End Sub
Private Sub cmdExit_Click()
Unload Me
con.Close
End Sub
Private Sub cmdUpdate_Click()
con.Execute "UPDATE Trans SET
BID = " & txtBID & " ,
AccountNo = " & txtAno & " ,
Withdraw = " & txtWDraw & ",
Deposit = " & txtDeposit & "
WHERE TID = " & txtTID & ""
txtTID = "" txtBID = "" txtAno
= "" txtWDraw = "" txtDeposit = "" txtDate = ""
MsgBox ("Record Updated")
End Sub
Private Sub Form_Load()
Call loadcon
MsgBox ("connected")
End SubfrmMENU [ MDI Form ]
The MDI form is that form which has MENU and when you click on any one of the menu item, it opens up another MDI Child form.
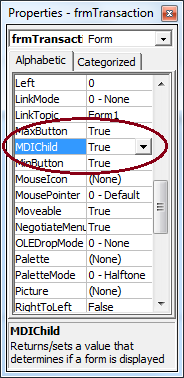
We will set MDI Child property for following forms
- frmBranch
- frmCustomer
- frmEmployee
- frmTransaction
Go to the property of each form and set the MDI Child to ‘True’.
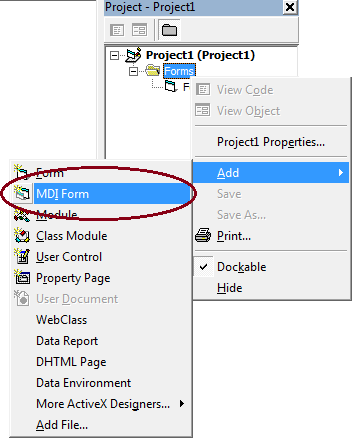
Under Project 1 , [Right Click] the Forms > [Click] Add > [Click] MDI Form.
Configure Menu using the Menu Editor in MDI Form and write appropriate code for the form.
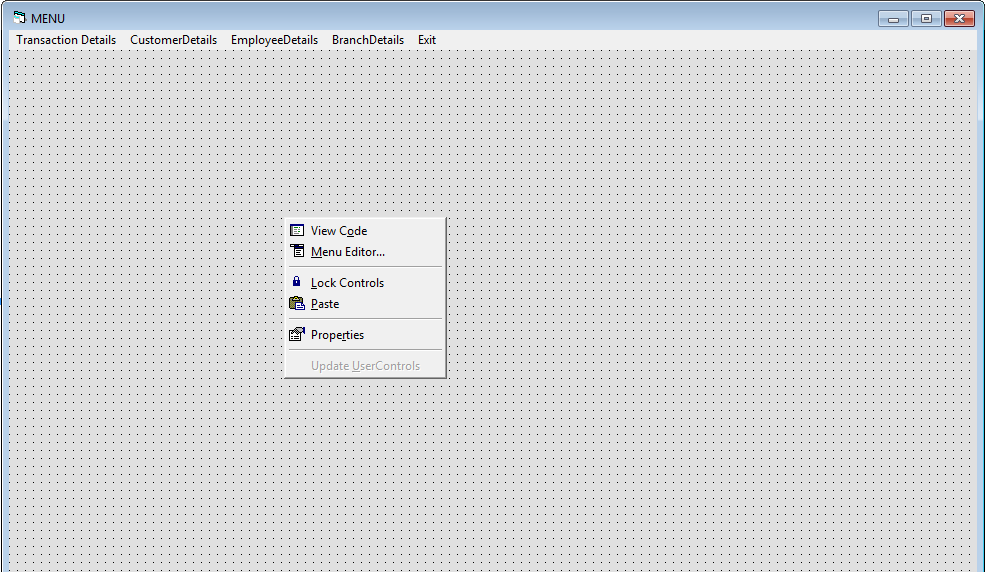
Code for frmMENU
Private Sub branch_Click(Index As Integer)
frmBranch.Show
End Sub
Private Sub customer_Click(Index As Integer)
frmCustomer.Show
End Sub
Private Sub employee_Click(Index As Integer)
frmEmployee.Show
End Sub
Private Sub exit_Click(Index As Integer)
Unload Me
Unload frmBankManagement
Unload frmLogin
Unload frmCustomer
Unload frmEmployee
End Sub
Private Sub transaction_Click(Index As Integer)
frmTransaction.Show
End SubCode for Module1.Bas
Most of the forms in the application need to connect to the database, so you may have to write code for connectivity with Microsoft Access Database repeatedly in each form.
Instead of writing the code for connectivity in each form, we write it once in a Module and call the function from the form. In this way, we save time to write the same code many times.
Here is the code for Module1.bas
Note; To know more about creating a new Module go to one of the previous Visual Basic 6 posts.
Public con As ADODB.Connection
Public rs As ADODB.Recordset
Public constr As String
Public Sub loadcon() constr = "Provider=Microsoft.Jet.OLEDB.4.0;
Data Source=C:UsersGirishDocumentsStudentDB.mdb;Persist Security Info=False"
con.Open constr
End SubEmployees Record Management using VB 6.0 and MS Access Database
In this article, we will learn to create an application in Visual Basic 6.0 for Employee Record Management in an organization.
The application does following tasks
- Insert, Delete, Update employee records.
- Compute the Gross Pay and Net Pay of each employee.
- Maintain records of departments for each employee.
- Each employee should be able to login to the system with own password.
The development of the application – Employees Record Management is done in following ways.
- Develop System Model.
- Define the Data Model (E-R Diagram)
- Design the User Interface in VB 6.
- Rename the components.
- Write codes for components.
- Test and verify Output.
System Model

E-R Diagram for Employee Record Management
Working with MS Access Database
Based on the E-R Model you can create a New Access Database and save it as the emp.mdb file. To create a blank database
Open Microsoft Office Access 2007 ( Check MS office documentation for other versions) > Click “Blank Database”.
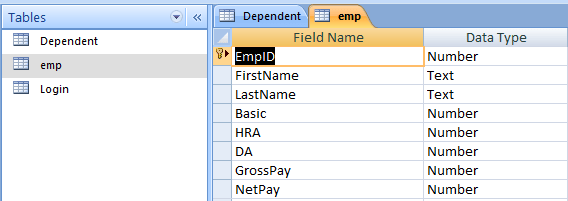
Create three table for the emp.mdb database.
Dependent Table Schema
Employee Table Schema

Login Table in Design View

Note: Each Table should have at least one field as Primary Key.
Relationship between Tables
Accessing Access Database from Visual Basic 6
You can use a common module from visual basic to connect to the access database. Functions from this module will be called from all Forms in the visual basic project, so that we do not need to rewrite the same code for database connectivity.
Add the ADODB components in the VB Toolbox.
Add an Adodb component, [Right Click] on the Control Object > Click Properties.
Under the Adodc properties windows > Click Build.
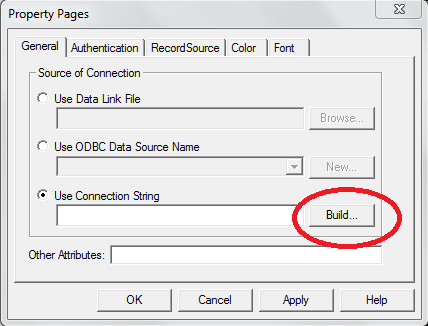
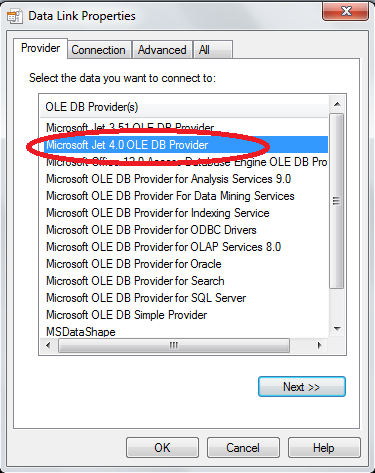
Under the Connection tab > Select the Database you created previously.
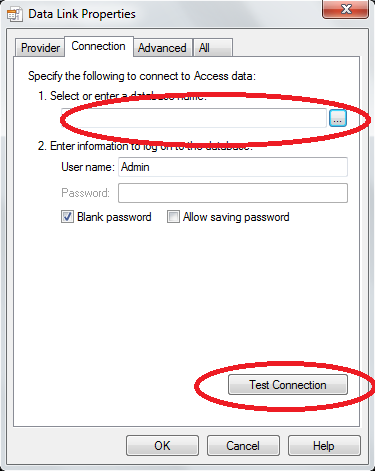
Now Click “Test Connection” to check if the database connection is successful. Click on the “Provider” tab again and we now have our connection string.
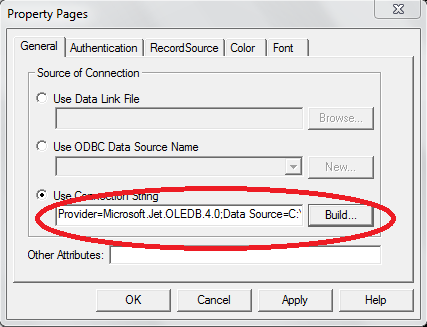
This new Connection String will be used in Module.Bas file for accessing the database at run-time. The existing ADODC control is no longer required and you can delete it.
Creating Module1 for Database Connectivity
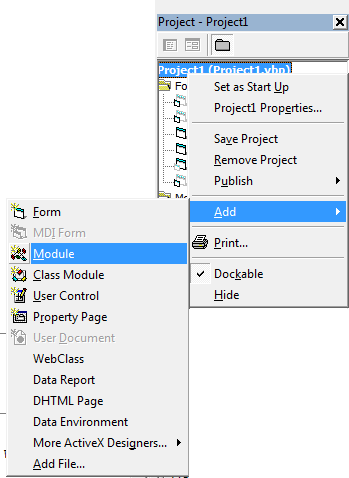
To create a new database connection at run-time, do the following. Under Project.vbp windows > Project1 [Right-Click] > Add [Select] > Module [Click].
A new module will open as shown in the following figure.
Type the following code in the Module Code Editor.
Public con As New adodb.Connection
Public rs As New adodb.Recordset
Public constr As String
Public Sub loadcon()
constr = "Provider=Microsoft.Jet.OLEDB.4.0;Data Source=C:\Users\Peter\Documents\emp.mdb;Persist Security Info=False"
con.Open constr
MsgBox ("connected")
End Sub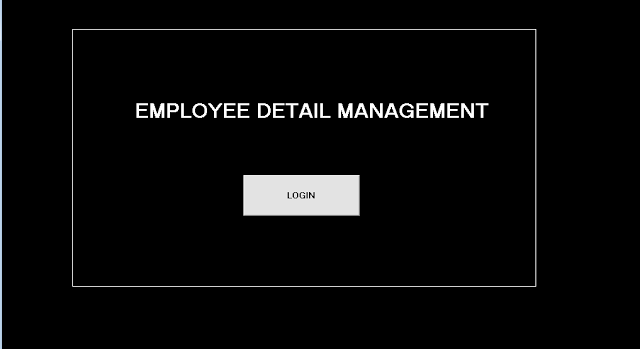
Labels
Name: lblEMPMANAGE
Caption: EMPLOYEE RECORD MANAGEMENTButtons
Name: cmdLogin
Caption: LoginCode for frmEMPMANAGE
Private Sub cmdLogin_Click()
    Unload Me
    frmLogin.Show
End SubComponents of frmLogin

Labels
Name: lblUserID
Caption:UserIDName: lblPassword
Caption: PasswordTextboxes
Name: txtUserID
Text: 'leave blank'Name: txtPassword
Text; 'leave blank'Buttons
Name; vbOK
Caption: LoginName: vbCancel
Caption: CancelCode for frmLogin
Option Explicit
Public LoginSucceeded As Boolean
Private Sub cmdCancel_Click()
'set the global var to false
'to denote a failed login
LoginSucceeded = False
Me.Hide
End Sub
Private Sub cmdOK_Click()
With
rs .Open "SELECT * FROM LOGIN", con, adOpenDynamic, adLockOptimistic
'check the username
.MoveFirst While Not .EOF
If txtUserID = !UserID And txtPassword = !Password Then
frmMenu.Show
LoginSucceeded = True
con.Close
MsgBox ("Connection Closed")
Exit Sub
Unload Me
ElseIf
txtUserID <> !UserID Then
.MoveNext
Else
MsgBox "Invalid Password, try again!", , "Login"
txtPassword.SetFocus SendKeys "{Home}+{End}"
Exit Sub
End If
Wend
.Close
End With
End Sub
Private Sub Form_Load()
Call loadcon
Unload frmEMPMANAGE
End SubComponents for frmEmpDetails
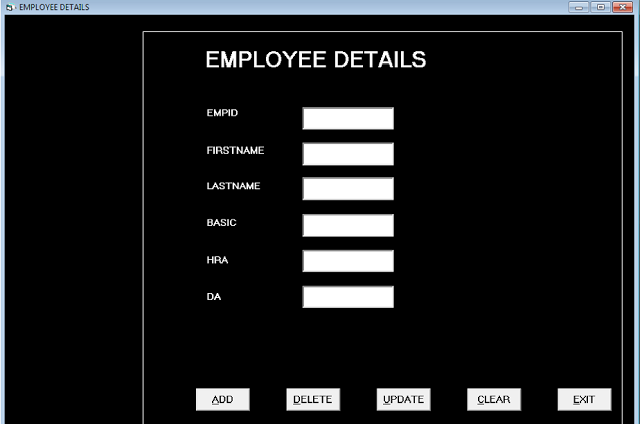
Labels
Name: lblEmpID
Caption: EMPIDName: lblFirstname
Caption: FirstNameName: lblLastname
Caption: LastNameName: lblHRA
Caption: HRATextBoxes
Name: txtEmpID
Text: 'leave blank'Name: txtFirstname
Text: 'leave blank'Name: txtLastname
Text: 'leave blank'Name: txtHRA
Text: 'leave blank'Name: txtDA
Text: 'leave blank'Name: txtBasic
Text: 'leave blank'Buttons
Name: cmdAdd
Caption: &ADDName: cmdDel
Caption: &DELETEName: cmdUpdate
Caption: &UpdateName: cmdClr
Caption: &ClearName: cmdExit
Caption: &ExitName: cmdFirstname
Caption: &FirstNameName: cmdLastname
Capttion: &LastNameName: cmdNext
Caption: Next RecordName: cmdPrev
Caption: Previous RecordCode for frmEmpDetails
Private Sub cmdAdd_Click()
con.Execute "INSERT INTO emp(EmpID,FirstName,
LastName,Basic, HRA, DA)
VALUES (" & txtEmpID & ",'" &
txtFirstname & "','" &
txtLastname & "'," &
txtBasic & "," &
txtHRA & "," &
txtDA & " );"
MsgBox ("Record Inserted")
End Sub
Private Sub cmdCLR_Click()
txtEmpID = ""
txtFirstname = ""
txtLastname = ""
txtBasic = ""
txtHRA = ""
txtDA = ""
End Sub
Private Sub cmdDel_Click()
con.Execute "DELETE * FROM emp
WHERE EmpID = " &
txtEmpID & ""
MsgBox ("Record Deleted")
txtEmpID = ""
End Sub
Private Sub cmdExit_Click()
Unload Me
con.Close
End Sub
Private Sub cmdUpdate_Click()
con.Execute "UPDATE emp SET FirstName = '" &
txtFirstname & "', LastName = ' " &
txtLastname & " ' , Basic = " &
txtBasic & " , HRA = " &
txtHRA & " , DA = " &
txtDA & " WHERE EmpID = " &
txtEmpID.Text & ""
End Sub
Private Sub Form_Load()
Call loadcon
End SubComponent for frmSalary
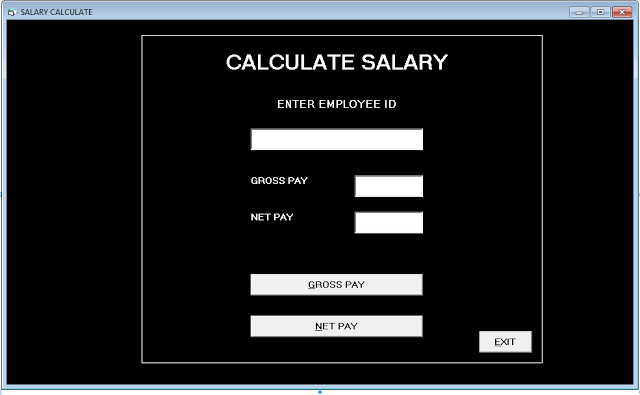
Labels
Name: lblCalculateS
Option: CALCULATE SALARYName: lblEmpID
Caption: ENTER EMPLOYEE IDName: lblGrossP
Caption: GROSS PAYName: lblNetP
Caption: NET PAYTextboxes
Name: txtEmpID
Text: 'leave blank'Name: txtGross
Text: 'leave blank'Name: txtNet
Text: 'leave blank'Buttons
Name : cmdGross
Caption: GROSS PAYName: cmdNet
Caption: NET PAYName: cmdExit
Caption: EXITCode for frmSalary
Private Sub cmdExit_Click()
Unload Me
con.Close
End Sub
Private Sub cmdGross_Click()
Dim gross As Double
Dim net As Double
Dim tax As Double
With
rs rs.Open "SELECT * FROM emp WHERE EmpID = " &
txtEmpID & "", con, adOpenDynamic, adLockPessimistic
gross = !Basic + !HRA + !DA
End With
txtGross.Text = gross
con.Execute "UPDATE emp SET GrossPay = ' " &
gross & " ' WHERE EmpID = " &
txtEmpID & ""
rs.Close
End Sub
Private Sub cmdNet_Click()
Dim gross As Double
Dim net As Double
Dim tax As Double
With rs
rs.Open "SELECT * FROM emp
WHERE EmpID = " &
txtEmpID & "",
con, adOpenDynamic, adLockPessimistic
gross = !Basic + !HRA + !DA
tax = gross * 10 / 100
net = gross - tax
End With
rs.Close
txtNet.Text = net
con.Execute "UPDATE emp
SET NetPay = ' " & net & " '
WHERE EmpID = " & txtEmpID & ""
End Sub
Private Sub Form_Load()
Call loadcon
End SubComponents for frmDependent
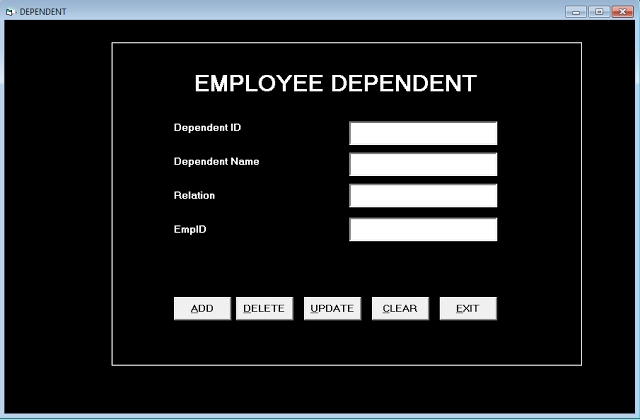
Labels
Name: lblDID
Caption: Department IDName: lblDname
Caption: Department NameName: lblRelation
Caption: RelationName: lblDependent
Caption: Employee DependentTextboxes
Name: txtDID
Text: 'leave blank'Name: txtDname
Text: 'leave blank'Name: txtRel
Text: 'leave blank'Name: txtEmpID
Text: 'leave blank'Buttons
Name: cmdAdd
Caption: &ADDName: cmdDel
Caption: &DELETEName: cmdUpdate
Caption: &UPDATEName: cmdClr
Caption: &CLEARCaption: &EXIT
Name: cmdExitCode for frmDependent
Private Sub cmdAdd_Click()
con.Execute "INSERT INTO
Dependent(DependentID, DependentName,Relation,EmpID )
VALUES (" & txtDID & ", '" &
txtDName & "','" &
txtRel & "'," &
txtEmpID & ");"
txtDID.Text = ""
txtDName.Text = ""
txtRel.Text = ""
txtEmpID = ""
con.Execute "DELETE * FROM Dependent
WHERE DependentID = " & txtDID & ""
End Sub
Private Sub cmdClr_Click()
txtDID.Text = ""
txtDName.Text = ""
txtRel.Text = ""
txtEmpID = ""
End Sub
Private Sub cmdExit_Click()
Unload Me
End Sub
Private Sub cmdUpdate_Click()
con.Execute "UPDATE Dependent
SET DependentName = ' " &
txtDName & " ' , Relation = ' " &
txtRel & " ' WHERE DependentID = " &
txtDID & " "
MsgBox ("Record Updated")
End Sub
Private Sub Form_Load()
Call loadcon
End SubfrmMenu [MDI Form]
MDI Form are Multiple-Document Interface in which you can open multiple forms. All our previously created will be child form of MDI.
This form is called frmMENU.
This form has menu editor to add different menu items and each menu item is linked to one of the forms created earlier. Before we get started with MDI form, you must set the MDI Child property of following Forms to ‘True’.
- frmEmpDetails
- frmSalary
- frmDependent
Create a New MDI Form
To create a new MDI From, go to Project1.vbp > [Right Click] and then [Select ] Add > [Click] MDI Form.
Right Click the form and you will see the Menu Editor, using the editor create following menu items.
Caption : Employee Details
Name : employee
Index : 0Caption : Salary Calculation
Name : salary
Index : 1Caption : Dependents
Name : dependents
Index : 2Caption : Exit
Name : exit
Index : 3Code for frmMENU
The code for frmMENU is simple, you click on one of the menu item and a new form opens up, however the new form does not open in a separate windows, but it will open within frmMENU as MDI Child form.
Private Sub depend_Click(Index As Integer)
frmDependent.Show
End Sub
Private Sub empdetails_Click(Index As Integer)
frmEmpDetails.Show
End Sub
Private Sub exit_Click(Index As Integer)
Unload Me
Unload frmLogin
End Sub
Private Sub salary_Click(Index As Integer)
frmSalary.Show
End SubPayroll Processing System in VB 6 With Ms Access
In this example, we are going to create a payroll processing system in VB 6 with Ms Access as the database. To complete this project, you need a computer with windows operating system XP or higher installed, Visual Basic 6.0 software, and Microsoft Access program anything higher than Ms Access 2003 or higher.
For the sake of this example, we are using VB 6.0 software and windows 7 64-bit system with Ms Access 2013 installed.
Payroll Processing System
The payroll processing system allow use to do following things with the employee information.
- Add Employee Record
- Modify Employee Record
- Delete the Employee Record
The main purpose of the payroll processing system is to calculate the salary of each employee.
Steps To Design And Implement This Project
To design and implement this project, we will follow a simple process listed below.
- Create a Database with tables for Employee and Salary
- Design the form for Employee records
- Write codes for the Employee form
- Design the form for Salary records
- Write codes for Salary form.
- Connect the database with the form
- Test each functionality and correct any errors.
Create The Database
The very first step is to create a database in Microsoft Access and add two tables. Open Ms Access 2013 and click ‘ Create a blank database’ and type the name of the database as ‘ EmpDB.mdb’. Save it to you drive in a folder called ‘AccessDB’.
At this moment the database is empty and it has nothing. Our task is to create two tables in the database. When you switch to Design view in Ms Access, you will asked to name your table, you can call it – Employee and click OK.
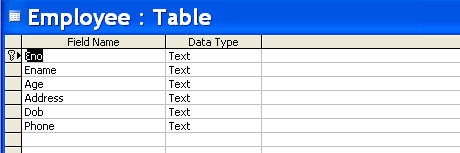
You table must have fields and corresponding data types. See the image below.
Once you have created tables, then you must create a relationship between these two tables. The employee number is the unique in both table. Each employee can have one salary account. Therefore, we must have a one-to-one relationship between employee table and the salary table.
Before you create the relationship close the tables, then go to database tools in Ms Access and click Relationships. The next step is to add both employee table and salary table in the relationship window.
You must click on the relationship link and edit the relationship. Select ‘Enforce Referential Integrity’ and also select ‘Cascade Update Related Fields’ and ‘Cascade Delete Related Record’. These two properties will make sure that if you delete any record from one table, that will also remove it from the other.
Now you can add some records to both the table. It is good to add at least 5 records in both table. Leave the Net field empty in Salary table because we need to calculate it and update it from our VB 6 program.
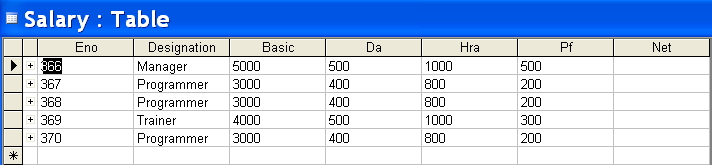
Note that the net salary is not calculated yet and salary is linked to a single employee.
Form Design For Employee Relation
In this section we will design a form in VB 6 for employee relation so that we could add, update, and delete records from the database. There will also be link to main program or to exit from the employee form.
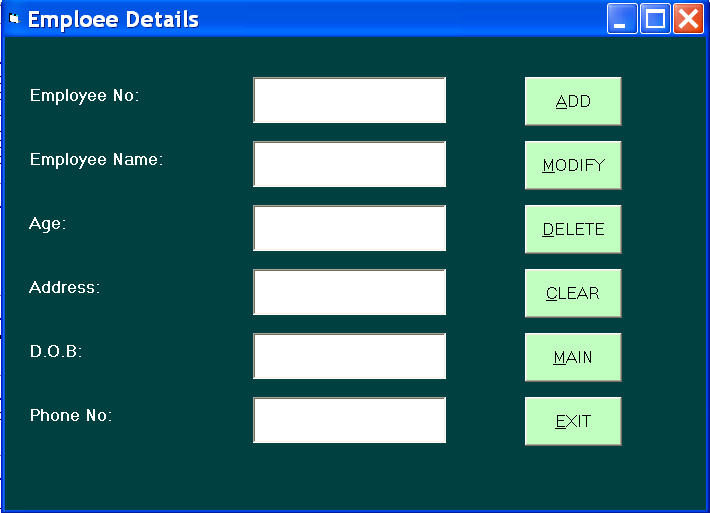
Form
Name: frmEmployee Caption: Employee Details BackColor: &H00404000& ForeColor: Highlight Text Height: 5775 Width: 10515
Labels
Name: lblEmpNo Caption: Employee No: BackColor: &H00404000& ForeColor: Highlight Text Font: Ms Sans Serif, 12, Bold Width: 2295 Height: 495
Name: lblEmpname Caption: Employee Name: BackColor: &H00404000& ForeColor: Highlight Text Font: Ms Sans Serif, 12, Bold Width: 2295 Height: 495
Name: lblAge Caption: Age BackColor: &H00404000& ForeColor: Highlight Text Font: Ms Sans Serif, 12, Bold Width: 2295 Height: 495
Name: lblAddress Caption: Address BackColor: &H00404000& ForeColor: Highlight Text Font: Ms Sans Serif, 12, Bold Width: 2295 Height: 495
Name: lblDob Caption: D.O.B BackColor: &H00404000& ForeColor: Highlight Text Font: Ms Sans Serif, 12, Bold Width: 2295 Height: 495
Name: lblPhone Caption: Phone No: BackColor: &H00404000& ForeColor: Highlight Text Font: Ms Sans Serif, 12, Bold Width: 2295 Height: 495
Textboxes
Name: txtEno Height: 695 Width: 2895 Text: 'leave blank'
Name: txtEname Height: 695 Width: 2895 Text: 'leave blank'
Name: txtAge Height: 695 Width: 2895 Text: 'leave blank'
Name: txtAddress Height: 695 Width: 2895 Text: 'leave blank'
Name: txtDob Height: 695 Width: 2895 Text: 'leave blank'
Name: txtPhone Height: 695 Width: 2895 Text: 'leave blank'
Buttons
Name: cmdAdd Caption: &ADD Font: Ms Sans Serif, 12, Regular
Name: cmdModify Caption: &MODIFY Font: Ms Sans Serif, 12, Regular
Name: cmdDelete Caption: &DELETE Font: Ms Sans Serif, 12, Regular
Name: cmdClear Caption: &CLEAR Font: Ms Sans Serif, 12, Regular
Name: cmdMain Caption: &MAIN Font: Ms Sans Serif, 12, Regular
Name: cmdExit Caption: &EXIT Font: Ms Sans Serif, 12, Regular
Code For Employee Form Of Payroll Processing System
Option Explicit
Private Sub cmdAdd_Click()
con.Execute "INSERT INTO Employee (Eno, Ename,Age,Address, Dob, Phone) VALUES ('" & txtEno & "','" & txtEname & "','" & txtAge & "','" & txtAddress & "','" & txtDob & "', '" & txtPhone & "')"
MsgBox "Record Added"
End Sub
Private Sub cmdClear_Click()
txtEno.Text = " "
txtEname.Text = " "
txtAge.Text = " "
txtAddress.Text = " "
txtDob.Text = " "
txtPhone.Text = " "
End Sub
Private Sub cmdDelete_Click()
con.Execute "DELETE * FROM Employee WHERE Eno = " & txtEno & ""
MsgBox ("Record Deleted")
txtEno = ""
End Sub
Private Sub cmdExit_Click()
Unload Me
con.Close
End Sub
Private Sub cmdMain_Click()
frmPayrollProcessing.Show
con.Close
End Sub
Private Sub cmdModify_Click()
con.Execute "UPDATE Employee SET Eno = '" & txtEno & "', Ename = ' " & txtEname & " ', Age = '" & txtAge & " ', Address = '" & txtAddress & "', Dob ='" & txtDob & "', Phone = '" & txtPhone & "' WHERE Eno = ' " & txtEno & " '"
MsgBox "Record Updated"
End Sub
Private Sub Form_Load()
Call loadcon
MsgBox ("Connected")
End SubForm Design For Salary Relation
In this section, we will create a form to add salary account for existing employees, calculate their net salaries. The form will also print the net salary of an employee in a text file.
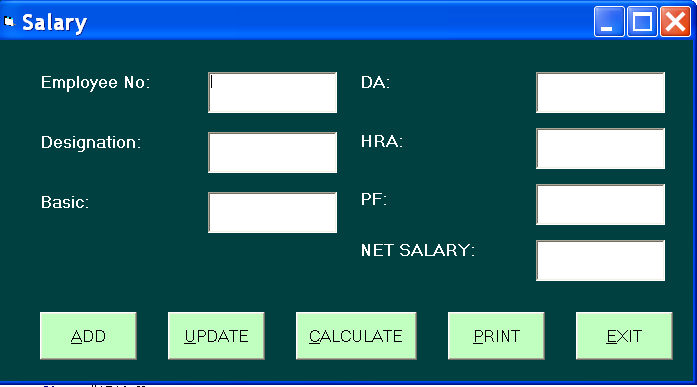
Form
Name: frmSalary Caption: Salary BackColor: &H00404000& ForeColor: Highlight Text Height: 5775 Width: 10515
Labels
Name: lblSalEno Caption: Employee No: BackColor: &H00404000& ForeColor: Highlight Text Font: Ms Sans Serif, 12, Bold Height: 615 Width: 2175
Name: lblSalDesig Caption: Designation: BackColor: &H00404000& ForeColor: Highlight Text Font: Ms Sans Serif, 12, Bold Height: 615 Width: 2175
Name: lblSalBasic Caption: Basic: BackColor: &H00404000& ForeColor: Highlight Text Font: Ms Sans Serif, 12, Bold Height: 615 Width: 2175
Name: lblDa Caption: DA: BackColor: &H00404000& ForeColor: Highlight Text Font: Ms Sans Serif, 12, Bold Height: 615 Width: 2175
Name: lblSalHra Caption: HRA: BackColor: &H00404000& ForeColor: Highlight Text Font: Ms Sans Serif, 12, Bold Height: 615 Width: 2175
Name: lblSalPf Caption: Pf: BackColor: &H00404000& ForeColor: Highlight Text Font: Ms Sans Serif, 12, Bold Height: 615 Width: 2175
Name: lblSalNet Caption: NET SALARY: BackColor: &H00404000& ForeColor: Highlight Text Font: Ms Sans Serif, 12, Bold Height: 615 Width: 2175
Textboxes
Name: txtSalEno Height: 615 Width: 1935 Text: 'leave blank'
Name: txtSalDesig Height: 615 Width: 1935 Text: 'leave blank'
Name: txtSalBasic Height: 615 Width: 1935 Text: 'leave blank'
Name: txtSalDa Height: 615 Width: 1935 Text: 'leave blank'
Name: txtSalHra Height: 615 Width: 1935 Text: 'leave blank'
Name: txtSalPf Height: 615 Width: 1935 Text: 'leave blank'
Name: txtSalNet Height: 615 Width: 1935 Text: 'leave blank'
Buttons
Name: cmdAdd Caption: &ADD Font: MS Sans Serif, 12, Regular Height: 735 Width: 1935
Name: cmdUpdate Caption: &UPDATE Font: MS Sans Serif, 12, Regular Height: 735 Width: 1935
Name: cmdCalculate Caption: &CALCULATE Font: MS Sans Serif, 12, Regular Height: 735 Width: 1935
Name: cmdPrint Caption: &PRINT Font: MS Sans Serif, 12, Regular Height: 735 Width: 1935
Name: cmdExit Caption: &EXIT Font: MS Sans Serif, 12, Regular Height: 735 Width: 1935
Code For Salary Form Of Payroll Processing System
Private Sub cmdAdd_Click()
con.Execute "INSERT INTO Salary (Eno, Designation, Basic, Da, Hra, Pf,Net) VALUES ('" & txtSalEno & "','" & txtSalDesig & "','" & txtSalBasic & "','" & txtSalDa & "','" & txtSalHra & "', '" & txtSalPf & "','" & txtSalNet & "')"
MsgBox "Record Added"
End Sub
Private Sub cmdCalculate_Click()
Dim Basic As Double
Dim Da As Double
Dim Hra As Double
Dim Pf As Double
Dim Net As Double
Basic = Val(txtSalBasic.Text)
Hra = Basic * 0.2
Da = Basic * 0.1
Pf = Basic * 0.1
Net = Basic + Da + Hra + Pf
txtSalHra.Text = Str(Hra)
txtSalDa.Text = Str(Da)
txtSalPf.Text = Str(Pf)
txtSalNet.Text = Str(Net)
End Sub
Private Sub cmdExit_Click()
Unload Me
con.Close
End Sub
Private Sub cmdPrint_Click()
Dim sFileText As String
Dim iFileNo As Integer
iFileNo = FreeFile
'open the file for writing
Open "C:\AccessDB\Test.txt" For Output As #iFileNo
'please note, if this file already exists it will be overwritten!
'write some example text to the file
Print #iFileNo, "Employee No:"; txtSalEno.Text
Print #iFileNo, "Employee Designation: "; txtSalDesig.Text
Print #iFileNo, "Basic:"; txtSalBasic.Text; ""
Print #iFileNo, "Net Salary:"; txtSalNet.Text
MsgBox " Printing Done!!"
'close the file (if you dont do this, you wont be able to open it again!)
Close #iFileNo
End Sub
Private Sub cmdUpdate_Click()
con.Execute "UPDATE Salary SET Basic = '" & txtSalBasic & "' , Da = '" & txtSalDa & "', Hra = '" & txtSalHra & "', Pf = '" & txtSalPf & "', Net = '" & txtSalNet & " ' WHERE Eno = '" & txtSalEno & " ' "
MsgBox ("Updated")
End Sub
Private Sub Form_Load()
Call loadcon
MsgBox "Connected!"
End Sub
Create A Main Form For The Payroll Processing Project
Since we have two separate forms and we want to be able to go to any form. In this section, we will create a new main form. Here is the design of the main form in VB 6.

Form
Name: frmPayrollProcessing Caption: Payroll Processing System BackColor: &H00404000& ForeColor: Highlight Text Height: 5475 Width: 8940
Labels
Name: lblMainBanner Caption: Payroll Processing System BackColor: &H00404000& ForeColor: Highlight Text
Buttons
Name: cmdMainEmp Caption: &EMPLOYEE Font: Ms Sans Serif, 12, Regular Height: 1182 Width: 2205
Name: cmdMainSalary Caption: &SALARY Font: Ms Sans Serif, 12, Regular Height: 1182 Width: 2205
Name: cmdMainExit Caption: &EXIT Font: Ms Sans Serif, 12, Regular Height: 1182 Width: 2205
Make sure that you start your project with the main form. Therefore, go to Project tab on the top and click on Project1 Properties. Select ‘frmPayrollProcessing‘ under Startup Object.
Code For Main Form
Private Sub cmdMainEmp_Click() frmEmp.Show End Sub
Private Sub cmdMainExit_Click() Unload Me End Sub
Private Sub cmdMainSalary_Click() frmSalary.Show End Sub
Create A Module To Establish Connection With Database
The final step in this project is to create a module that help you establish a connection with the Ms Access database. This step is very important for your project success.
To create a new module, go to Project Explorer and right-click on Forms > select Add > click Module.
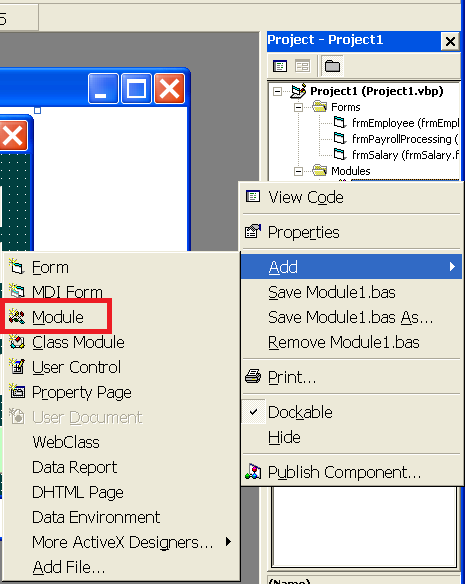
The module code window will open up immediately. Insert the following code and recheck.
Public con As New ADODB.Connection
Public rs As New ADODB.Recordset
Public constr As String
Public Sub loadcon()
constr = "Provider=Microsoft.Jet.OLEDB.4.0;Data Source=C:\AccessDB\EmpDB.mdb;Persist Security Info=False"
con.Open constr
End SubTesting The Project
There are two phase to testing the project – payroll processing.
- You always starts with Employee table and create employee records
- If you want to compute the salary of an employee , Enter the employee no, designation, and basic and click on the Calculate button. The program will automatically compute the net salary.
- The third step is to print the output to a text file. Each time you click on the print button it will over write the file located in C:/Test.txt. If there is not file with that name , the program will create it when you click on the print button.
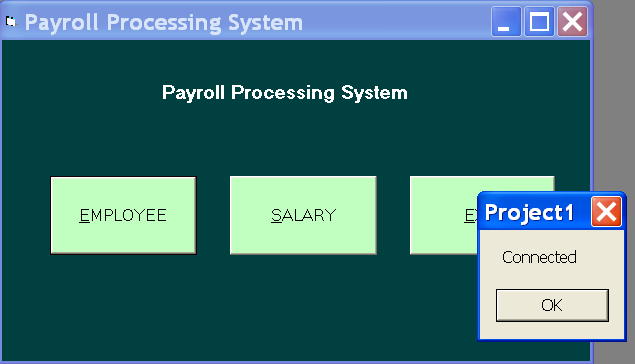
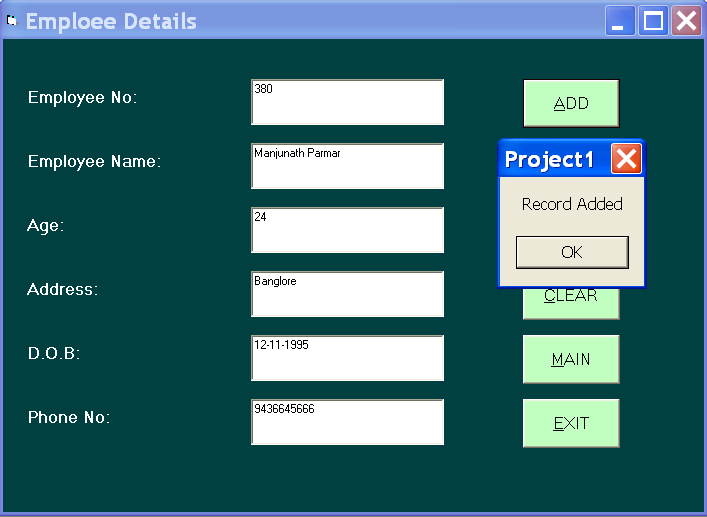

The net salary and other details are automatically processed.
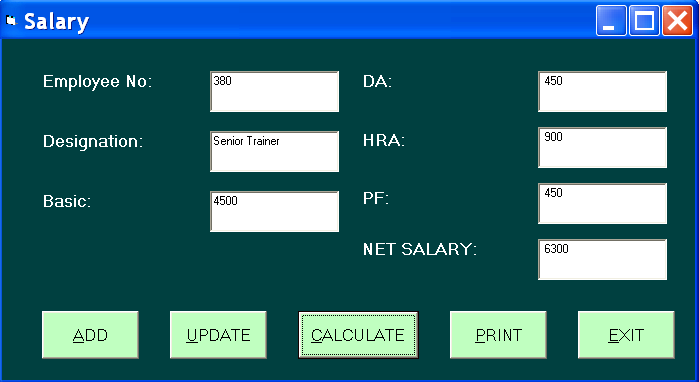
This record is new for Salary table; therefore, it is not updated but added to the salary table. You can click the Add button to add the record in Salary table.
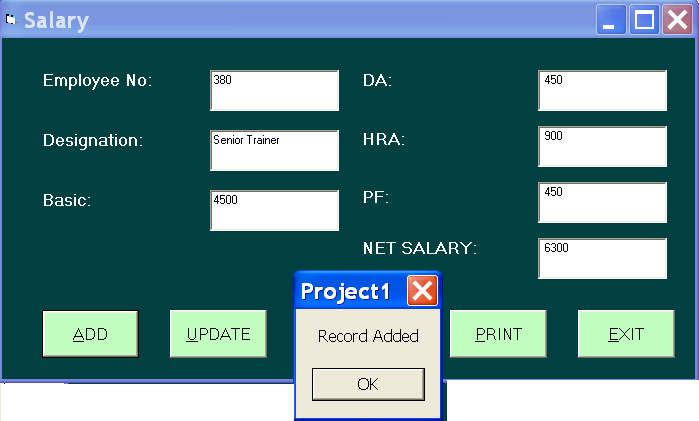
There is a print button which will print the information in a text file. Press that PRINT button and check the output text file located in AccessDB folder where you keep your database files.

Open the text file – Test.txt and you should see an entry for your latest database entry.
There are other functionalities like Update, Modify, etc which you can test on your own.
Create A Report In VB 6 With MS Access Database
You can create reports from a database using visual basic 6. To create this project, you need visual basic 6.0, Microsoft Access 2003 and above, Windows XP and above as operating system. In this example project, we do the following
- Create a database with Microsoft Access
- Create a data project in visual basic 6
- Connect the vb 6 project to the database
- Import all the fields and data to generate a report
- Test our project and make sure it works correctly.
Create A Database with Microsoft Access
The first step in this project is to create a simple database with a single table in Microsoft access. For the purpose of this exercise, we are using Access 2013.
Create a blank database called product_list and save it as product_list.mdb. The database must be in access 2002-2003 format (.mdb).
In the database, create a table called Products and insert following data.
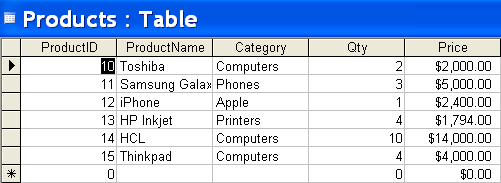
You can choose data types for each field as per your wish. It does not affect the project because this is the only table we are going to use.
Create A Data Project in Visual Basic 6
Once the database is ready, our next step should be to create a data project in visual basic 6 software. As soon as you launch the VB 6, you get an option to select the type of projects you want to start.
Choose “Data Project”. See the image below.
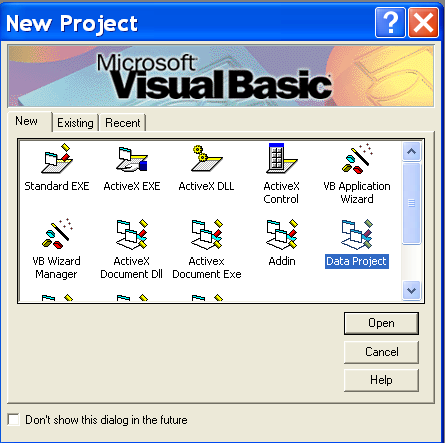
The first thing you must do is to double click the “DataEnvironment 1” under Project Explorer windows.
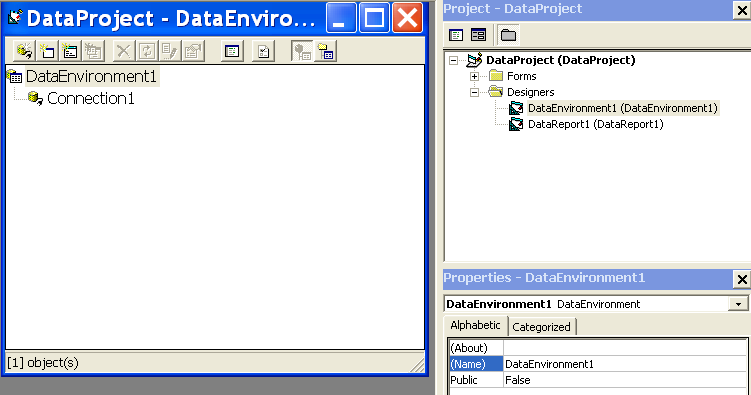
This will bring the DataEnvironment1 windows.
Connect The DataEnvironment1 to Product_list Database
From the DataEnvironment1 windows, right-click the Connection1, and go to properties.
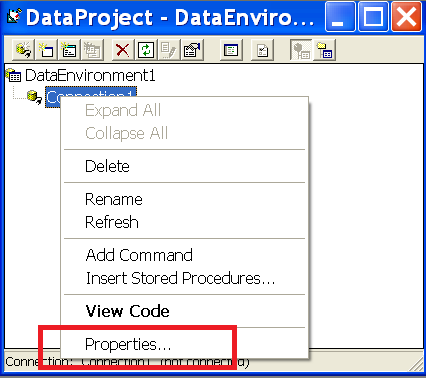
The data link properties will open up. You must select ” Microsoft Jet 4.0 OLE DB Provider” and click Next.
The next tab is Connection, under ‘Select or enter a database name’, click the (…) to browse to the database product_list.mdb and select it.
The connection must be successful if previous steps are done correctly. If connection fails, check the error and fix it. Click OK to close the data link window.
You are back to DataEnvironment1 window.
Import All Fields to DataReport1
Before we import fields from our Product table in product_list database. We must create a command1 in DataEnvironment1 window.
Right click the Connection1 and select Add Command option shown below.
Right click Command1 and click Properties. The Command1 properties will open, you must select ‘Database Object’ as Table under Source of data.
Select the table “Products” under Object Name.
The table fields will appear under Command1 as follows.
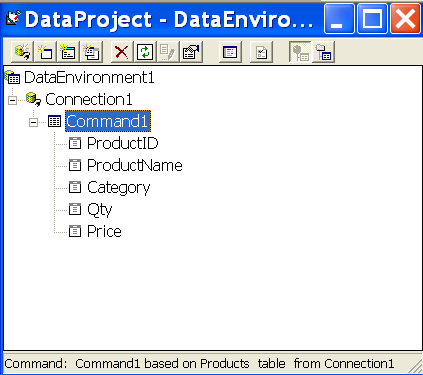
The next step is to click the DataReport1 under Project Explorer on the right side.
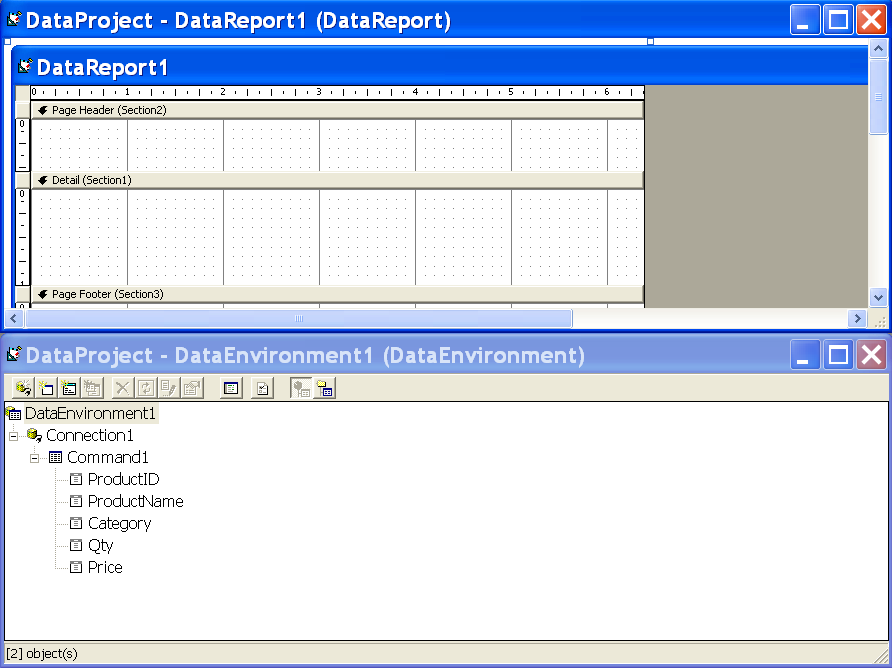
Now, you must drag all the fields from the Command1 to Details (Section1) in DataReport1. Note that there are two columns created representing each field. The first field is headings, therefore, drag it to Page Header(section2) in DataReport1.
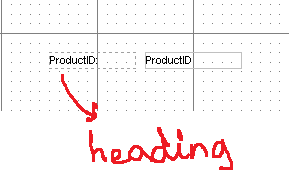
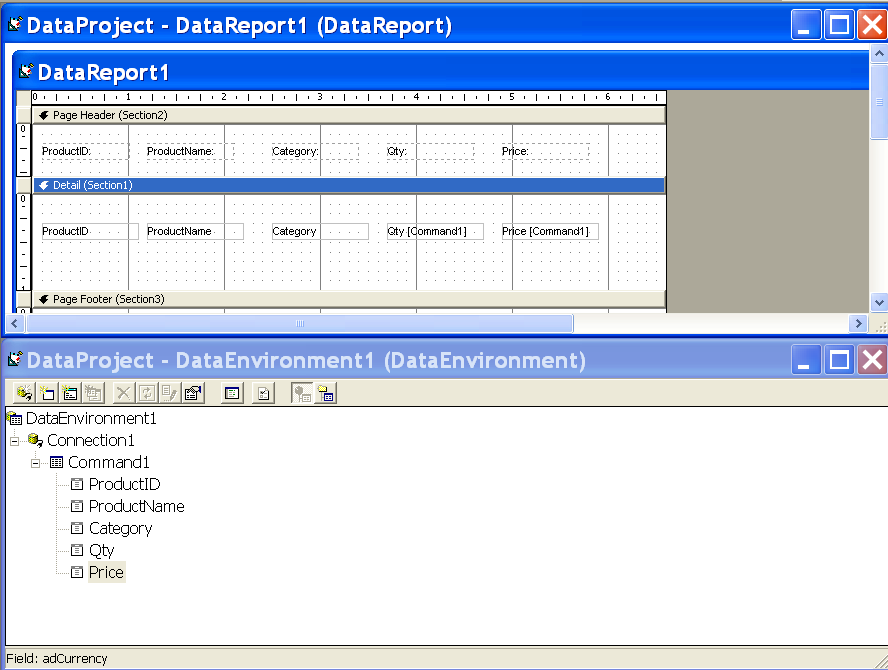
Note that you can choose any field to add or delete from the report. You have absolute control over how you want the report to appear.
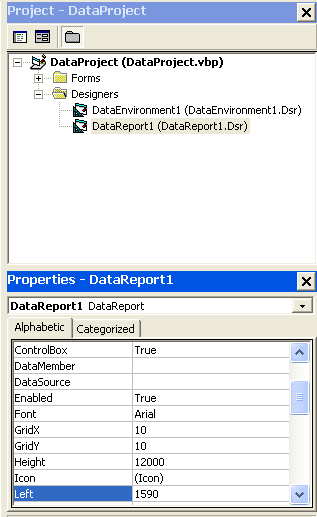
In the next step, go to properties of DataReport1 in the Project Explorer.
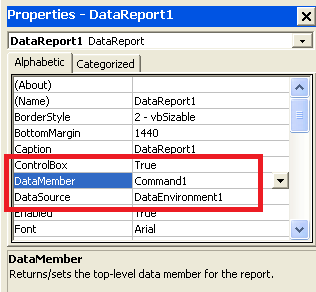
The DataReport1 has two properties you need to set.
DataMember : Command1 DataSource: DataEnvironment
First you must select the data source and then data member.
Test The Project and Viewing Data Report
In this final section, we will test the report generation. The data project has a form where you need to create two buttons. See the image below.
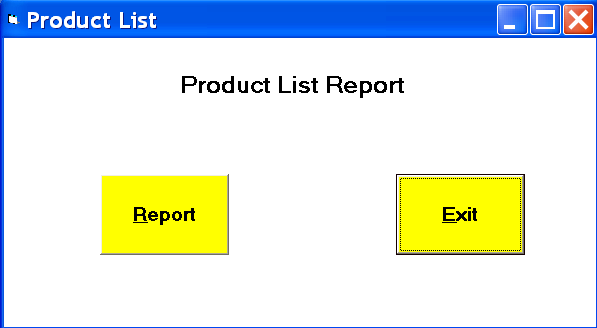
Properties Of Form
Name : frmDataEnv Caption: Product List BackColor: &H00FFFFFF& Width : 9000 Height: 5000
Properties of Label
Name : lblBanner Caption: Product List Report BackColor: &H00FFFFFF& Font: Bold 18 PX MS Sans Serif
Properties of Buttons
Name : cmdExit Caption: &Exit BackColor: &H0000FFFF& Style: 1- Graphical Font: 14 Bold Ms Sans Serif
Add following code for exit button.
Private Sub cmdExit_Click() Unload Me End Sub
Properties of report button.
Name : cmdReport Caption: &Report BackColor: &H0000FFFF& Style: 1-Graphical Font: 14 Bold Ms Sans Serif
Add the following code to show reports when the report button is clicked.
Private Sub cmdReport_Click() DataReport1.Show End Sub
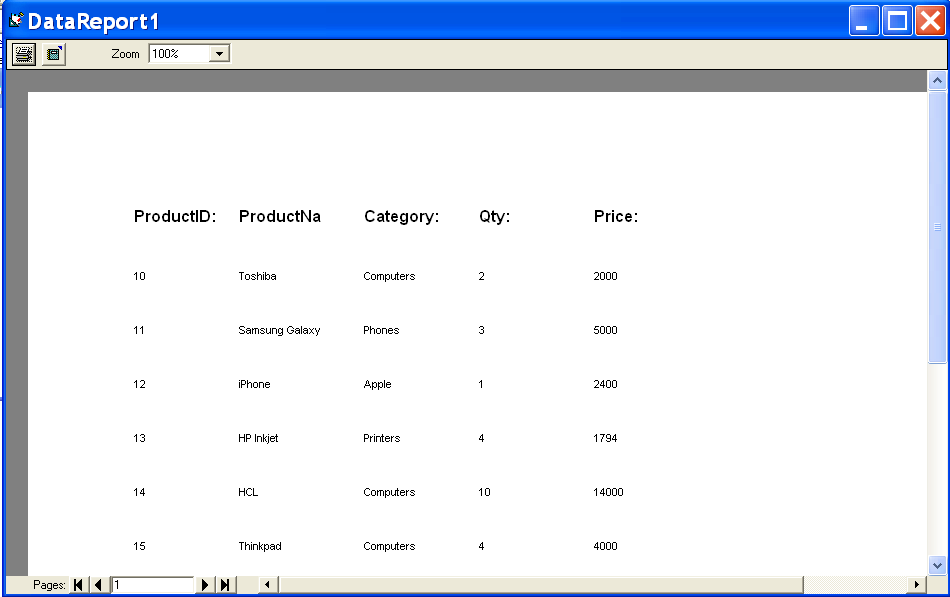
When we run the program and click on the Report button, you should see a report generated from the Access database, like the one above. The Exit button will close the VB program.